Maintenance and Adjustments
|
|
|
|
|
|
|
|
|
|
|
IMPORTANT! |
| Daily Maintenance/Inspection |
|
|
|
|
|
|
| |
Maintenance, replacement or repair of |
|
|
|
|
|
|
|
| ||
|
|
|
|
|
|
|
|
|
| |
emission control devices and systems |
|
| Clean around | Lubricate |
|
|
| |||
may be performed by any repair estab- |
|
| cutters |
|
|
| ||||
lishment or individual; however, warranty |
|
| Inspect cooling | spark plug |
|
|
|
| ||
|
| fins, and clean as |
|
|
|
|
|
|
| |
repairs must be performed by a dealer or |
|
| required |
|
|
|
|
|
|
|
service center authorized by Shindaiwa |
|
|
|
|
|
|
|
|
|
|
Corporation. The use of parts that are not |
| Clean debris from |
|
|
|
|
|
|
| |
equivalent in performance and durability to |
|
|
|
|
|
|
|
| ||
authorized parts may impair the effective- |
|
| tank and muffler |
|
|
|
|
|
|
|
|
|
|
|
|
|
|
|
|
| |
ness of the emission control system and |
|
|
|
|
|
|
|
|
|
|
may have a bearing on the outcome of a |
|
|
|
|
|
|
| Check cutters and | ||
warranty claim. |
|
|
|
|
|
|
| |||
|
|
|
|
|
| Inspect/clean | guide bar for damage | |||
|
|
|
|
|
| and that bolts | ||||
|
|
|
|
|
|
| air filter | |||
|
|
|
|
|
|
|
| are tight | ||
|
|
|
|
|
|
| element |
| ||
WARNING! |
|
|
|
|
|
|
|
|
| |
|
|
|
|
|
|
|
|
|
| |
Accidental |
|
|
|
|
|
| Inspect front and rear handles for | |||
injury! Before performing any main- |
|
|
|
|
|
| damaged or loose attachments | |||
|
|
|
|
|
|
|
|
|
| |
tenance on this equipment, stop the |
| Figure 12 |
|
|
|
|
|
|
| |
engine and disconnect the spark plug! |
|
|
|
|
|
|
|
|
|
|
|
|
|
|
|
|
|
|
|
| |
|
|
| WARNING! |
|
|
|
|
| Keep cooling | |
|
|
|
|
|
|
| ||||
1. Remove all grass clippings and dirt from |
|
|
|
|
|
|
| fins clean | ||
the hedge trimmer. |
| To reduce fire hazard, keep the engine |
|
|
|
|
|
|
| |
n Remove any compacted debris from |
|
|
|
|
|
|
|
| ||
| and muffler free of debris, leaves, or |
|
|
|
|
|
|
| ||
around the fuel tank and/or muffler. |
| excessive grease. |
|
|
|
|
|
|
| |
n Inspect the engine cooling fins for |
|
|
|
|
|
|
|
|
|
|
|
|
|
|
|
|
|
|
|
| |
2. | Check for loose, damaged, or missing |
|
|
|
|
|
|
| ||
clogging, and clean as necessary. |
|
|
|
|
|
|
| |||
n Clean under the cylinder cover and |
|
| components, and repair as necessary. |
|
| Keep cooling air |
|
|
| |
|
|
|
|
|
|
| ||||
3. | Lubricate the cutters with oil before use, |
|
|
|
| |||||
around the spark plug. |
|
|
|
| ||||||
n Inspect the air filter element for clog- |
|
| and after refueling. |
|
| intake passages |
|
|
| |
4. Check the cutters for damage and make |
|
| clean |
|
|
| ||||
ging, clean as necessary. |
| (Fuel tank removed |
|
|
| |||||
|
|
| sure all bolts are tight. |
|
| for clarity) |
|
|
| |
|
|
|
|
|
| Figure 13 |
|
|
| |
Assembly and Adjustments
Throttle Cable Free Play
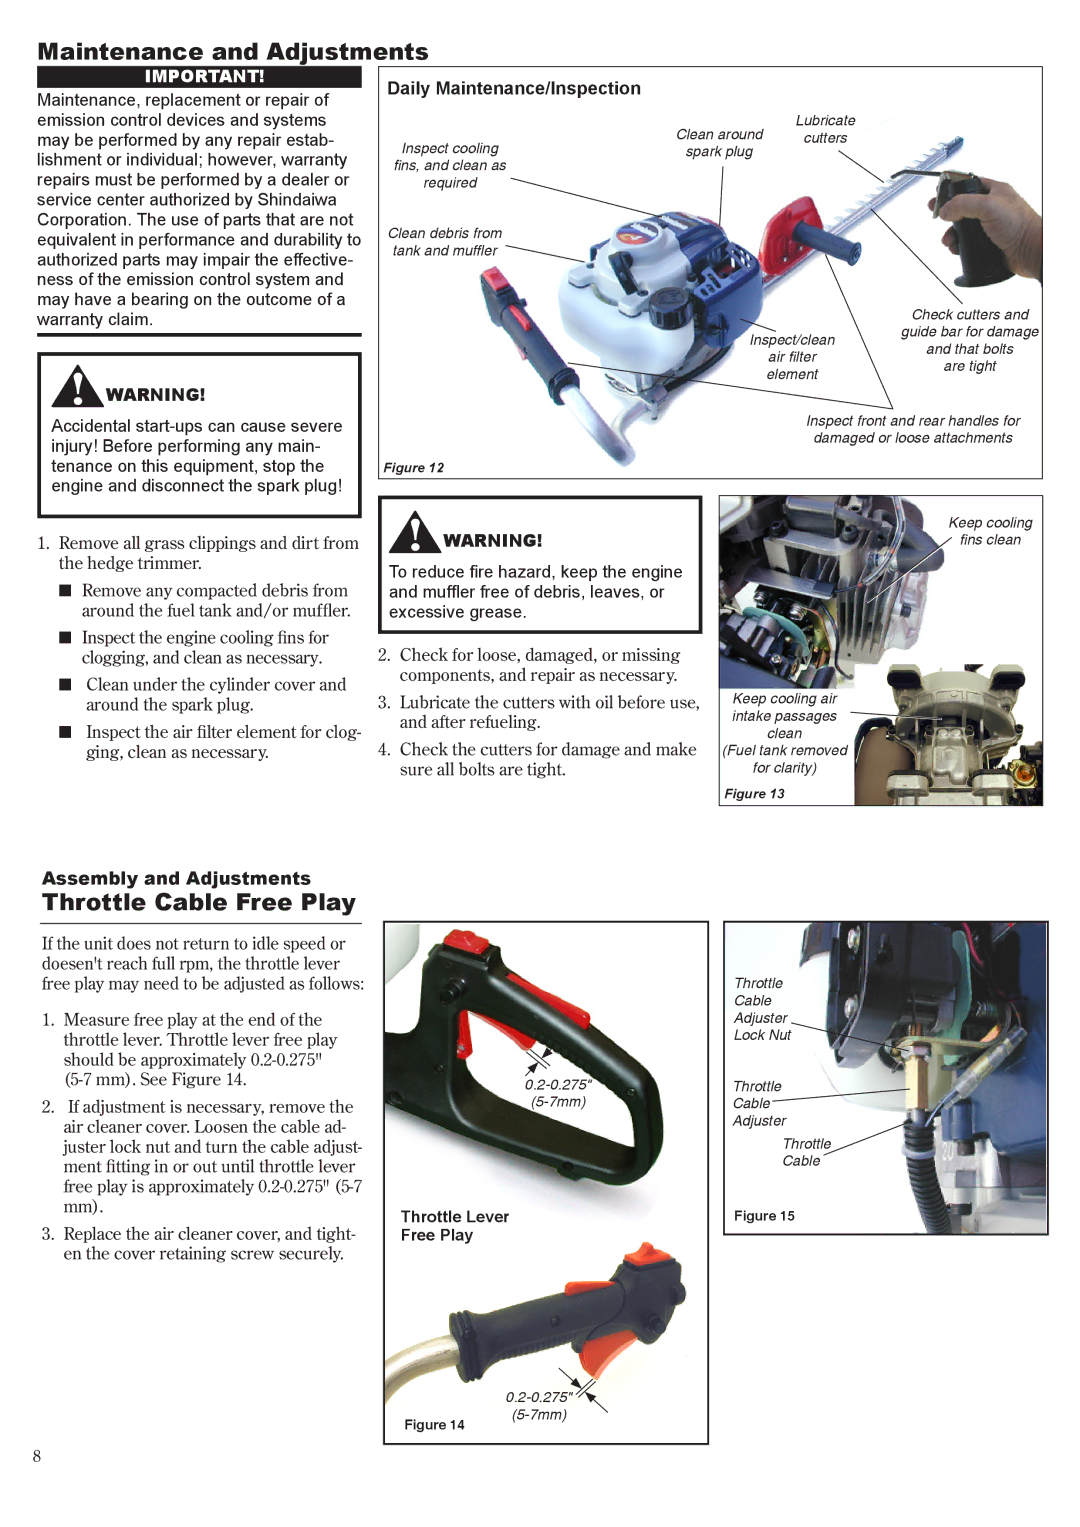
If the unit does not return to idle speed or doesen't reach full rpm, the throttle lever free play may need to be adjusted as follows:
1.Measure free play at the end of the throttle lever. Throttle lever free play should be approximately
2.If adjustment is necessary, remove the air cleaner cover. Loosen the cable ad- juster lock nut and turn the cable adjust- ment fitting in or out until throttle lever free play is approximately
3.Replace the air cleaner cover, and tight- en the cover retaining screw securely.
Throttle Lever
Free Play
Throttle
Cable
Adjuster
Lock Nut![]()
Throttle
Cable
Adjuster
Throttle
Cable
Figure 15
Figure 14
![]()
