EZO/G
©2005, Shure Incorporated 27D3123 (Rev.1)
Easyflex® Overhead Microphone
User Guide
Use the Easyflex EZO series miniature overhead microphones for choirs and performance groups in recording or sound reinforce- ment applications. These electret condenser microphones have a wide frequency range and high sensitivity. Designed for overhead suspension from a ceiling or other fixture, the attached wireform allows them to be easily aimed at the sound source.
Features
• Wide dynamic range and frequency response for accurate
|
| sound reproduction across the audio spectrum |
| • White or Charcoal Gray finish that blends unobtrusively with | |
|
| most surroundings |
| • Flexible wire form for ease of aiming | |
EZO/W | • | |
• | Slide on windscreen | |
| • New improved RF Filtering | |
|
| SHURE Incorporated http://www.shure.com |
|
| United States, Canada, Latin America, Caribbean: |
|
| 5800 W. Touhy Avenue, Niles, IL |
|
| Phone: |
|
| Europe, Middle East, Africa: |
|
| Shure Europe GmbH, Phone: |
|
| Asia, Pacific: |
Printed in U.S.A. | Shure Asia Limited, Phone: | |
|
| 1 |
| Ceiling Tile Installation | ||
Mini |
|
|
|
Connector |
|
|
|
Preamp |
| Mini | Preamp |
| Connector | ||
|
|
| |
Grommet | Washer |
|
|
| (for 5/8" ceiling tile) |
| Ceiling Tile |
|
|
| (Side) |
Grommet
![]()
![]() 1/2"
1/2"
Ceiling Tile
0.6 – 1m
1.8 – 3m (6 – 9 ft.)
2 | 3 |
.6 – 1 m (2 – 3 ft.)
4
.6 – 1 m (2 – 3 ft.)
5
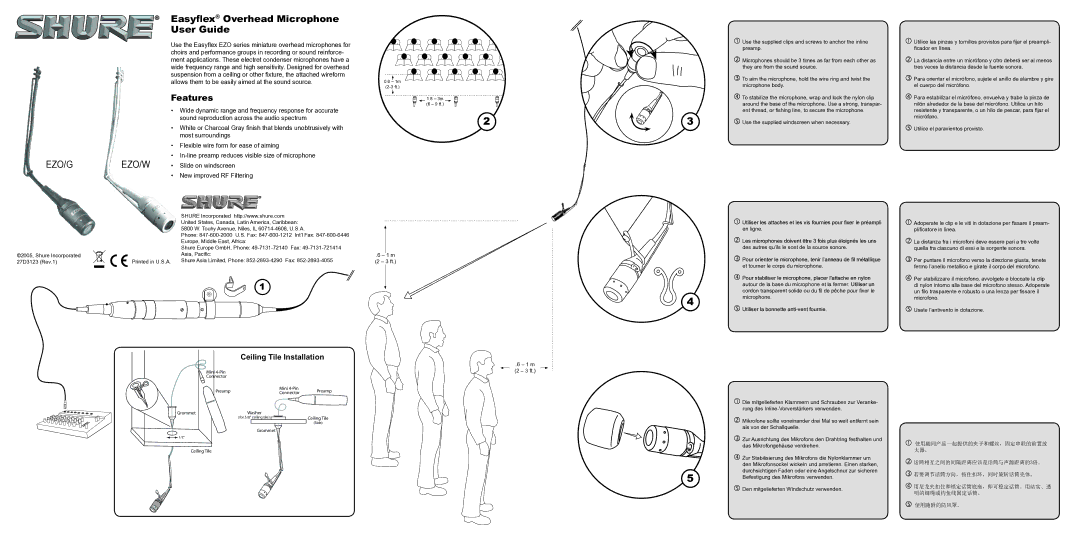
Use the supplied clips and screws to anchor the inline preamp.
Microphones should be 3 times as far from each other as they are from the sound source.
To aim the microphone, hold the wire ring and twist the microphone body.
To stabilize the microphone, wrap and lock the nylon clip around the base of the microphone. Use a strong, transpar- ent thread, or fishing line, to secure the microphone.
Use the supplied windscreen when necessary.
Utiliser les attaches et les vis fournies pour fixer le pré�ampli en ligne.
Les microphones doivent ê�tre 3 fois plus é�loigné�s les uns des autres qu’ils le sont de la source sonore.
Pour orienter le microphone, tenir l’anneau de fil mé�tallique et tourner le corps du microphone.
Pour stabiliser le microphone, placer l’attache en nylon autour de la base du microphone et la fermer. Utiliser un cordon transparent solide ou du fil de pêche pour fixer le microphone.
Utiliser la bonnette
Die mitgelieferten Klammern und Schrauben zur Veranke- rung des
Mikrofone sollte voneinander drei Mal so weit entfernt sein als von der Schallquelle.
Zur Ausrichtung des Mikrofons den Drahtring festhalten und das Mikrofongehäuse verdrehen.
Zur Stabilisierung des Mikrofons die Nylonklammer um den Mikrofonsockel wickeln und arretieren. Einen starken, durchsichtigen Faden oder eine Angelschnur zur sicheren Befestigung des Mikrofons verwenden.
Den mitgelieferten Windschutz verwenden.
Utilice las pinzas y tornillos provistos para fijar el preampli- ficador en línea.
La distancia entre un micrófono y otro deberá ser al menos tres veces la distancia desde la fuente sonora.
Para orientar el micrófono, sujete el anillo de alambre y gire el cuerpo del micrófono.
Para estabilizar el micrófono, envuelva y trabe la pinza de nilón alrededor de la base del micrófono. Utilice un hilo resistente y transparente, o un hilo de pescar, para fijar el micrófono.
Utilice el paravientos provisto.
Adoperate le clip e le viti in dotazione per fissare il pream- plificatore in linea.
La distanza fra i microfoni deve essere pari a tre volte quella fra ciascuno di essi e la sorgente sonora.
Per puntare il microfono verso la direzione giusta, tenete fermo l’anello metallico e girate il corpo del microfono.
Per stabilizzare il microfono, avvolgete e bloccate la clip di nylon intorno alla base del microfono stesso. Adoperate un filo trasparente e robusto o una lenza per fissare il microfono.
Usate l’antivento in dotazione.
使用随同产品一起提供的夹子和螺丝,固定串联的前置放 大器。
话筒相互之间的间隔距离应该是话筒与声源距离的3倍。
若要调节话筒方向,按住扣环,同时旋转话筒壳体。
用尼龙夹扣住和锁定话筒底座,即可稳定话筒。用结实、透 明的细绳或钓鱼线固定话筒。
使用随附的防风罩。
