Before you begin:
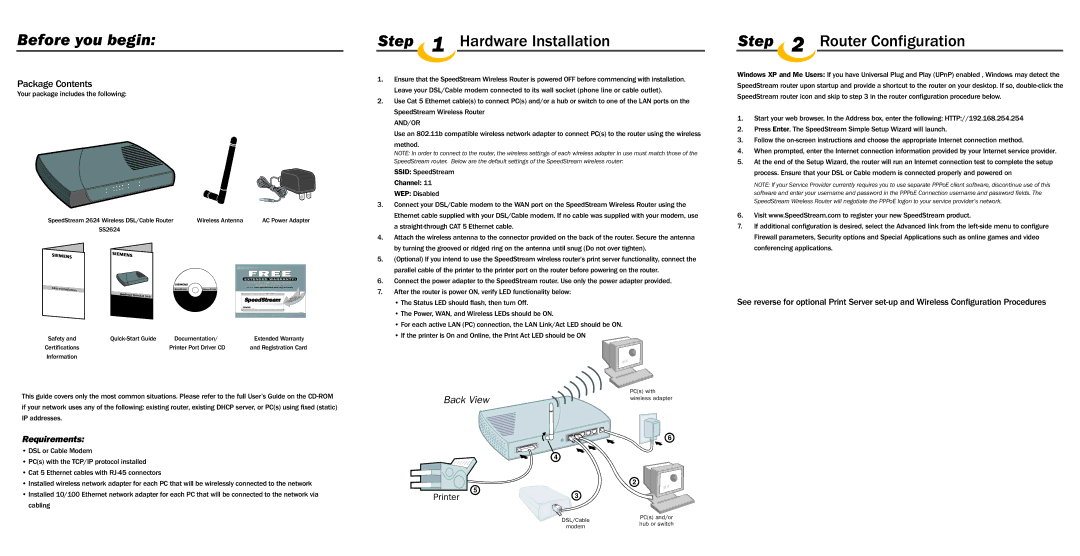
Package Contents
Your package includes the following:
SpeedStream 2624 Wireless DSL/Cable Router | Wireless Antenna | AC Power Adapter |
SS2624 |
|
|
|
|
|
|
|
|
| FREE |
|
|
|
|
|
|
|
| EXTENDED WARRANTY! | |
|
|
|
|
|
|
| GET A ONE YEAR HARDWARE WARRANTY EXTENSION |
|
|
|
|
|
|
|
| ON YOUR SPEEDSTREAM PRODUCT. |
|
Safety and | Certifications |
|
|
|
|
| JUST GO TO www.speedstream.com/reg/extwrnty |
|
|
| SpeedStream | Software |
|
|
| ||
|
| SpeedStream® Quick- |
|
|
|
| L i v e a B r o a d b a n d L i f e ™ |
|
|
| Start Guide |
|
|
|
| this where | |
|
|
|
|
|
|
| Keepto | knoweducation,. |
|
|
|
|
|
|
| your PC t, | DSL info |
|
|
|
|
|
|
| supporproduct | |
|
|
|
|
|
|
| nearfor new |
|
|
|
|
|
|
|
| to go and |
|
|
|
|
|
|
|
| w w w . s p e e d s t r e a m . c o m |
|
Safety and |
| Documentation/ | Extended Warranty | |||||
Certifications |
| Printer Port Driver CD | and Registration Card | |||||
Information |
|
|
|
|
|
|
| |
This guide covers only the most common situations. Please refer to the full User’s Guide on the
Requirements:
•DSL or Cable Modem
•PC(s) with the TCP/IP protocol installed
•Cat 5 Ethernet cables with
•Installed wireless network adapter for each PC that will be wirelessly connected to the network
•Installed 10/100 Ethernet network adapter for each PC that will be connected to the network via cabling
Step 1 Hardware Installation
1.Ensure that the SpeedStream Wireless Router is powered OFF before commencing with installation. Leave your DSL/Cable modem connected to its wall socket (phone line or cable outlet).
2.Use Cat 5 Ethernet cable(s) to connect PC(s) and/or a hub or switch to one of the LAN ports on the SpeedStream Wireless Router
AND/OR
Use an 802.11b compatible wireless network adapter to connect PC(s) to the router using the wireless
method.
NOTE: In order to connect to the router, the wireless settings of each wireless adapter in use must match those of the SpeedStream router. Below are the default settings of the SpeedStream wireless router:
SSID: SpeedStream
Channel: 11
WEP: Disabled
3.Connect your DSL/Cable modem to the WAN port on the SpeedStream Wireless Router using the Ethernet cable supplied with your DSL/Cable modem. If no cable was supplied with your modem, use a
4.Attach the wireless antenna to the connector provided on the back of the router. Secure the antenna by turning the grooved or ridged ring on the antenna until snug (Do not over tighten).
5.(Optional) If you intend to use the SpeedStream wireless router’s print server functionality, connect the parallel cable of the printer to the printer port on the router before powering on the router.
6.Connect the power adapter to the SpeedStream router. Use only the power adapter provided.
7.After the router is power ON, verify LED functionality below:
•The Status LED should flash, then turn Off.
•The Power, WAN, and Wireless LEDs should be ON.
•For each active LAN (PC) connection, the LAN Link/Act LED should be ON.
•If the printer is On and Online, the Print Act LED should be ON
Back View | PC(s) with | |
wireless adapter | ||
| ||
| 6 | |
| R | |
| 4 | |
5 | 2 | |
3 | ||
Printer |
Step 2 Router Configuration
Windows XP and Me Users: If you have Universal Plug and Play (UPnP) enabled , Windows may detect the
SpeedStream router upon startup and provide a shortcut to the router on your desktop. If so,
1.Start your web browser. In the Address box, enter the following: HTTP://192.168.254.254
2.Press Enter. The SpeedStream Simple Setup Wizard will launch.
3.Follow the
4.When prompted, enter the Internet connection information provided by your Internet service provider.
5.At the end of the Setup Wizard, the router will run an Internet connection test to complete the setup process. Ensure that your DSL or Cable modem is connected properly and powered on
NOTE: If your Service Provider currently requires you to use separate PPPoE client software, discontinue use of this software and enter your username and password in the PPPoE Connection username and password fields. The SpeedStream Wireless Router will negotiate the PPPoE logon to your service provider’s network.
6.Visit www.SpeedStream.com to register your new SpeedStream product.
7.If additional configuration is desired, select the Advanced link from the
See reverse for optional Print Server
DSL/Cable | PC(s) and/or | |
hub or switch | ||
modem | ||
|
