Operating handle adjustment procedure

Operating handle adjustment procedure

The next series of steps address adjusting the position of the handle assembly and lock segment assembly so that the handle can be inserted into the OPEN and CLOSED slot correctly.

Important: It is extremely important to adjust the handle position so it is impossible to place the operating handle in the CLOSED slot unless the air switch blades are fully closed. An operator may not be able to check the blades visually to verify the air switch is fully closed at night and/or under severe weather conditions.

Therefore, it should take considerable wind-up (torsion) of the vertical pipe to get the handle in position to force it into the CLOSED slot. Remember that as the air switch gets older, it will become harder to operate and more force will be required on the operating handle to completely close the air switch. The operator must apply sufficient force to completely close the air switch.

1.Adjust the CLOSED and OPEN segments on the lock segment assembly such that they are approximately 90°/100° apart, with adjustment still left in the slots in each direction. Tighten the bolts loosened under Installation instructions item 10 on page 12.

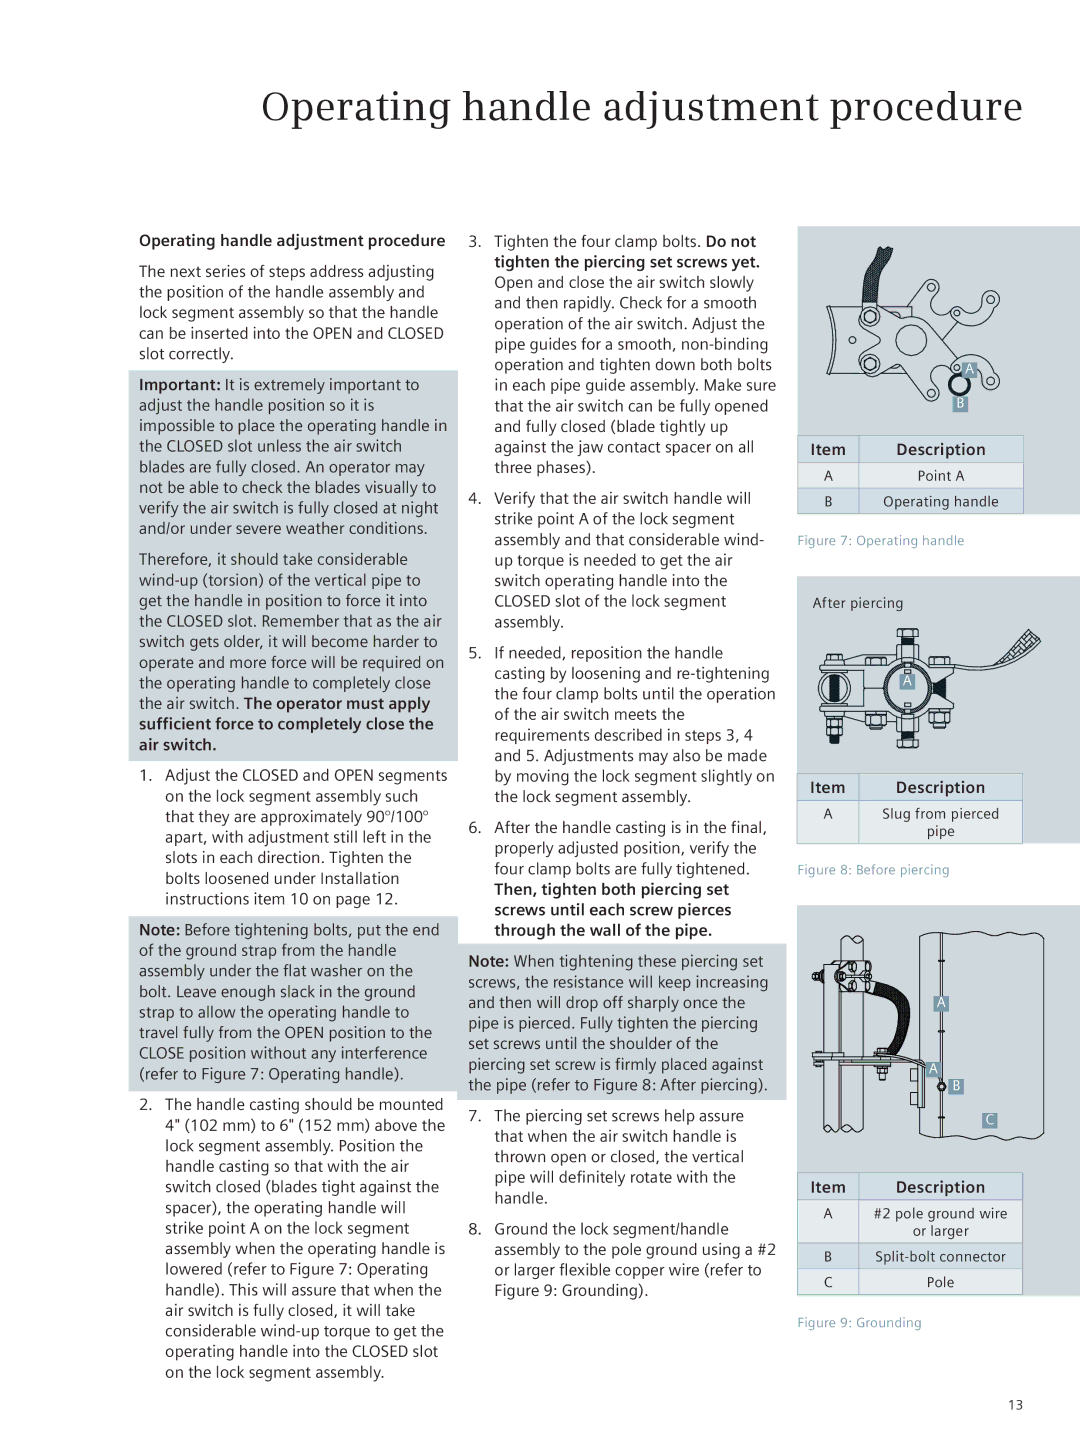
Note: Before tightening bolts, put the end of the ground strap from the handle assembly under the flat washer on the bolt. Leave enough slack in the ground strap to allow the operating handle to travel fully from the OPEN position to the CLOSE position without any interference (refer to Figure 7: Operating handle).

2.The handle casting should be mounted 4" (102 mm) to 6" (152 mm) above the lock segment assembly. Position the handle casting so that with the air switch closed (blades tight against the spacer), the operating handle will strike point A on the lock segment assembly when the operating handle is lowered (refer to Figure 7: Operating handle). This will assure that when the air switch is fully closed, it will take considerable wind-up torque to get the operating handle into the CLOSED slot on the lock segment assembly.

3.Tighten the four clamp bolts. Do not tighten the piercing set screws yet. Open and close the air switch slowly and then rapidly. Check for a smooth operation of the air switch. Adjust the pipe guides for a smooth, non-binding operation and tighten down both bolts in each pipe guide assembly. Make sure that the air switch can be fully opened and fully closed (blade tightly up against the jaw contact spacer on all three phases).

4.Verify that the air switch handle will strike point A of the lock segment assembly and that considerable wind- up torque is needed to get the air switch operating handle into the CLOSED slot of the lock segment assembly.

5.If needed, reposition the handle casting by loosening and re-tightening the four clamp bolts until the operation of the air switch meets the requirements described in steps 3, 4 and 5. Adjustments may also be made by moving the lock segment slightly on the lock segment assembly.

6.After the handle casting is in the final, properly adjusted position, verify the four clamp bolts are fully tightened.

Then, tighten both piercing set screws until each screw pierces through the wall of the pipe.

Note: When tightening these piercing set screws, the resistance will keep increasing and then will drop off sharply once the pipe is pierced. Fully tighten the piercing set screws until the shoulder of the piercing set screw is firmly placed against the pipe (refer to Figure 8: After piercing).

7.The piercing set screws help assure that when the air switch handle is thrown open or closed, the vertical pipe will definitely rotate with the handle.

8.Ground the lock segment/handle assembly to the pole ground using a #2 or larger flexible copper wire (refer to Figure 9: Grounding).

A

B

Item

Description

APoint A

BOperating handle

Figure 7: Operating handle

After piercing

A

Item

Description

ASlug from pierced

pipe

Figure 8: Before piercing

A

A

B

C

Item

Description

A#2 pole ground wire

or larger

BSplit-bolt connector

CPole

Figure 9: Grounding

13

Page 13
Image 13
Siemens E50001-F710-A420-X-4A00 instruction manual Operating handle adjustment procedure

E50001-F710-A420-X-4A00 specifications

The Siemens E50001-F710-A420-X-4A00 is a state-of-the-art industrial component that exemplifies Siemens' commitment to delivering advanced automation solutions. This particular model falls within the realm of programmable logic controllers (PLCs), which are pivotal in modern industrial automation systems.

One of the standout features of the E50001-F710-A420-X-4A00 is its exceptional processing speed. Equipped with a powerful processor, it allows for rapid execution of complex logic operations, ensuring high efficiency in manufacturing processes. Additionally, this PLC supports multitasking capabilities, enabling it to handle multiple processes simultaneously without compromising performance.

A notable characteristic of this model is its extensive I/O options. The E50001-F710-A420-X-4A00 comes with a variety of digital and analog input/output modules, providing flexibility in connecting to various sensors and actuators. This versatility makes it suitable for a wide range of applications, from simple machine control to complex production line systems.

The device is designed with robust communication interfaces, facilitating seamless integration with other equipment and systems. It supports diverse protocols, including Ethernet, Profibus, and Profinet, which enables easy connectivity to field devices and higher-level control systems. This characteristic makes it possible to implement Industry 4.0 initiatives, allowing for real-time data exchange and enhanced monitoring capabilities.

Another key feature of the Siemens E50001-F710-A420-X-4A00 is its user-friendly programming environment. It supports various programming languages as per the IEC 61131-3 standard, including ladder logic, structured text, and function block diagrams. Such flexibility enables engineers to choose the most intuitive and effective method for their specific applications.

In terms of reliability, this PLC is built to withstand harsh industrial conditions. Its robust construction ensures resistance to dust, moisture, and temperature fluctuations, making it suitable for deployment in various environments. Moreover, it includes built-in diagnostic tools that aid in troubleshooting and maintenance, thereby reducing downtime.

In summary, the Siemens E50001-F710-A420-X-4A00 stands out due to its high processing speed, extensive I/O capabilities, versatile communication interfaces, user-friendly programming options, and robust design. These features, combined with its reliability, make it an excellent choice for organizations seeking to enhance their automation processes and adapt to the evolving demands of the manufacturing industry. With the E50001-F710-A420-X-4A00, Siemens continues to lead the way in providing innovative solutions that drive efficiency and productivity in industrial automation.