Siemens TPS3 11 user manual Wide

Models: TPS3 11

1 12
Download 12 pages 43.75 Kb
Page 6
Image 6

SPDs on Ungrounded Systems

Caution – Ungrounded systems are inherently unstable and can produce excessively high line-to-ground voltages during certain fault conditions. During these fault conditions, any electrical equipment including an SPD, may be subjected to voltages which exceed their designed ratings. This information is being provided to the user so that an informed decision can be made before installing any electrical equipment on an ungrounded power system.

Optional Flush Mount Installation Instructions

Caution: The chassis of the TPS3 11 unit can fall into the wall cavity if the four screws attaching the faceplate to the chassis are removed. Use caution not to drop the TPS3 11 unit into the wall during instal- lation or service.

The TPS3 11 unit is approximately 4.0” deep. The unit will not mount flush unless there is at least 3.75” of clearance. The unit is designed to mount flush on a typical “2 x 4” stud wall with drywall.

Depending on the depth of the wall cavity, there are two installation procedures. The preferred installation utilizes Back Flange Mounting. The back flange supports the weight of the TPS3 unit and service procedures are greatly simplified. If this can not be accomplished, an alternate Front Flange Mount is possible. Please note that the front flange installation may create servicing difficulties in the future.

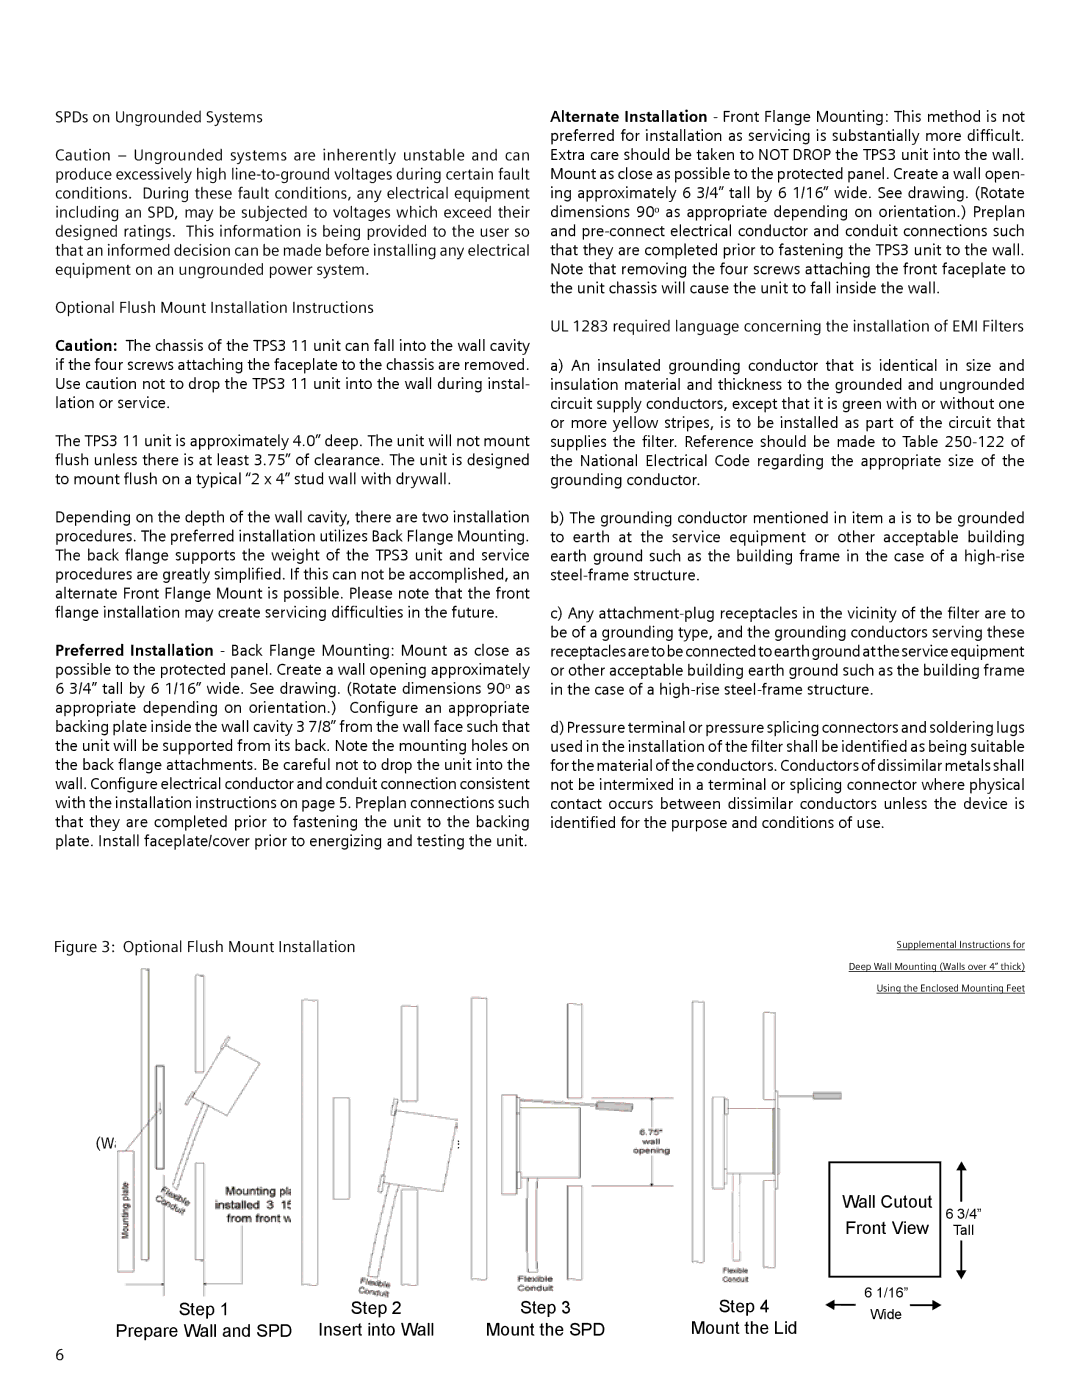
Preferred Installation - Back Flange Mounting: Mount as close as possible to the protected panel. Create a wall opening approximately 6 3/4” tall by 6 1/16” wide. See drawing. (Rotate dimensions 90o as appropriate depending on orientation.) Configure an appropriate backing plate inside the wall cavity 3 7/8” from the wall face such that the unit will be supported from its back. Note the mounting holes on the back flange attachments. Be careful not to drop the unit into the wall. Configure electrical conductor and conduit connection consistent with the installation instructions on page 5. Preplan connections such that they are completed prior to fastening the unit to the backing plate. Install faceplate/cover prior to energizing and testing the unit.

Figure 3: Optional Flush Mount Installation

Flush Mount “F Option” (Preferred Installation)

Supplemental Installation Instructions

for Deep Wall Mounting

(Walls over 4” thick) Using the Enclosed Mounting Feet

Alternate Installation - Front Flange Mounting: This method is not preferred for installation as servicing is substantially more difficult. Extra care should be taken to NOT DROP the TPS3 unit into the wall. Mount as close as possible to the protected panel. Create a wall open- ing approximately 6 3/4” tall by 6 1/16” wide. See drawing. (Rotate dimensions 90o as appropriate depending on orientation.) Preplan and pre-connect electrical conductor and conduit connections such that they are completed prior to fastening the TPS3 unit to the wall. Note that removing the four screws attaching the front faceplate to the unit chassis will cause the unit to fall inside the wall.

UL 1283 required language concerning the installation of EMI Filters

a)An insulated grounding conductor that is identical in size and insulation material and thickness to the grounded and ungrounded circuit supply conductors, except that it is green with or without one or more yellow stripes, is to be installed as part of the circuit that supplies the filter. Reference should be made to Table 250-122 of the National Electrical Code regarding the appropriate size of the grounding conductor.

b)The grounding conductor mentioned in item a is to be grounded to earth at the service equipment or other acceptable building earth ground such as the building frame in the case of a high-rise steel-frame structure.

c)Any attachment-plug receptacles in the vicinity of the filter are to be of a grounding type, and the grounding conductors serving these receptaclesaretobeconnectedtoearthgroundattheserviceequipment or other acceptable building earth ground such as the building frame in the case of a high-rise steel-frame structure.

d)Pressure terminal or pressure splicing connectors and soldering lugs used in the installation of the filter shall be identified as being suitable for the material of the conductors. Conductors of dissimilar metals shall not be intermixed in a terminal or splicing connector where physical contact occurs between dissimilar conductors unless the device is identified for the purpose and conditions of use.

Supplemental Instructions for

Deep Wall Mounting (Walls over 4” thick)

Using the Enclosed Mounting Feet

Wall Cutout 6 3/4”

Front View Tall

Step 1

Step 2

Step 3

Step 4

Prepare Wall and SPD

Insert into Wall

Mount the SPD

Mount the Lid

61/16” Wide

6

Page 6
Image 6
Siemens TPS3 11 user manual Wide

TPS3 11 specifications

Siemens TPS3 11 is a cutting-edge process control system that is designed to enhance industrial automation and optimize production processes. As a part of Siemens' long-standing commitment to innovation, the TPS3 11 serves a diverse range of industries, including power generation, water management, and manufacturing.

One of the standout features of the Siemens TPS3 11 is its modular architecture. This design allows for flexibility and scalability, making it suitable for both small and large-scale operations. The system can easily be expanded by adding modules, which means that businesses can start with what they need and expand as they grow. This adaptable design helps to future-proof investments in automation technology.

The TPS3 11 leverages advanced technologies such as integrated safety protocols, which enhance operational safety without compromising efficiency. The system follows global safety standards, ensuring that it can be used in environments that require high levels of safety and reliability. This makes it particularly advantageous in sectors such as chemicals and oil and gas, where safety is paramount.

Another key characteristic of the Siemens TPS3 11 is its user-friendly interface. The system features an intuitive Human-Machine Interface (HMI) that simplifies the monitoring and control of processes. Operators can easily access real-time data, visualize workflows, and manage operational parameters with minimal training, thus reducing the learning curve and increasing overall efficiency.

Siemens TPS3 11 is also equipped with advanced communication capabilities, supporting various industrial protocols and network configurations. This ensures seamless integration with existing systems and devices, promoting a unified operational environment. The system's compatibility with Industry 4.0 standards further strengthens its position in the realm of modern industrial automation, enabling businesses to leverage big data and IoT technologies.

In terms of performance, the TPS3 11 is engineered for high reliability and uptime. Redundant components and robust hardware design minimize the risk of failures, allowing industries to maximize productivity and reduce downtime. The system's ability to perform in demanding environments ensures it can withstand the rigors of industrial applications.

Overall, Siemens TPS3 11 stands out as a powerful process control solution that combines modularity, safety, user-friendliness, and advanced communication features. It positions businesses to achieve operational excellence and adapt to the evolving demands of modern industries. With its blend of cutting-edge technology and proven reliability, the TPS3 11 represents a significant advancement in the field of industrial automation.