Installing the Antenna

The optimum mounting location for the magnetic antenna is on the roof of the vehicle, with a minimum unobstructed area of 12 inches by 12 inches, and exactly 6½ inches from the rear roof edge of the vehicle (the length of the rubber antenna cable cover/tail). It is important to avoid any obstructions that will block the SIRIUS signal, obstructions such as a roof rack, a sunroof, roof mounted cargo containers, or other antennas. For convertible vehicles, the antenna should be installed on the trunk lid.

For best performance, it is recommended that the antenna be installed with the rubber antenna cable cover/tail. This rubber antenna cable cover/tail provides two benefits: first, it positions the antenna the recommended distance from the rear window, rear door/hatch, or trunk edge to give the antenna the best view of the sky. Secondly, it conceals and protects the exposed antenna cable. The rubber antenna cable cover/tail has adhesive strips that hold it securely in place.

The following illustrations show the recommended mounting locations of the antenna for several types of vehicles. (Figure 9) Follow these recommendations for best performance from the antenna.

Figure 9

Sedan/Coupe. Mount the antenna along the rear centerline of the vehicle roof, located at the rear of the roof near the rear window.

Pickup Truck. Mount the antenna along the rear centerline of the cab roof, located at the rear of the roof near the rear window.

SUV/Mini-Van. Mount the antenna along the rear centerline of the vehicle roof, located at the rear of the roof near the rear door/hatch.

Convertible. Mount the antenna along the centerline of the trunk lid, with the rubber antenna cable cover/tail directed toward the rear window.

When you have selected a suitable mounting location, clean the area where the antenna and rubber antenna cable cover/tail will be mounted with the supplied alcohol swab.

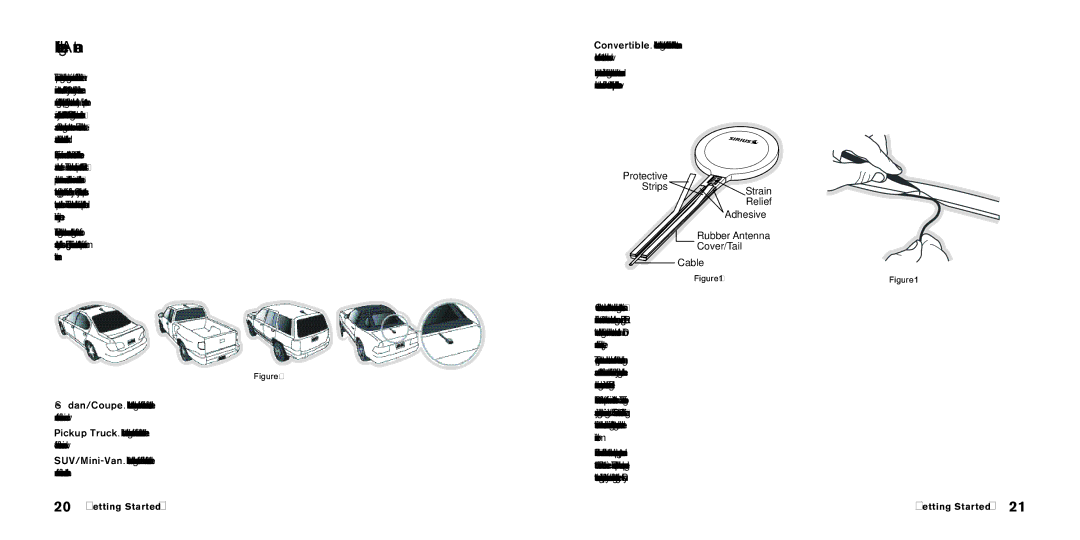
Protective


Strips

Strain


Relief


Adhesive


Rubber Antenna


Cover/Tail


Cable


Figure 10

Figure 11

Connect the rubber antenna cable cover/tail to the antenna cable, making sure that the strain- relief on the antenna sits into the rubber antenna cable cover/tail groove. (Figure 10) Route the antenna cable through the wire channel in the rubber antenna cable cover/tail. Do not remove the adhesive strips yet.

Temporarily position the antenna and rubber antenna cable cover/tail in the selected mounting area and route the cable from the antenna to the vehicle’s interior by tucking it underneath the rubber molding around rear window, as shown in Figure 11.

Route the cable from the lowest point of the rear window into the trunk. Take advantage of any existing cable channels or wiring conduits. For SUVs, mini-vans and 5-door vehicles, bring the cable into the vehicle under the rubber molding for the tailgate, and continue under the interior trim.

From the trunk, or rear of the vehicle, route the cable around the passenger compartment and to the front of the vehicle, to the receiver. Take care not pull the cable across sharp edges that could damage it, and keep it away from areas where it might entangle feet. Coil any

20 [ Getting Started ]

[ Getting Started ] 21

Page 12
Image 12
Sirius Satellite Radio S50 manual Installing the Antenna

S50 specifications

Sirius Satellite Radio S50 was a groundbreaking portable satellite radio receiver that revolutionized the way listeners could enjoy satellite radio on the go. Launched in the mid-2000s, the S50 was designed to provide a robust selection of music, news, sports, and entertainment programming, all with the convenience of portability.

One of the standout features of the S50 was its ability to store and playback content. With a built-in memory capable of holding up to 50 hours of recorded material, users could easily pause, rewind, and replay their favorite shows, ensuring that they never missed a moment of their desired programming. The S50 employed an innovative flash memory technology that not only improved the efficiency of playback but also provided quick access to stored content.

The S50 also boasted a high-resolution color display that made navigation easy and visually appealing. The large screen allowed users to view channel information, artist details, and song titles at a glance, enhancing the overall listening experience. Coupled with a user-friendly interface, this feature made it easy for both tech-savvy individuals and casual listeners to operate the device effortlessly.

Another significant aspect of the S50 was its dual functionality. It was equipped with both satellite and terrestrial antennas, allowing users to receive signals in just about any environment. This hybrid technology ensured that even in areas with limited satellite reception, users could continue enjoying their favorite programming through terrestrial broadcast signals.

The compact and sleek design of the S50 made it portable and easy to carry. Weighing in at just a few ounces, it easily fit into pockets or bags, making it ideal for both commuters and outdoor enthusiasts. Additionally, the device came with a variety of mounting options for vehicles, further enhancing its versatility.

Battery life was another key feature of the S50. With the ability to operate for several hours on a single charge, users could listen to their favorite shows without worrying about running out of power during long trips or extended listening sessions.

In conclusion, the Sirius Satellite Radio S50 was a pioneering device that combined portability, functionality, and a rich array of features. Its ability to store and replay content, vibrant display, robust reception technology, and compact design positioned it as a favorite among satellite radio enthusiasts. As satellite radio technology has continued to evolve, the S50 remains a noteworthy milestone in the journey of mobile audio entertainment.