SM 1619X04663 05-11:SM 1619X04663 05-11 5/3/11 8:15 AM Page 43

Ensamblaje

Un amplio surtido de brocas de fresadora con diferentes perfiles se encuentra disponible por separado.

! ADVERTENCIA

Para prevenir lesiones

personales, saque siempre el

enchufe de la fuente de energía antes de quitar o instalar brocas o accesorios.

INSTALACIÓN DE UNA BROCA DE FRESADORA

Coloque la fresadora en posición invertida de manera que su parte de arriba descanse en el banco de trabajo. Otra opción es quitar el motor de la base antes de instalar la broca.

1.Quite el escudo antivirutas.

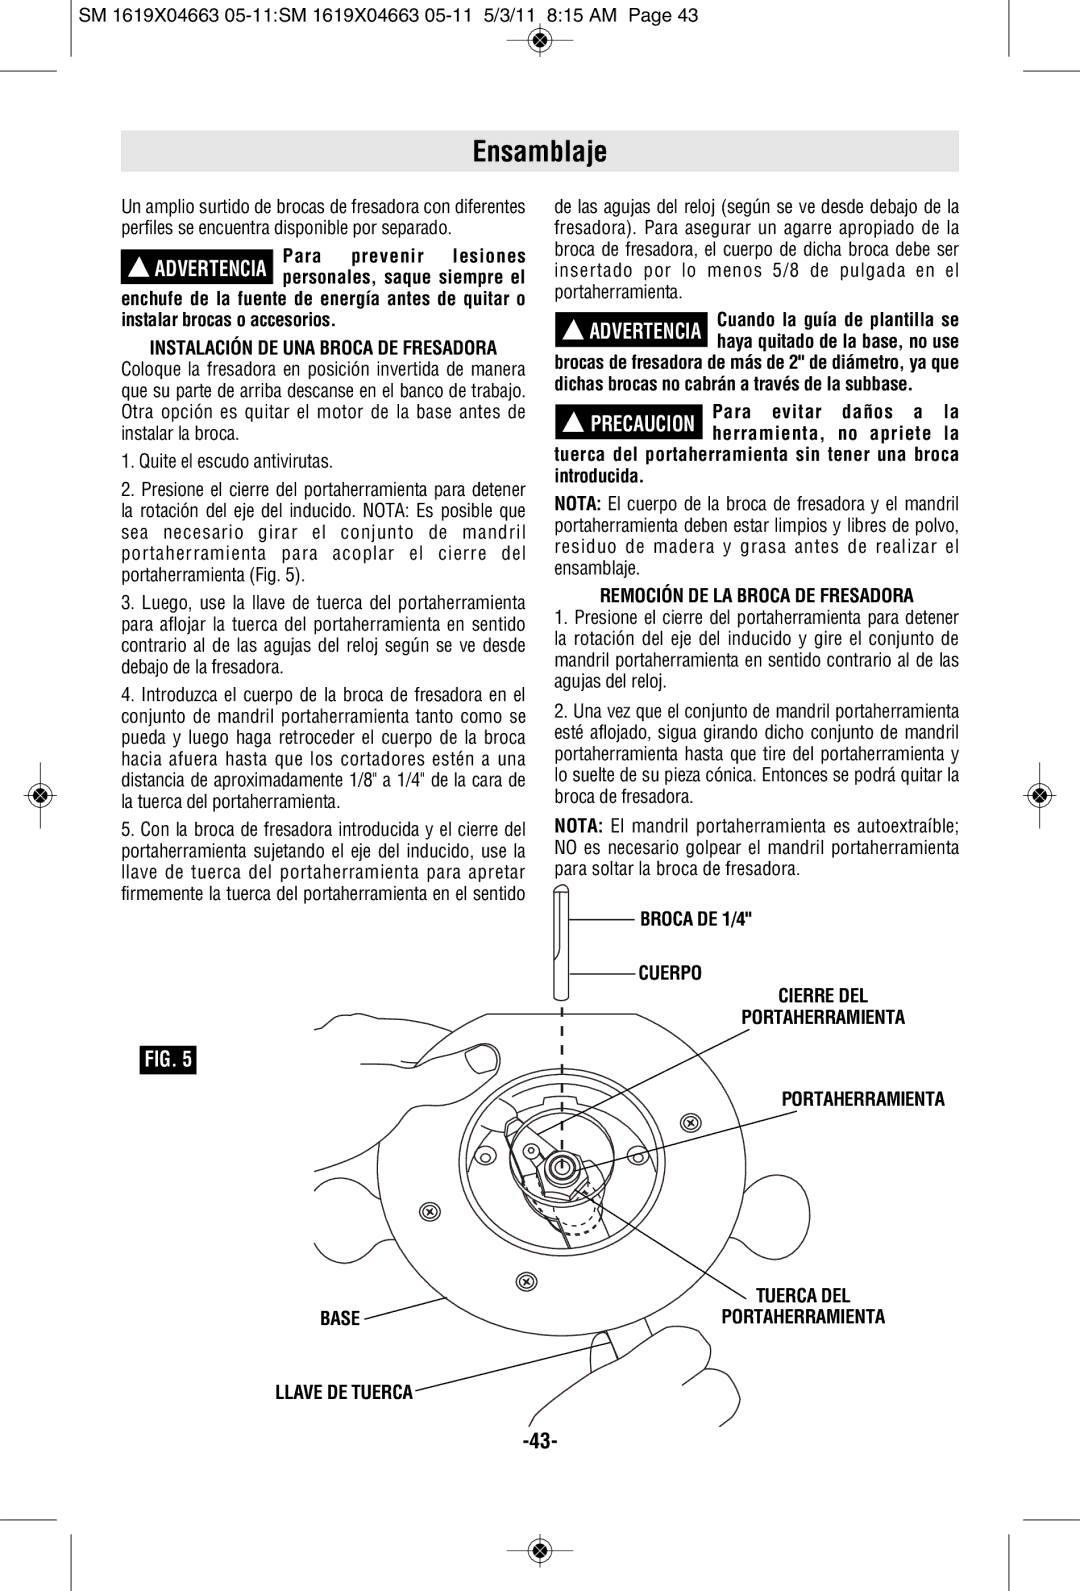
2.Presione el cierre del portaherramienta para detener la rotación del eje del inducido. NOTA: Es posible que sea necesario girar el conjunto de mandril portaherramienta para acoplar el cierre del portaherramienta (Fig. 5).

3.Luego, use la llave de tuerca del portaherramienta para aflojar la tuerca del portaherramienta en sentido contrario al de las agujas del reloj según se ve desde debajo de la fresadora.

4.Introduzca el cuerpo de la broca de fresadora en el conjunto de mandril portaherramienta tanto como se pueda y luego haga retroceder el cuerpo de la broca hacia afuera hasta que los cortadores estén a una distancia de aproximadamente 1/8" a 1/4" de la cara de la tuerca del portaherramienta.

5.Con la broca de fresadora introducida y el cierre del portaherramienta sujetando el eje del inducido, use la llave de tuerca del portaherramienta para apretar firmemente la tuerca del portaherramienta en el sentido

FIG. 5

de las agujas del reloj (según se ve desde debajo de la fresadora). Para asegurar un agarre apropiado de la broca de fresadora, el cuerpo de dicha broca debe ser insertado por lo menos 5/8 de pulgada en el portaherramienta.

Cuando la guía de plantilla se ! ADVERTENCIA haya quitado de la base, no use

brocas de fresadora de más de 2" de diámetro, ya que dichas brocas no cabrán a través de la subbase.

! PRECAUCION

Para evitar

daños a

la

herramienta,

no apriete

la


tuerca del portaherramienta sin tener una broca introducida.

NOTA: El cuerpo de la broca de fresadora y el mandril portaherramienta deben estar limpios y libres de polvo, residuo de madera y grasa antes de realizar el ensamblaje.

REMOCIÓN DE LA BROCA DE FRESADORA

1.Presione el cierre del portaherramienta para detener la rotación del eje del inducido y gire el conjunto de mandril portaherramienta en sentido contrario al de las agujas del reloj.

2.Una vez que el conjunto de mandril portaherramienta esté aflojado, sigua girando dicho conjunto de mandril portaherramienta hasta que tire del portaherramienta y lo suelte de su pieza cónica. Entonces se podrá quitar la broca de fresadora.

NOTA: El mandril portaherramienta es autoextraíble; NO es necesario golpear el mandril portaherramienta para soltar la broca de fresadora.

BROCA DE 1/4"

CUERPO

CIERRE DEL PORTAHERRAMIENTA

PORTAHERRAMIENTA


TUERCA DEL

BASE

PORTAHERRAMIENTA

LLAVE DE TUERCA


-43-

Page 43
Image 43
Skil 1827, 1830, 1817 manual Ensamblaje, Remoción DE LA Broca DE Fresadora, Broca DE 1/4 Cuerpo, Llave DE Tuerca

1827, 1817, 1830 specifications

Skil is a renowned brand in the power tool industry, offering a range of products that cater to the needs of both professionals and DIY enthusiasts. Among its impressive lineup, the Skil 1830, 1817, and 1827 models stand out for their unique features and versatile capabilities, making them essential tools for a variety of applications.

The Skil 1830 is a highly efficient reciprocating saw designed for both heavy-duty tasks and intricate cutting jobs. One of its standout features is the Variable Speed Control, which allows users to adjust the speed according to the material being cut. This feature ensures maximum precision and control, whether working with wood, metal, or plastic. The 1830 also comes equipped with a tool-less blade change system, making it easy to switch blades quickly and efficiently. Its powerful motor ensures optimal performance, while the ergonomic handle provides comfort during extended use.

On the other hand, the Skil 1817 is a versatile circular saw that is perfect for both beginners and seasoned pros. Its powerful 15-amp motor delivers impressive cutting performance, enabling users to easily tackle a variety of materials. One of the most notable aspects of the 1817 is its laser guide system, which enhances accuracy and precision when making straight cuts. Additionally, the integrated dust blower keeps the cutting line clear for improved visibility, while the lightweight design of the saw allows for easy maneuverability without sacrificing power.

Lastly, the Skil 1827 is a robust and reliable jigsaw that excels in making curved and intricate cuts. Its orbital cut option allows users to switch between a pendulum action for fast cuts and a straight cut for finer details. The 1827 features a variable speed dial that can be adjusted based on the material, ensuring optimal performance for every job. An integrated blower keeps the cutting line free of debris, enhancing visibility and accuracy. Its ergonomic grip ensures comfort during extended use, and the tool-less blade change feature allows for quick and easy blade swaps.

In summary, the Skil 1830, 1817, and 1827 power tools offer a range of features and technologies that cater to various cutting needs. From the adjustable speed and tool-less blade changes of the 1830 to the laser guide of the 1817 and the orbital cutting options of the 1827, each model is designed with the user in mind, ensuring ease of use, comfort, and precision. Whether working on a professional project or a home improvement task, these Skil tools provide the reliability and performance needed to achieve excellent results.