SM 1619X04663 05-11:SM 1619X04663 05-11 5/3/11 8:15 AM Page 44

CUIDADO DEL MANDRIL PORTAHERRAMIENTA

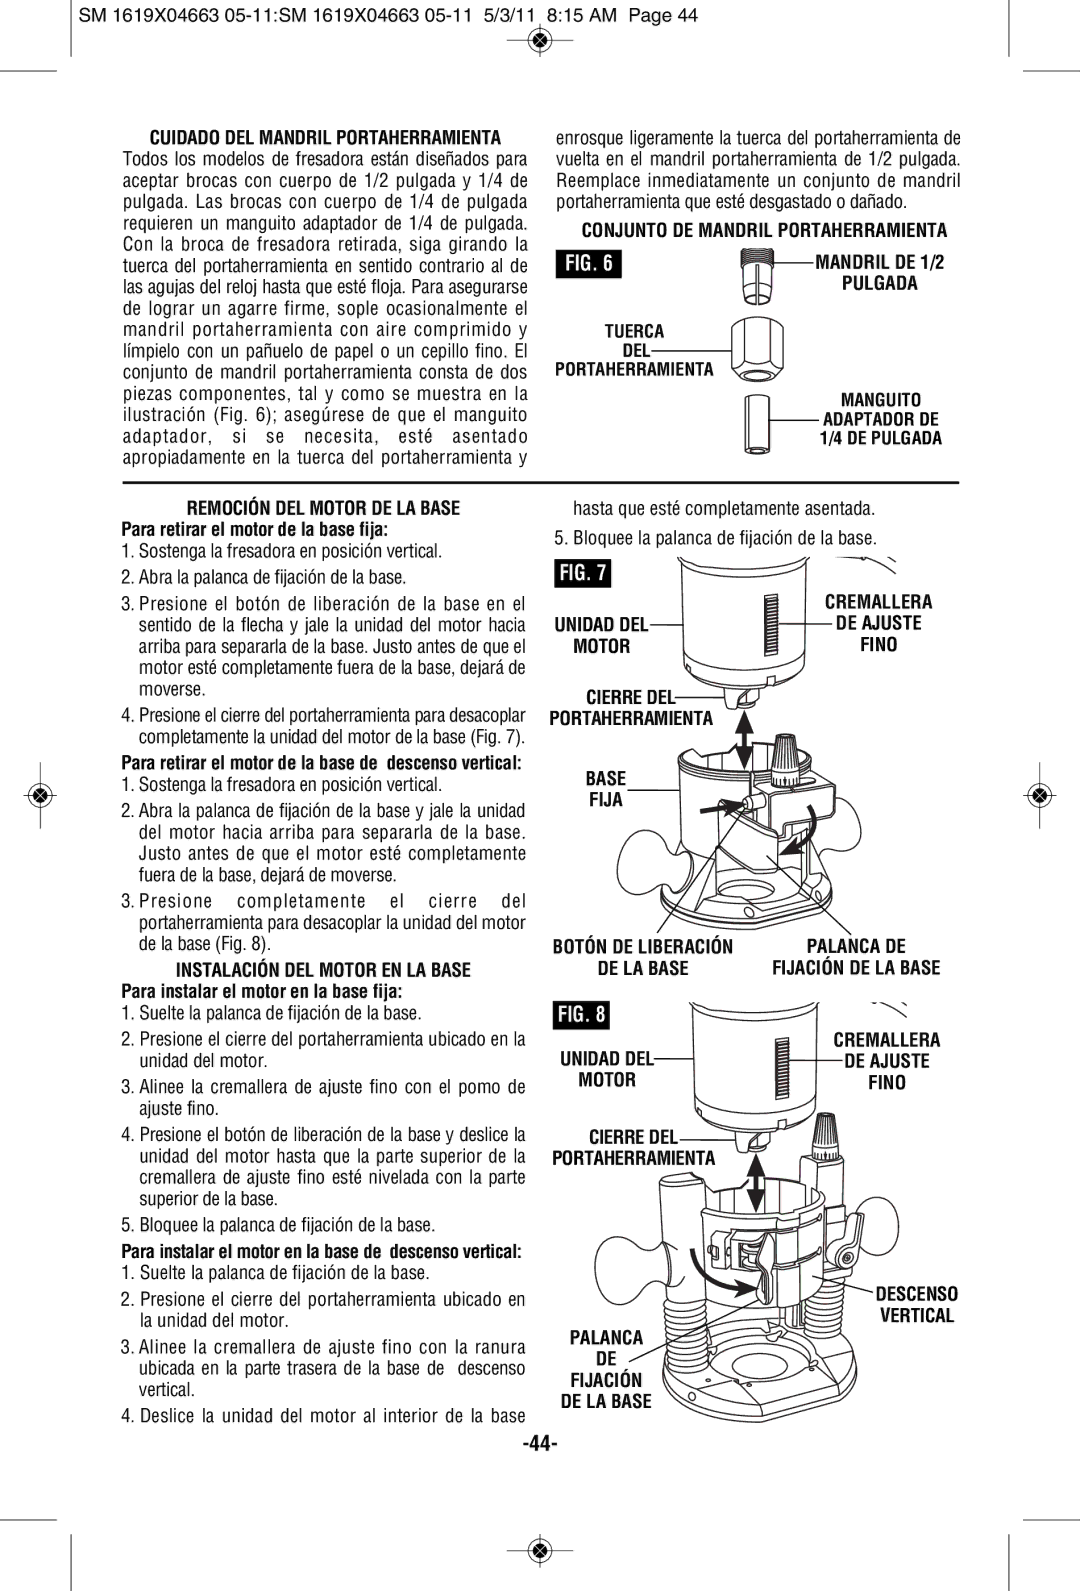
Todos los modelos de fresadora están diseñados para aceptar brocas con cuerpo de 1/2 pulgada y 1/4 de pulgada. Las brocas con cuerpo de 1/4 de pulgada requieren un manguito adaptador de 1/4 de pulgada. Con la broca de fresadora retirada, siga girando la tuerca del portaherramienta en sentido contrario al de las agujas del reloj hasta que esté floja. Para asegurarse de lograr un agarre firme, sople ocasionalmente el mandril portaherramienta con aire comprimido y límpielo con un pañuelo de papel o un cepillo fino. El conjunto de mandril portaherramienta consta de dos piezas componentes, tal y como se muestra en la ilustración (Fig. 6); asegúrese de que el manguito adaptador, si se necesita, esté asentado apropiadamente en la tuerca del portaherramienta y

enrosque ligeramente la tuerca del portaherramienta de vuelta en el mandril portaherramienta de 1/2 pulgada. Reemplace inmediatamente un conjunto de mandril portaherramienta que esté desgastado o dañado.

CONJUNTO DE MANDRIL PORTAHERRAMIENTA

FIG. 6

MANDRIL DE 1/2


PULGADA

TUERCA

DEL

PORTAHERRAMIENTA

MANGUITO

ADAPTADOR DE 1/4 DE PULGADA

REMOCIÓN DEL MOTOR DE LA BASE Para retirar el motor de la base fija:

1.Sostenga la fresadora en posición vertical.

2.Abra la palanca de fijación de la base.

3.Presione el botón de liberación de la base en el sentido de la flecha y jale la unidad del motor hacia arriba para separarla de la base. Justo antes de que el motor esté completamente fuera de la base, dejará de moverse.

4.Presione el cierre del portaherramienta para desacoplar completamente la unidad del motor de la base (Fig. 7).

Para retirar el motor de la base de descenso vertical:

1.Sostenga la fresadora en posición vertical.

2.Abra la palanca de fijación de la base y jale la unidad del motor hacia arriba para separarla de la base. Justo antes de que el motor esté completamente fuera de la base, dejará de moverse.

3.Presione completamente el cierre del portaherramienta para desacoplar la unidad del motor de la base (Fig. 8).

INSTALACIÓN DEL MOTOR EN LA BASE Para instalar el motor en la base fija:

1.Suelte la palanca de fijación de la base.

2.Presione el cierre del portaherramienta ubicado en la unidad del motor.

3.Alinee la cremallera de ajuste fino con el pomo de ajuste fino.

4.Presione el botón de liberación de la base y deslice la unidad del motor hasta que la parte superior de la cremallera de ajuste fino esté nivelada con la parte superior de la base.

5.Bloquee la palanca de fijación de la base.

Para instalar el motor en la base de descenso vertical:

1.Suelte la palanca de fijación de la base.

2.Presione el cierre del portaherramienta ubicado en la unidad del motor.

3.Alinee la cremallera de ajuste fino con la ranura ubicada en la parte trasera de la base de descenso vertical.

4.Deslice la unidad del motor al interior de la base

hasta que esté completamente asentada.

5. Bloquee la palanca de fijación de la base.

FIG. 7


CREMALLERA

UNIDAD DEL

DE AJUSTE

MOTOR

FINO

CIERRE DEL

PORTAHERRAMIENTA

BASE

FIJA

BOTÓN DE LIBERACIÓN

PALANCA DE

DE LA BASE

FIJACIÓN DE LA BASE

FIG. 8

UNIDAD DEL

CREMALLERA

DE AJUSTE

MOTOR

FINO

CIERRE DEL


PORTAHERRAMIENTA


DESCENSO

VERTICAL

PALANCA

DE

FIJACIÓN

DE LA BASE

-44-

Page 44
Image 44
Skil 1817, 1830, 1827 manual Conjunto DE Mandril Portaherramienta, Cierre DEL Portaherramienta Base Fija

1827, 1817, 1830 specifications

Skil is a renowned brand in the power tool industry, offering a range of products that cater to the needs of both professionals and DIY enthusiasts. Among its impressive lineup, the Skil 1830, 1817, and 1827 models stand out for their unique features and versatile capabilities, making them essential tools for a variety of applications.

The Skil 1830 is a highly efficient reciprocating saw designed for both heavy-duty tasks and intricate cutting jobs. One of its standout features is the Variable Speed Control, which allows users to adjust the speed according to the material being cut. This feature ensures maximum precision and control, whether working with wood, metal, or plastic. The 1830 also comes equipped with a tool-less blade change system, making it easy to switch blades quickly and efficiently. Its powerful motor ensures optimal performance, while the ergonomic handle provides comfort during extended use.

On the other hand, the Skil 1817 is a versatile circular saw that is perfect for both beginners and seasoned pros. Its powerful 15-amp motor delivers impressive cutting performance, enabling users to easily tackle a variety of materials. One of the most notable aspects of the 1817 is its laser guide system, which enhances accuracy and precision when making straight cuts. Additionally, the integrated dust blower keeps the cutting line clear for improved visibility, while the lightweight design of the saw allows for easy maneuverability without sacrificing power.

Lastly, the Skil 1827 is a robust and reliable jigsaw that excels in making curved and intricate cuts. Its orbital cut option allows users to switch between a pendulum action for fast cuts and a straight cut for finer details. The 1827 features a variable speed dial that can be adjusted based on the material, ensuring optimal performance for every job. An integrated blower keeps the cutting line free of debris, enhancing visibility and accuracy. Its ergonomic grip ensures comfort during extended use, and the tool-less blade change feature allows for quick and easy blade swaps.

In summary, the Skil 1830, 1817, and 1827 power tools offer a range of features and technologies that cater to various cutting needs. From the adjustable speed and tool-less blade changes of the 1830 to the laser guide of the 1817 and the orbital cutting options of the 1827, each model is designed with the user in mind, ensuring ease of use, comfort, and precision. Whether working on a professional project or a home improvement task, these Skil tools provide the reliability and performance needed to achieve excellent results.