2. INSTALLATION (CONT)
Connect in Parallel
1. Remove the existing screws holding the push button of the wall console.
2. Remove the 2 screws that secure the wires on the existing wall console.
Extension
3. Connect one end of the extensionwires
3. OPERATION
After installing the Skylink® wall console, you may connect the power to the garage door opener.
The garage door closer monitors the door position in order to determine when the door needs to be closed. The Garage Door Sensor will send wireless signal to the wall console to report the door’s position. User can set the wall console so it will close the door after it has been opened for a predetermined period of time.
wires provided in this kit to the 2 terminals on the existing wall console, the other end to the
4.Mount both wall consoles (original one and
and straighten up the antenna on the
5.You may power up the garage door opener by plugging in the AC cord.
6.Follow instructions in “Charging Up Wall Console
Charging Up Wall Console GC-433R
There is a power storage
1. After powering up the garage door opener, the |
console will be charged. |
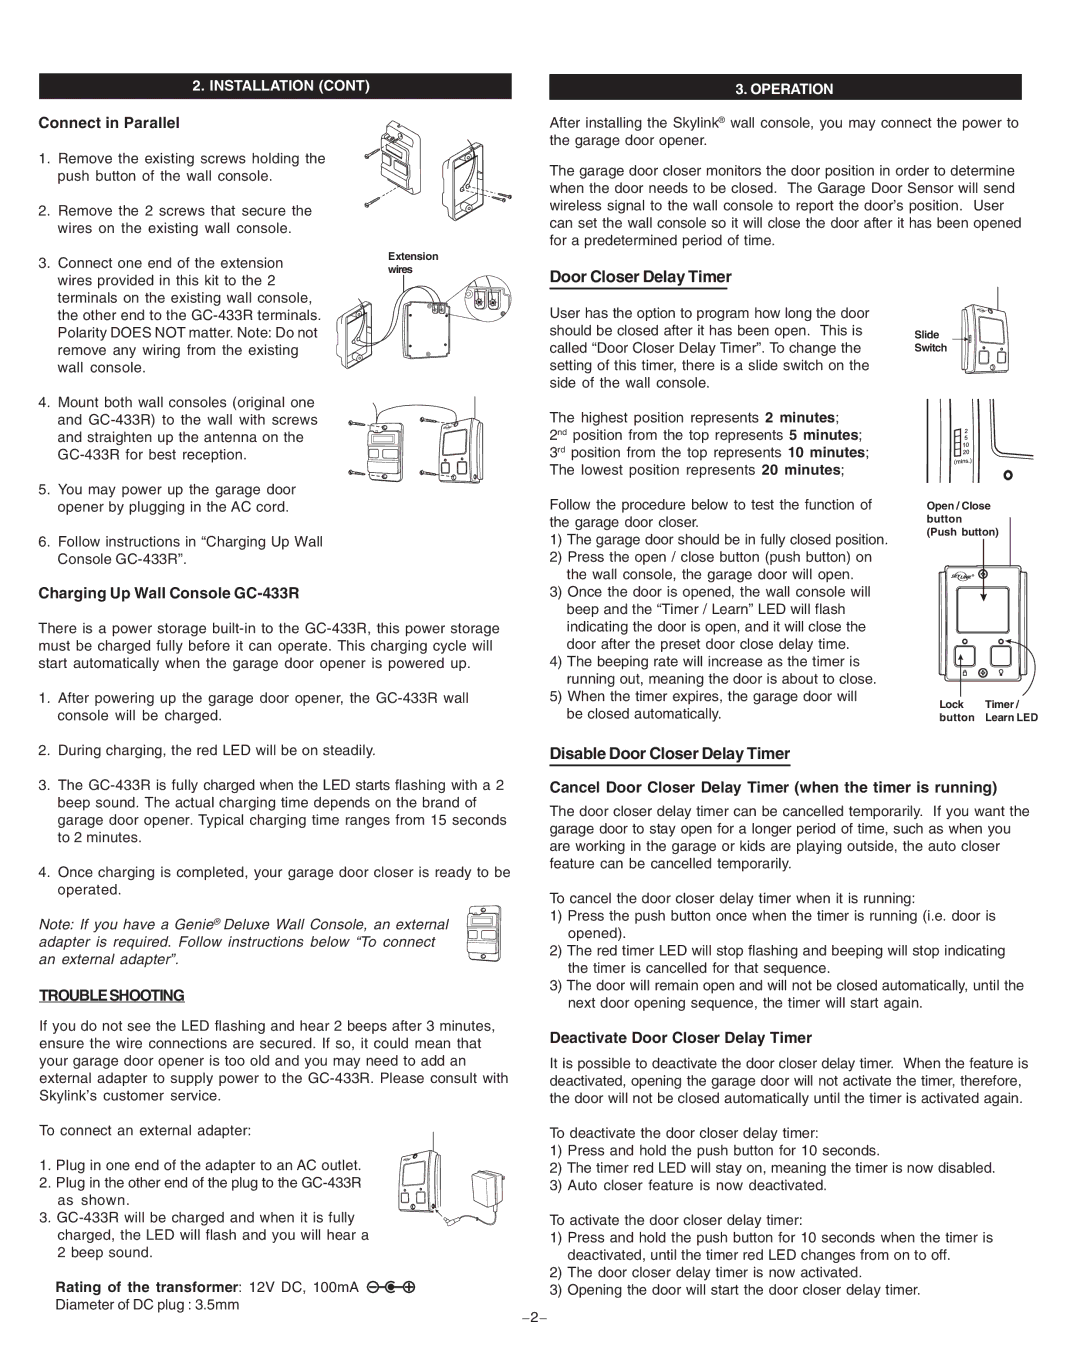
Door Closer Delay Timer
User has the option to program how long the door should be closed after it has been open. This is called “Door Closer Delay Timer”. To change the setting of this timer, there is a slide switch on the side of the wall console.
The highest position represents 2 minutes;
2nd position from the top represents 5 minutes; 3rd position from the top represents 10 minutes; The lowest position represents 20 minutes;
Follow the procedure below to test the function of the garage door closer.
1)The garage door should be in fully closed position.
2)Press the open / close button (push button) on the wall console, the garage door will open.
3)Once the door is opened, the wall console will beep and the “Timer / Learn” LED will flash indicating the door is open, and it will close the door after the preset door close delay time.
4)The beeping rate will increase as the timer is running out, meaning the door is about to close.
5)When the timer expires, the garage door will be closed automatically.
Slide
Switch
Open / Close button (Push button)
Lock | Timer / |
button | Learn LED |
2. | During charging, the red LED will be on steadily. |
3. | The |
| beep sound. The actual charging time depends on the brand of |
| garage door opener. Typical charging time ranges from 15 seconds |
| to 2 minutes. |
4. | Once charging is completed, your garage door closer is ready to be |
| operated. |
Note: If you have a Genie® Deluxe Wall Console, an external adapter is required. Follow instructions below “To connect an external adapter”.
TROUBLESHOOTING
If you do not see the LED flashing and hear 2 beeps after 3 minutes, ensure the wire connections are secured. If so, it could mean that your garage door opener is too old and you may need to add an external adapter to supply power to the
To connect an external adapter:
1. Plug in one end of the adapter to an AC outlet.
2. Plug in the other end of the plug to the
3.
Rating of the transformer: 12V DC, 100mA ![]()
Diameter of DC plug : 3.5mm
Disable Door Closer Delay Timer
Cancel Door Closer Delay Timer (when the timer is running)
The door closer delay timer can be cancelled temporarily. If you want the garage door to stay open for a longer period of time, such as when you are working in the garage or kids are playing outside, the auto closer feature can be cancelled temporarily.
To cancel the door closer delay timer when it is running:
1)Press the push button once when the timer is running (i.e. door is opened).
2)The red timer LED will stop flashing and beeping will stop indicating the timer is cancelled for that sequence.
3)The door will remain open and will not be closed automatically, until the next door opening sequence, the timer will start again.
Deactivate Door Closer Delay Timer
It is possible to deactivate the door closer delay timer. When the feature is deactivated, opening the garage door will not activate the timer, therefore, the door will not be closed automatically until the timer is activated again.
To deactivate the door closer delay timer:
1)Press and hold the push button for 10 seconds.
2)The timer red LED will stay on, meaning the timer is now disabled.
3)Auto closer feature is now deactivated.
To activate the door closer delay timer:
1)Press and hold the push button for 10 seconds when the timer is deactivated, until the timer red LED changes from on to off.
2)The door closer delay timer is now activated.
3)Opening the door will start the door closer delay timer.