Keyless Entry System

Model GT-115

1. INTRODUCTION


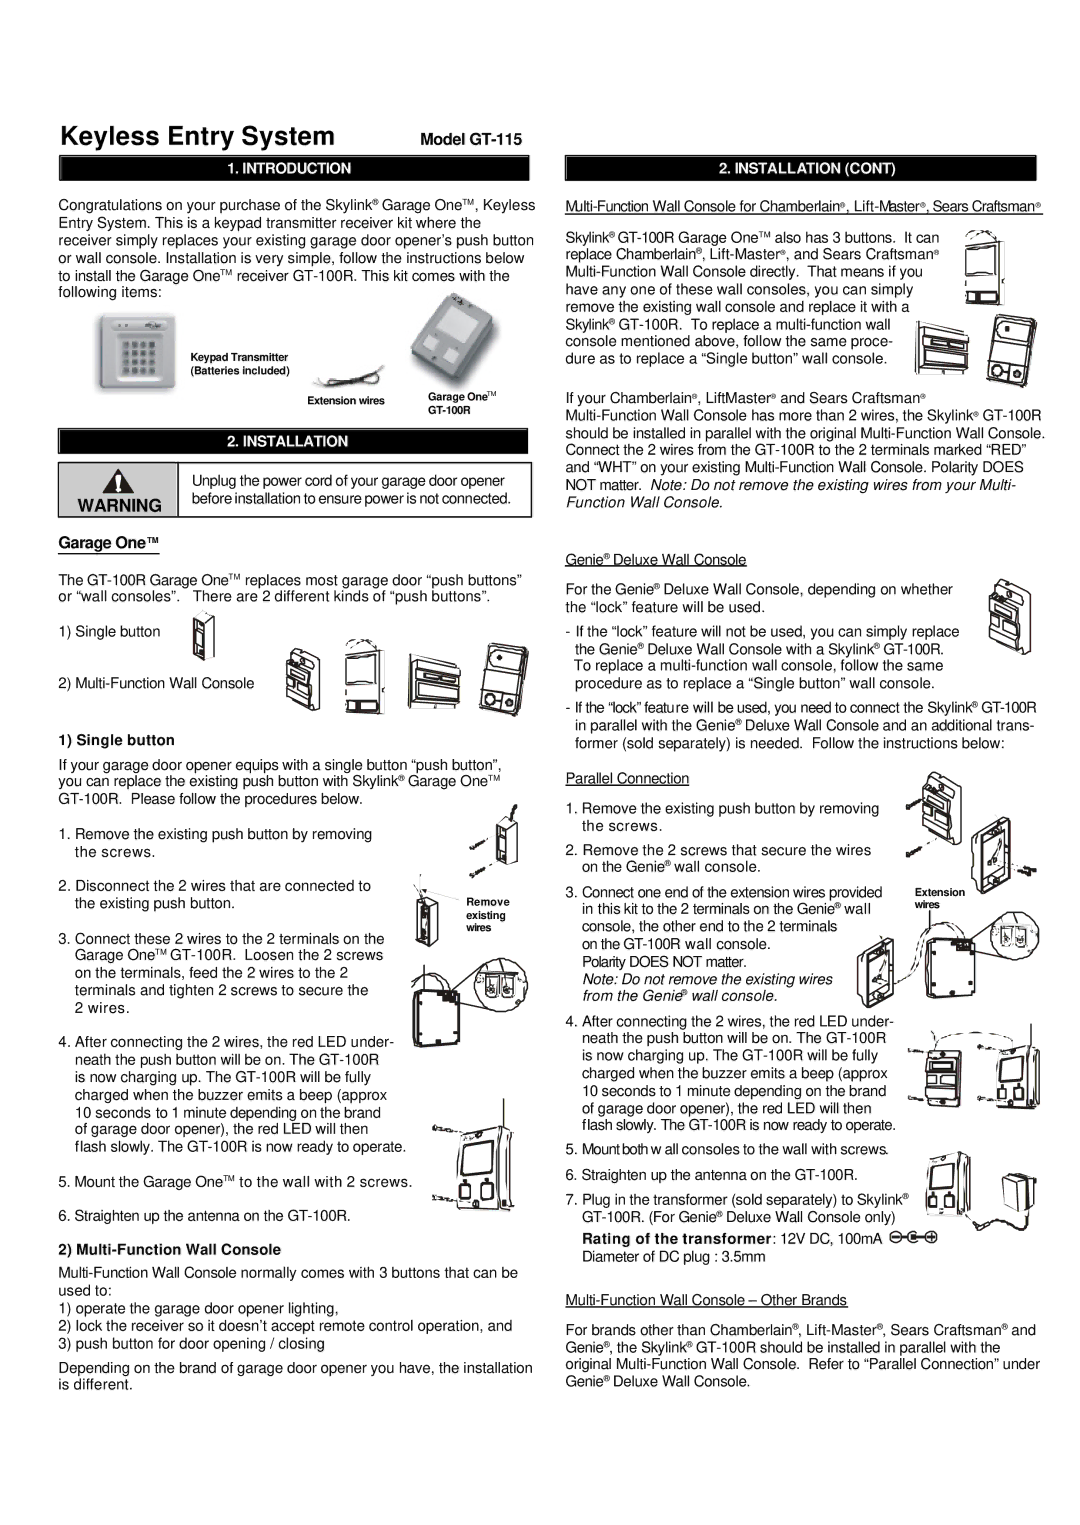
Congratulations on your purchase of the Skylink® Garage OneTM, Keyless Entry System. This is a keypad transmitter receiver kit where the receiver simply replaces your existing garage door opener’s push button or wall console. Installation is very simple, follow the instructions below to install the Garage OneTM receiver GT-100R. This kit comes with the following items:

Keypad Transmitter (Batteries included)


Extension wires

Garage OneTM


GT-100R


2. INSTALLATION


Unplug the power cord of your garage door opener


WARNING

before installation to ensure power is not connected.


Garage OneTM

The GT-100R Garage OneTM replaces most garage door “push buttons” or “wall consoles”. There are 2 different kinds of “push buttons”.

1) Single button

2) Multi-Function Wall Console

1) Single button

If your garage door opener equips with a single button “push button”, you can replace the existing push button with Skylink® Garage OneTM GT-100R. Please follow the procedures below.

1. Remove the existing push button by removing the screws.

2. Disconnect the 2 wires that are connected to

the existing push button. Remove

existing wires

3. Connect these 2 wires to the 2 terminals on the Garage OneTM GT-100R. Loosen the 2 screws on the terminals, feed the 2 wires to the 2 terminals and tighten 2 screws to secure the 2 wires.

4. After connecting the 2 wires, the red LED under- neath the push button will be on. The GT-100R is now charging up. The GT-100R will be fully charged when the buzzer emits a beep (approx 10 seconds to 1 minute depending on the brand of garage door opener), the red LED will then flash slowly. The GT-100R is now ready to operate.

5. Mount the Garage OneTM to the wall with 2 screws.

6. Straighten up the antenna on the GT-100R.

2) Multi-Function Wall Console

Multi-Function Wall Console normally comes with 3 buttons that can be used to:

1)operate the garage door opener lighting,

2)lock the receiver so it doesn’t accept remote control operation, and

3)push button for door opening / closing

Depending on the brand of garage door opener you have, the installation is different.

2. INSTALLATION (CONT)

Multi-Function Wall Console for Chamberlain®, Lift-Master®, Sears Craftsman®

Skylink® GT-100R Garage OneTM also has 3 buttons. It can replace Chamberlain®, Lift-Master®, and Sears Craftsman® Multi-Function Wall Console directly. That means if you have any one of these wall consoles, you can simply remove the existing wall console and replace it with a Skylink® GT-100R. To replace a multi-function wall console mentioned above, follow the same proce- dure as to replace a “Single button” wall console.

If your Chamberlain®, LiftMaster® and Sears Craftsman® Multi-Function Wall Console has more than 2 wires, the Skylink® GT-100R should be installed in parallel with the original Multi-Function Wall Console. Connect the 2 wires from the GT-100R to the 2 terminals marked “RED” and “WHT” on your existing Multi-Function Wall Console. Polarity DOES NOT matter. Note: Do not remove the existing wires from your Multi- Function Wall Console.

Genie® Deluxe Wall Console

For the Genie® Deluxe Wall Console, depending on whether the “lock” feature will be used.

- If the “lock” feature will not be used, you can simply replace the Genie® Deluxe Wall Console with a Skylink® GT-100R. To replace a multi-function wall console, follow the same procedure as to replace a “Single button” wall console.

-If the “lock” feature will be used, you need to connect the Skylink® GT-100R in parallel with the Genie® Deluxe Wall Console and an additional trans- former (sold separately) is needed. Follow the instructions below:

Parallel Connection


1.

Remove the existing push button by removing


the screws.


2. Remove the 2 screws that secure the wires


on the Genie® wall console.


3.

Connect one end of the extension wires provided

Extension


in this kit to the 2 terminals on the Genie® wall

wires

console, the other end to the 2 terminals on the GT-100R wall console.

Polarity DOES NOT matter.

Note: Do not remove the existing wires from the Genie® wall console.

4. After connecting the 2 wires, the red LED under- neath the push button will be on. The GT-100R is now charging up. The GT-100R will be fully charged when the buzzer emits a beep (approx 10 seconds to 1 minute depending on the brand of garage door opener), the red LED will then flash slowly. The GT-100R is now ready to operate.

5. Mount both w all consoles to the wall with screws.

6. Straighten up the antenna on the GT-100R.

7. Plug in the transformer (sold separately) to Skylink® GT-100R. (For Genie® Deluxe Wall Console only)

Rating of the transformer: 12V DC, 100mA

Diameter of DC plug : 3.5mm

Multi-Function Wall Console – Other Brands

For brands other than Chamberlain®, Lift-Master®, Sears Craftsman® and Genie®, the Skylink® GT-100R should be installed in parallel with the original Multi-Function Wall Console. Refer to “Parallel Connection” under Genie® Deluxe Wall Console.

Page 1
Image 1
SkyLink Keyless Entry System manual Model GT-115, Garage OneTM, Introduction, Installation

GT-115, Keyless Entry System specifications

SkyLink GT-115 is an advanced keyless entry system designed to enhance convenience, security, and accessibility for a variety of vehicles. With the increasing need for smarter and safer access solutions, the GT-115 stands out due to its innovative features and robust technology.

One of the main features of the SkyLink GT-115 is the keyless entry mechanism, which enables users to lock and unlock their vehicles without the need for traditional keys. This system relies on advanced RFID technology, allowing users to access their vehicles effortlessly with a simple touch of a button on a remote control or smartphone. The added convenience eliminates the hassle of fumbling for keys, especially in adverse weather conditions or when carrying multiple items.

The GT-115 also boasts a user-friendly installation process. It is designed to be compatible with a wide range of vehicles, making it suitable for various makes and models. The system comes with comprehensive instructions and all necessary hardware, ensuring that users can set it up quickly and efficiently, whether they are professional installers or DIY enthusiasts.

Security is a top priority for the SkyLink GT-115. The system utilizes encrypted signals to prevent unauthorized access and potential hacking attempts. Additionally, it includes a built-in alarm function that can deter thieves and alert the vehicle owner in case of any suspicious activity. This feature adds an extra layer of protection, giving users peace of mind regarding the safety of their vehicles.

Another notable characteristic of the SkyLink GT-115 is its durable construction. Designed to withstand harsh environmental conditions, the components are rugged and resistant to wear and tear. This durability ensures long-lasting performance, even in the most demanding situations.

Moreover, the GT-115 is equipped with a battery-saving mode that prolongs the life of the remote control. This thoughtful feature ensures that users can enjoy the system without frequent battery replacements, adding to the overall efficiency of the device.

In summary, the SkyLink GT-115 keyless entry system combines convenience, security, and durability in one package. With its advanced features, user-friendly installation, and emphasis on safety, it represents a significant advancement in automotive access technology, making it an ideal choice for modern vehicle owners seeking to enhance their driving experience.