Maintenance

!

WARNING


!


DO NOT attempt any maintenance, adjustments or service


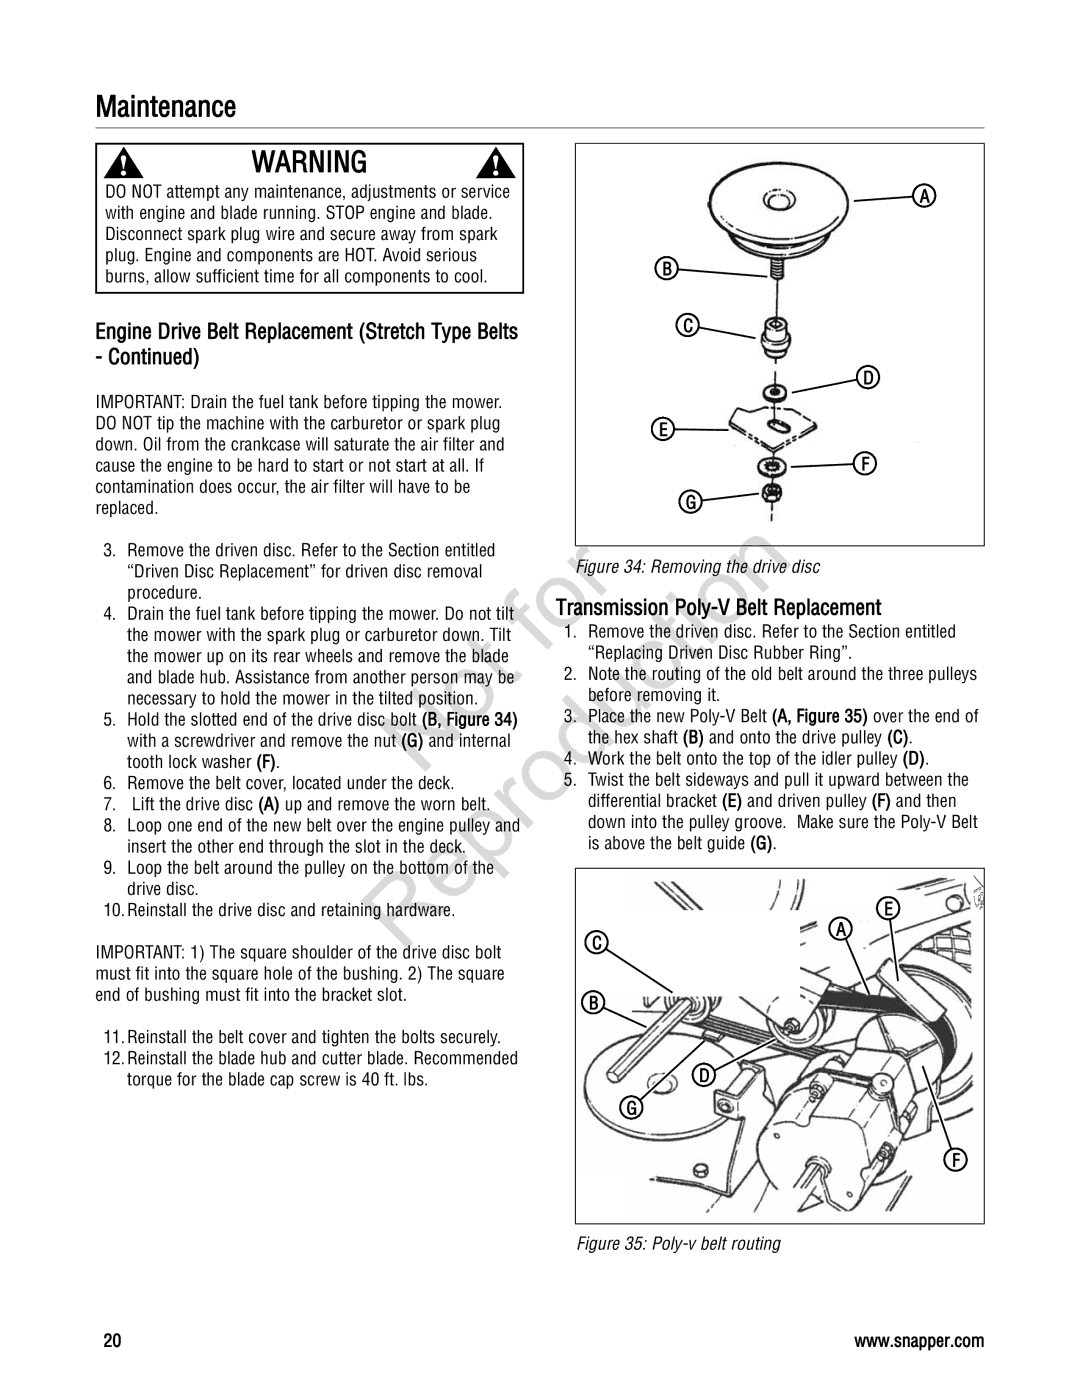
A


with engine and blade running. STOP engine and blade.


Disconnect spark plug wire and secure away from spark


plug. Engine and components are HOT. Avoid serious


B


burns, allow sufficient time for all components to cool.


C


Engine Drive Belt Replacement (Stretch Type Belts


- Continued)


D


IMPORTANT: Drain the fuel tank before tipping the mower.


DO NOT tip the machine with the carburetor or spark plug


E


down. Oil from the crankcase will saturate the air filter and


F


cause the engine to be hard to start or not start at all. If


contamination does occur, the air filter will have to be


G


replaced.


Reproduction


3. Remove the driven disc. Refer to the Section entitled


Figu e 34: Removi g the drive disc

“Driven Disc Replacement” for driven disc removal


procedure.


Transmiss on P ly-V Belt Replacement

4. Drain the fuel tank before tipping the mower. Do not tilt

the mower with the spark plug or carburetor down. Tilt

1. Remove he dr ven disc. Refer to the Section entitled

the mower up on its rear wheels and remove

he blade


“Repla ing Driven Disc Rubber Ring”.

and blade hub. Assistance from another pers

n may be

2. Note the routing of the old belt around the three pulleys

necessary to hold the mower in the tilted p siti n.


before removing it.

5. Hold the slotted end of the drive disc b lt (B, Figure 34)

3. Place the new Poly-V Belt (A, Figure 35) over the end of

with a screwdriver and remove the nut (G) and internal


the hex shaft (B) and onto the drive pulley (C).

tooth lock washer (F).


4. Work the belt onto the top of the idler pulley (D).

6. Remove the belt cover, located under the deck.

5. Twist the belt sideways and pull it upward between the

7. Lift the drive disc (A) up and remove the worn belt.


differential bracket (E) and driven pulley (F) and then

8. Loop one end of the new belt over the engine

ulley and


down into the pulley groove. Make sure the Poly-V Belt

insert the other end through the slot in the

ck.


is above the belt guide (G).

9. Loop the belt around the pulley on the bottom of the


drive disc.

E

10. Reinstall the drive disc and retaining hardware.


A

IMPORTANT: 1) The square shoulder of the drive disc bolt

C


must fit into the square hole of the bushing. 2) The square


end of bushing must fit into the bracket slot.

B


11. Reinstall the belt cover and tighten the bolts securely.


12. Reinstall the blade hub and cutter blade. Recommended

D

torque for the blade cap screw is 40 ft. lbs.

G

F

Figure 35: Poly-v belt routing

20

www.snapper.com

Page 20
Image 20
Snapper 20 manual Transmiss on P ly-V Belt Replacement, Engine Drive Belt Replacement Stretch Type Belts

20 specifications

Snapper 20, an innovative product from Snapper, is designed to revolutionize the way outdoor enthusiasts tackle lawn maintenance and gardening tasks. This versatile machine combines powerful engineering with user-friendly features, making it an ideal choice for both residential and professional use.

One of the standout features of Snapper 20 is its cutting technology. It is equipped with a robust blade system that delivers a clean, even cut, ensuring your lawn maintains a manicured appearance. The adjustable cutting height is another significant aspect, allowing users to customize the length of their grass depending on the season and type of lawn. This feature not only enhances the aesthetic appeal of the lawn but also promotes healthier grass growth.

Its powerful engine is a defining characteristic of the Snapper 20. With a high-performance motor, the machine provides reliable starting every time. Coupled with the efficient fuel system, this ensures that users can complete larger tasks without the need for frequent refueling. Additionally, the engine is designed for fuel efficiency, helping users save on operational costs while being environmentally conscious.

The Snapper 20 also stands out with its lightweight design. Weighing significantly less than many competitors in the market, it is easy to maneuver, reducing fatigue during extended use. This design consideration makes it suitable for various terrains, whether flat lawns or hilly landscapes.

Maintenance is made simple with the Snapper 20. Its tool-free assembly and easy-access components allow users to perform routine checks and necessary repairs without needing extensive mechanical knowledge. This thoughtful design significantly extends the lifespan of the machine and minimizes downtime.

Ergonomics play a crucial role in the Snapper 20 design. The padded handles provide a comfortable grip, while the adjustable height allows users of all sizes to operate the machine with ease. Added features like the foldable handles enhance storage efficiency, making it easy to keep in garages or sheds without taking up too much space.

Additionally, modern technologies such as vibration dampening systems help reduce user fatigue during prolonged use. The Snapper 20 exemplifies a blend of power, efficiency, and ease of use, meeting the demands of today’s lawn care enthusiasts and professionals alike, making it a standout choice in the outdoor power equipment market.