Snapper 2400 Series manual Battery Maintenance, Lubricate Rear Axle Shafts

Models: 2400 Series

1 40
Download 40 pages 32.18 Kb
Page 23
Image 23

BATTERY MAINTENANCE

WARNING

When removing or installing battery cables, disconnect the negative cable FIRST and reconnect it LAST. If not done in this order, the positive terminal can be shorted to the frame by a tool.

Cleaning the Battery and Cables

Service Interval: Every 100 Hours

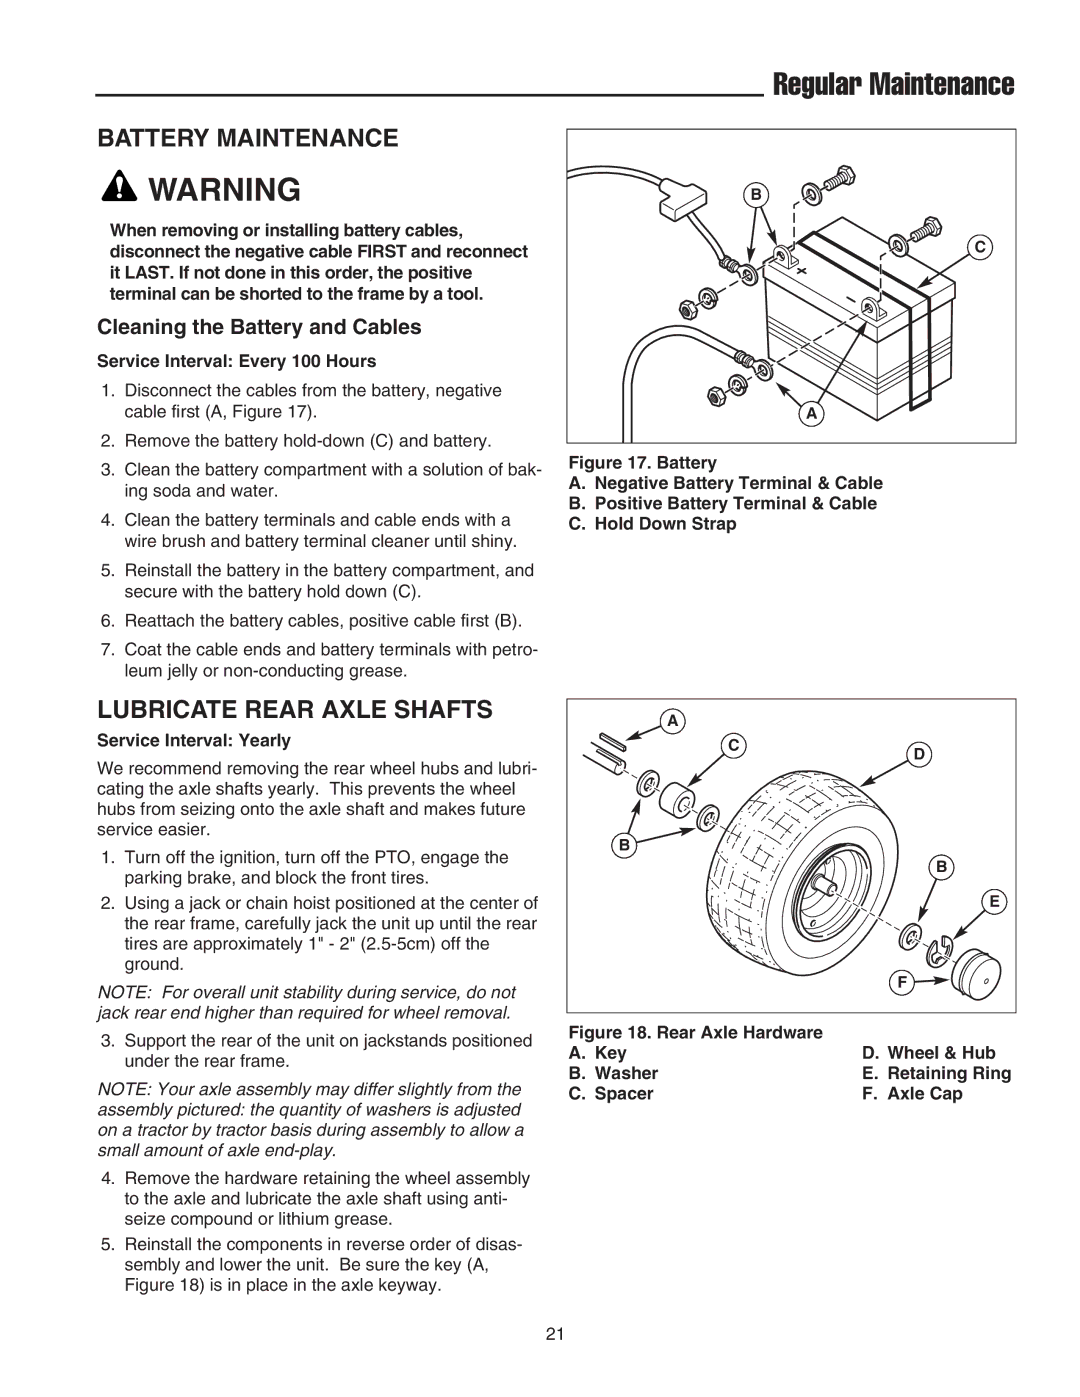
1.Disconnect the cables from the battery, negative cable first (A, Figure 17).

2.Remove the battery hold-down (C) and battery.

3.Clean the battery compartment with a solution of bak- ing soda and water.

4.Clean the battery terminals and cable ends with a wire brush and battery terminal cleaner until shiny.

5.Reinstall the battery in the battery compartment, and secure with the battery hold down (C).

6.Reattach the battery cables, positive cable first (B).

7.Coat the cable ends and battery terminals with petro- leum jelly or non-conducting grease.

LUBRICATE REAR AXLE SHAFTS

Service Interval: Yearly

We recommend removing the rear wheel hubs and lubri- cating the axle shafts yearly. This prevents the wheel hubs from seizing onto the axle shaft and makes future service easier.

1.Turn off the ignition, turn off the PTO, engage the parking brake, and block the front tires.

2.Using a jack or chain hoist positioned at the center of the rear frame, carefully jack the unit up until the rear tires are approximately 1" - 2" (2.5-5cm) off the ground.

NOTE: For overall unit stability during service, do not jack rear end higher than required for wheel removal.

3.Support the rear of the unit on jackstands positioned under the rear frame.

NOTE: Your axle assembly may differ slightly from the

assembly pictured: the quantity of washers is adjusted on a tractor by tractor basis during assembly to allow a small amount of axle end-play.

4.Remove the hardware retaining the wheel assembly to the axle and lubricate the axle shaft using anti- seize compound or lithium grease.

5.Reinstall the components in reverse order of disas- sembly and lower the unit. Be sure the key (A, Figure 18) is in place in the axle keyway.

Regular Maintenance

B

C

A

Figure 17. Battery

A.Negative Battery Terminal & Cable

B.Positive Battery Terminal & Cable

C.Hold Down Strap

A


C

D


B


B


E


F

Figure 18. Rear Axle Hardware


A. Key

D. Wheel & Hub

B. Washer

E. Retaining Ring

C. Spacer

F. Axle Cap

21

Page 23
Image 23
Snapper 2400 Series manual Battery Maintenance, Lubricate Rear Axle Shafts, Cleaning the Battery and Cables

2400 Series specifications

The Snapper 2400 Series is a well-engineered line of outdoor power equipment recognized for its robust performance and user-friendly design. Built to deliver outstanding cutting results, this series is suitable for both residential and commercial users who seek reliability and efficiency in their gardening tools.

One of the key features of the Snapper 2400 Series is its powerful engine. Equipped with a high-performance Briggs & Stratton engine, these mowers can handle tough grass and uneven terrains with ease. The reliable starting system eliminates the frustration typical of other models, ensuring that users can get to work quickly and efficiently.

The cutting deck of the Snapper 2400 Series is another highlight. With its innovative design and durable construction, the cutting deck provides a wide mowing path that allows for faster completion of lawn care tasks. The high-quality steel deck is resistant to wear and tear, and its sleek design ensures optimal air flow for a clean cut, further enhancing the mower's performance.

Maneuverability is another standout feature of the Snapper 2400 Series. With features like zero-turn capabilities, users can navigate around trees, flower beds, and other landscape features effortlessly. The ergonomic controls add to the user-friendly experience, making operation smoother and more enjoyable, even for those who may be new to lawn maintenance.

The Snapper 2400 Series is also known for its versatility. Many models within the series offer multiple cutting height adjustments, allowing users to adapt the mower's performance to different grass types and conditions. Furthermore, optional attachments such as mulching kits and baggers provide extra functionality, enabling users to customize their mowing experience.

In terms of durability, the Snapper 2400 Series is built with heavy-duty components that stand up to rigorous use. This quality construction ensures that the products not only perform well but also last longer, offering great value for the investment.

In conclusion, the Snapper 2400 Series combines powerful engines, efficient cutting systems, versatile features, and durable construction, making it a reliable choice for anyone looking for high-quality lawn care equipment. With its emphasis on user experience and performance, the Snapper 2400 Series stands out in its category, appealing to homeowners and professionals alike.