Mower Deck Removal & Installation

Snapper Models

WARNING

Engage parking brake, disengage PTO, stop engine and remove key before attempting to install or remove the mower.

Removing the Mower Deck

1.Park tractor on a hard, level surface such as a concrete floor. Turn off PTO switch and engine, remove the key and apply parking brake.

2.Place mower in the lowest cutting position using the mower height adjuster.

3.Place the attachment lift in the highest position.

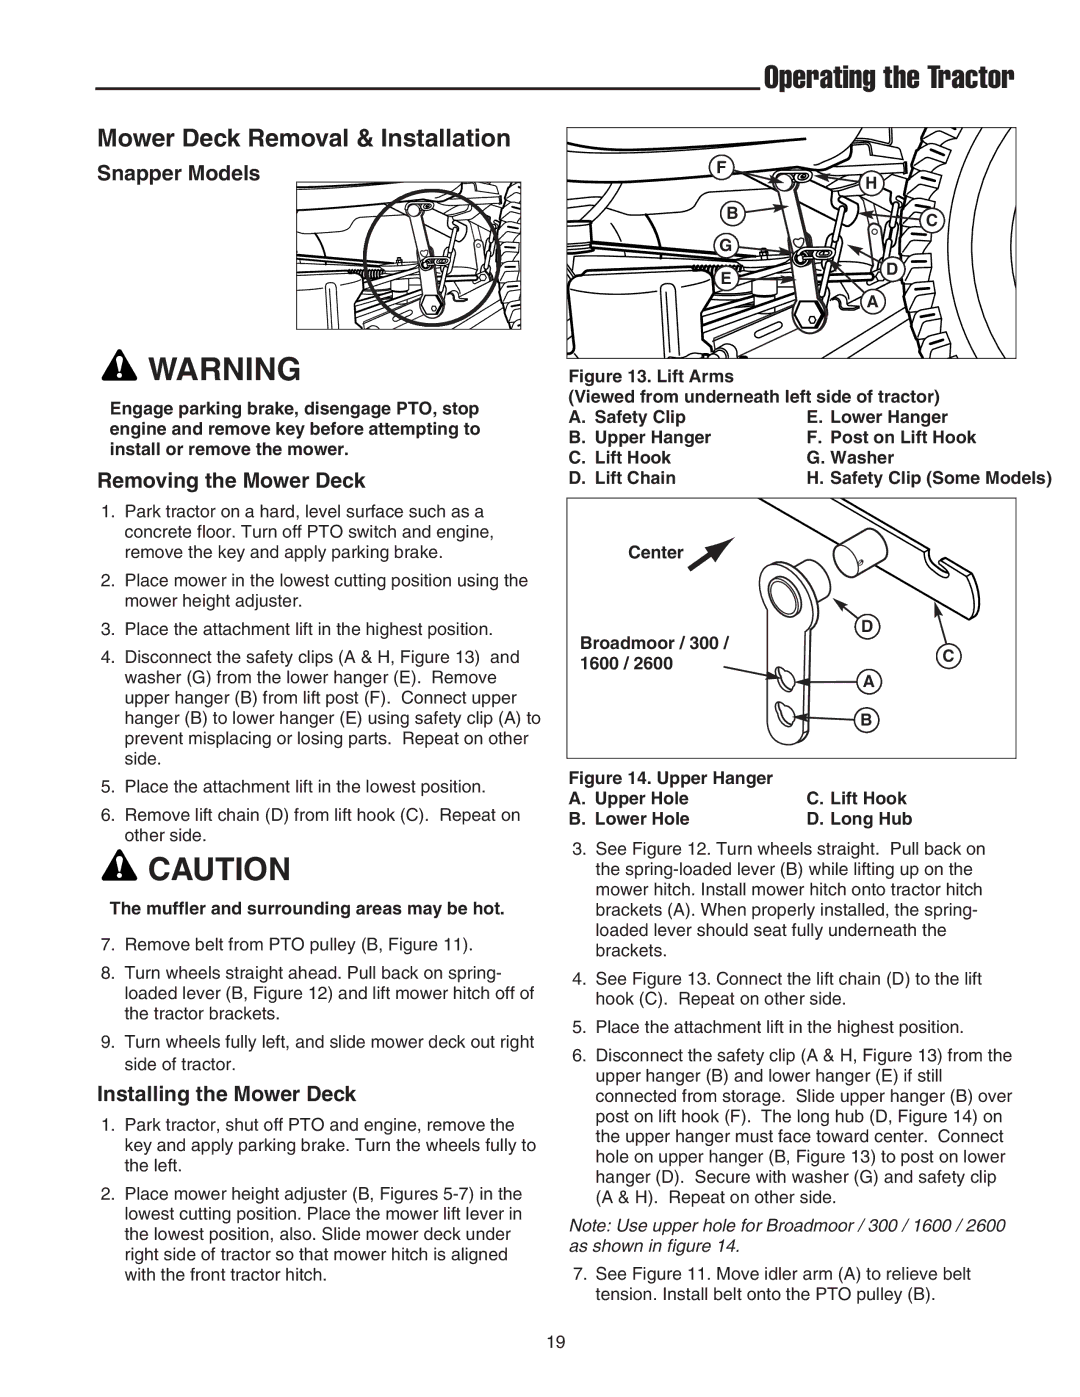
4.Disconnect the safety clips (A & H, Figure 13) and washer (G) from the lower hanger (E). Remove upper hanger (B) from lift post (F). Connect upper hanger (B) to lower hanger (E) using safety clip (A) to prevent misplacing or losing parts. Repeat on other side.

5.Place the attachment lift in the lowest position.

6.Remove lift chain (D) from lift hook (C). Repeat on other side.

CAUTION

The muffler and surrounding areas may be hot.

7.Remove belt from PTO pulley (B, Figure 11).

8.Turn wheels straight ahead. Pull back on spring- loaded lever (B, Figure 12) and lift mower hitch off of the tractor brackets.

9.Turn wheels fully left, and slide mower deck out right side of tractor.

Installing the Mower Deck

1.Park tractor, shut off PTO and engine, remove the key and apply parking brake. Turn the wheels fully to the left.

2.Place mower height adjuster (B, Figures 5-7) in the lowest cutting position. Place the mower lift lever in the lowest position, also. Slide mower deck under right side of tractor so that mower hitch is aligned with the front tractor hitch.

Operating the Tractor

F

H


B

C


G


E

D


A

Figure 13. Lift Arms

(Viewed from underneath left side of tractor)

A. Safety Clip

E. Lower Hanger

B. Upper Hanger

F. Post on Lift Hook

C. Lift Hook

G. Washer

D. Lift Chain

H. Safety Clip (Some Models)

Center

Broadmoor / 300 /

D

C

1600 / 2600

A


B

Figure 14. Upper Hanger


A. Upper Hole

C. Lift Hook

B. Lower Hole

D. Long Hub

3.See Figure 12. Turn wheels straight. Pull back on the spring-loaded lever (B) while lifting up on the mower hitch. Install mower hitch onto tractor hitch brackets (A). When properly installed, the spring- loaded lever should seat fully underneath the brackets.

4.See Figure 13. Connect the lift chain (D) to the lift hook (C). Repeat on other side.

5.Place the attachment lift in the highest position.

6.Disconnect the safety clip (A & H, Figure 13) from the upper hanger (B) and lower hanger (E) if still connected from storage. Slide upper hanger (B) over post on lift hook (F). The long hub (D, Figure 14) on the upper hanger must face toward center. Connect hole on upper hanger (B, Figure 13) to post on lower hanger (D). Secure with washer (G) and safety clip (A & H). Repeat on other side.

Note: Use upper hole for Broadmoor / 300 / 1600 / 2600 as shown in figure 14.

7.See Figure 11. Move idler arm (A) to relieve belt tension. Install belt onto the PTO pulley (B).

19

Page 21
Image 21
Snapper 300 Series, 2600 Series, 1600 Series manual Snapper Models, Upper Hanger Upper Hole Lift Hook Lower Hole Long Hub

300 Series, 1600 Series, 2600 Series specifications

The Snapper brand has long been recognized for its commitment to quality and innovation in outdoor power equipment. Among its remarkable offerings, the Snapper 2600 Series, 1600 Series, and 300 Series stand out for their robust features, advanced technologies, and user-friendly characteristics, making them ideal for both residential and commercial users.

Starting with the Snapper 2600 Series, this line is celebrated for its powerful performance and durability. Equipped with professional-grade engines, the 2600 Series delivers exceptional torque and speed, enabling efficient mowing even in tough conditions. The series boasts a unique adjustable cutting height feature, allowing users to tailor the grass length to their preferences. With its heavy-duty construction and reinforced components, this series is designed to withstand rigorous use, providing longevity and reliability for demanding tasks.

Transitioning to the Snapper 1600 Series, this series is an excellent option for homeowners who seek a combination of performance and ease of use. Featuring lightweight designs and compact sizes, the 1600 Series is ideal for navigating through tight spaces in smaller yards. With innovative technologies such as the Easy Start system, users can enjoy a hassle-free starting experience. Furthermore, the series includes versatile cutting options, giving homeowners the flexibility to achieve a clean, precise cut every time.

Lastly, the Snapper 300 Series caters to users who prioritize technology and innovation. This series incorporates advanced cutting systems that enhance efficiency while reducing clippings left on the lawn. The 300 Series also integrates smart technology, with features such as automatic throttle control and variable speed settings, allowing users to effortlessly adjust performance based on grass conditions. The ergonomic design ensures comfort during extended use, reducing fatigue and enhancing the overall mowing experience.

In summary, the Snapper 2600, 1600, and 300 Series are distinguished by their powerful engines, user-friendly features, and advanced technologies. Whether you are a professional landscaper or a homeowner looking for reliable equipment, Snapper's commitment to performance and innovation ensures that you have the tools you need to maintain a beautiful lawn and garden. With options tailored to various levels of experience and requirements, Snapper continues to be a trusted name in outdoor power equipment.