Regular Maintenance

Battery Maintenance

WARNING

When removing or installing battery cables, disconnect the negative cable FIRST and reconnect it LAST. If not done in this order, the positive terminal can be shorted to the frame by a tool.

Cleaning the Battery and Cables

Service Interval: Every 100 Hours

1.

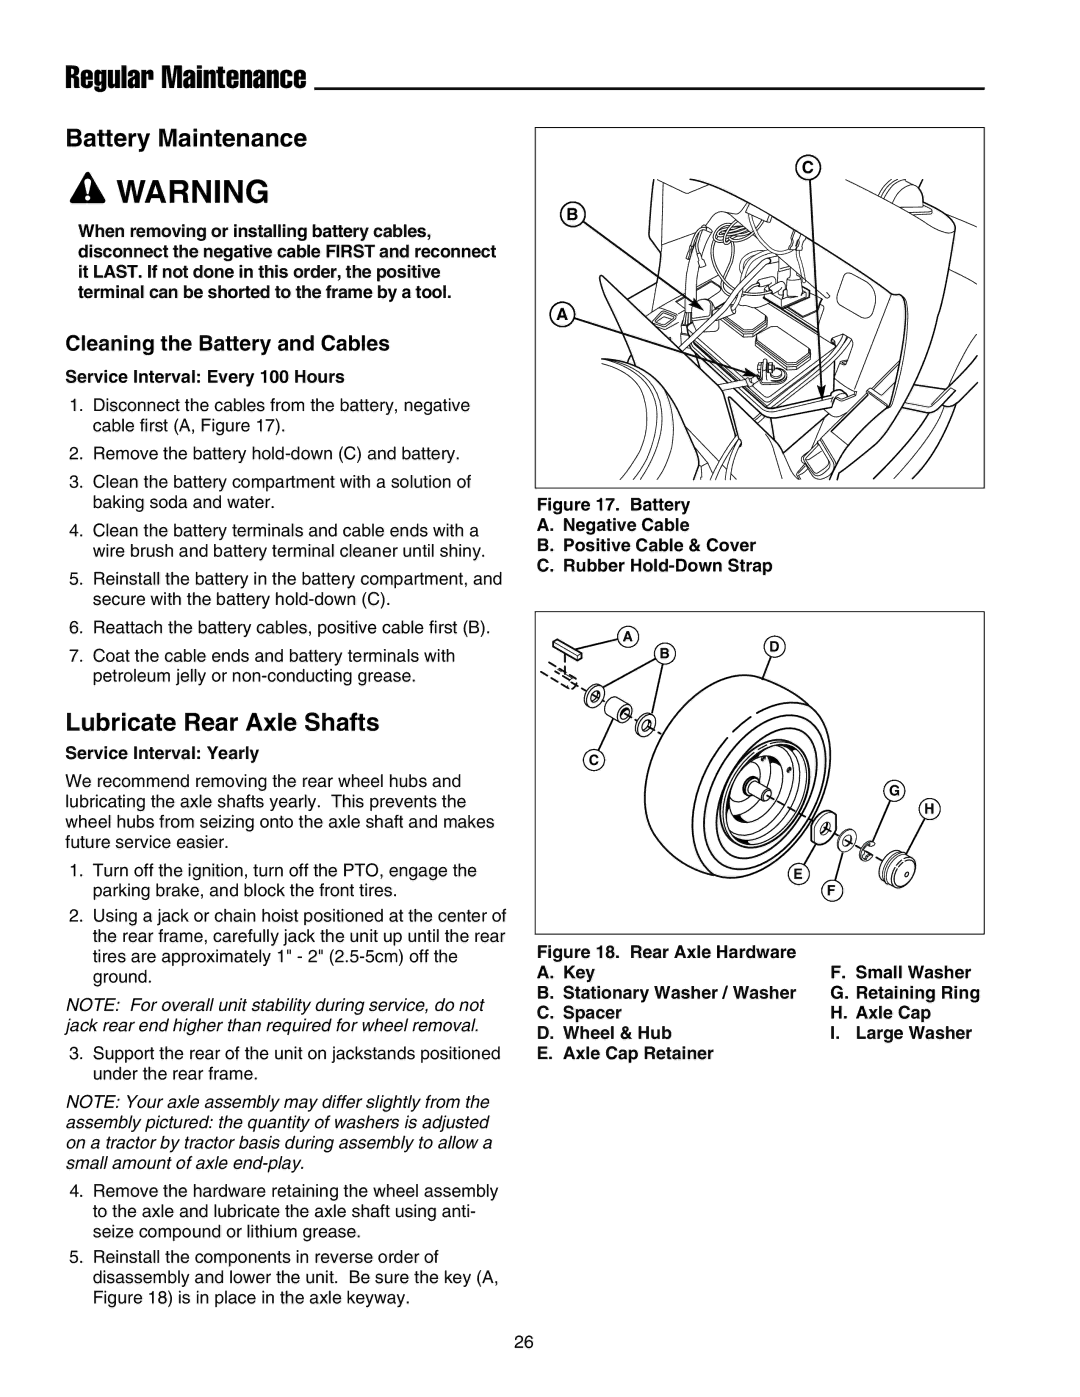
Disconnect the cables from the battery, negative


cable first (A, Figure 17).

2.

Remove the battery hold-down (C) and battery.

3.

Clean the battery compartment with a solution of


baking soda and water.

4.

Clean the battery terminals and cable ends with a


wire brush and battery terminal cleaner until shiny.

5.

Reinstall the battery in the battery compartment, and


secure with the battery hold-down (C).

6.

Reattach the battery cables, positive cable first (B).

C

B

A

Figure 17. Battery

A.Negative Cable

B.Positive Cable & Cover

C.Rubber Hold-Down Strap

7. Coat the cable ends and battery terminals with

petroleum jelly or non-conducting grease.

Lubricate Rear Axle Shafts

Service Interval: Yearly

A

C

BD

We recommend removing the rear wheel hubs and lubricating the axle shafts yearly. This prevents the wheel hubs from seizing onto the axle shaft and makes future service easier.

1.Turn off the ignition, turn off the PTO, engage the parking brake, and block the front tires.

2.Using a jack or chain hoist positioned at the center of the rear frame, carefully jack the unit up until the rear tires are approximately 1" - 2" (2.5-5cm) off the ground.

NOTE: For overall unit stability during service, do not jack rear end higher than required for wheel removal.

3.Support the rear of the unit on jackstands positioned under the rear frame.

NOTE: Your axle assembly may differ slightly from the

assembly pictured: the quantity of washers is adjusted on a tractor by tractor basis during assembly to allow a small amount of axle end-play.

4.Remove the hardware retaining the wheel assembly to the axle and lubricate the axle shaft using anti- seize compound or lithium grease.

5.Reinstall the components in reverse order of disassembly and lower the unit. Be sure the key (A, Figure 18) is in place in the axle keyway.


G


H

E

F


Figure 18. Rear Axle Hardware


A. Key

F. Small Washer

B. Stationary Washer / Washer

G. Retaining Ring

C. Spacer

H. Axle Cap

D. Wheel & Hub

I. Large Washer

E. Axle Cap Retainer


26

Page 28
Image 28
Snapper 2600 Series, 300 Series manual Battery Maintenance, Lubricate Rear Axle Shafts, Cleaning the Battery and Cables

300 Series, 1600 Series, 2600 Series specifications

The Snapper brand has long been recognized for its commitment to quality and innovation in outdoor power equipment. Among its remarkable offerings, the Snapper 2600 Series, 1600 Series, and 300 Series stand out for their robust features, advanced technologies, and user-friendly characteristics, making them ideal for both residential and commercial users.

Starting with the Snapper 2600 Series, this line is celebrated for its powerful performance and durability. Equipped with professional-grade engines, the 2600 Series delivers exceptional torque and speed, enabling efficient mowing even in tough conditions. The series boasts a unique adjustable cutting height feature, allowing users to tailor the grass length to their preferences. With its heavy-duty construction and reinforced components, this series is designed to withstand rigorous use, providing longevity and reliability for demanding tasks.

Transitioning to the Snapper 1600 Series, this series is an excellent option for homeowners who seek a combination of performance and ease of use. Featuring lightweight designs and compact sizes, the 1600 Series is ideal for navigating through tight spaces in smaller yards. With innovative technologies such as the Easy Start system, users can enjoy a hassle-free starting experience. Furthermore, the series includes versatile cutting options, giving homeowners the flexibility to achieve a clean, precise cut every time.

Lastly, the Snapper 300 Series caters to users who prioritize technology and innovation. This series incorporates advanced cutting systems that enhance efficiency while reducing clippings left on the lawn. The 300 Series also integrates smart technology, with features such as automatic throttle control and variable speed settings, allowing users to effortlessly adjust performance based on grass conditions. The ergonomic design ensures comfort during extended use, reducing fatigue and enhancing the overall mowing experience.

In summary, the Snapper 2600, 1600, and 300 Series are distinguished by their powerful engines, user-friendly features, and advanced technologies. Whether you are a professional landscaper or a homeowner looking for reliable equipment, Snapper's commitment to performance and innovation ensures that you have the tools you need to maintain a beautiful lawn and garden. With options tailored to various levels of experience and requirements, Snapper continues to be a trusted name in outdoor power equipment.