DRIVE BELT ADJUSTMENT (Continued)

If the auger drive slips (auger slows or doesn't rotate nor- mally while blowing snow), or stays engaged when the control is disengaged — and the auger clutch cable has been properly adjusted — the auger drive belt may be out of adjustment.

WARNING

Auger must NOT rotate unless the Auger Control lever has been depressed. Proper Auger Drive Belt adjustments stop the auger within 5 seconds after the Auger Control is disengaged.

Checking Auger Belt & Belt Guide Adjustments

1.Insert the engine key and start the snowthrower.

2.Engage and disengage the auger control a series of ten times, checking that the auger comes to a com- plete stop within 5 seconds after the control is disen- gaged each time.

3.If the auger comes to a complete stop each time with- in 5 seconds, the adjustment is correct. If the auger does NOT come to a complete stop within the neces- sary 5 seconds, the adjustment is incorrect: readjust- ing the auger belt & belt guide according to the pro- cedures below.

Adjusting Auger Drive Belt

1.Make certain that the snowthrower is off, the engine key has been removed, and the spark plug discon- nected.

Adjustments

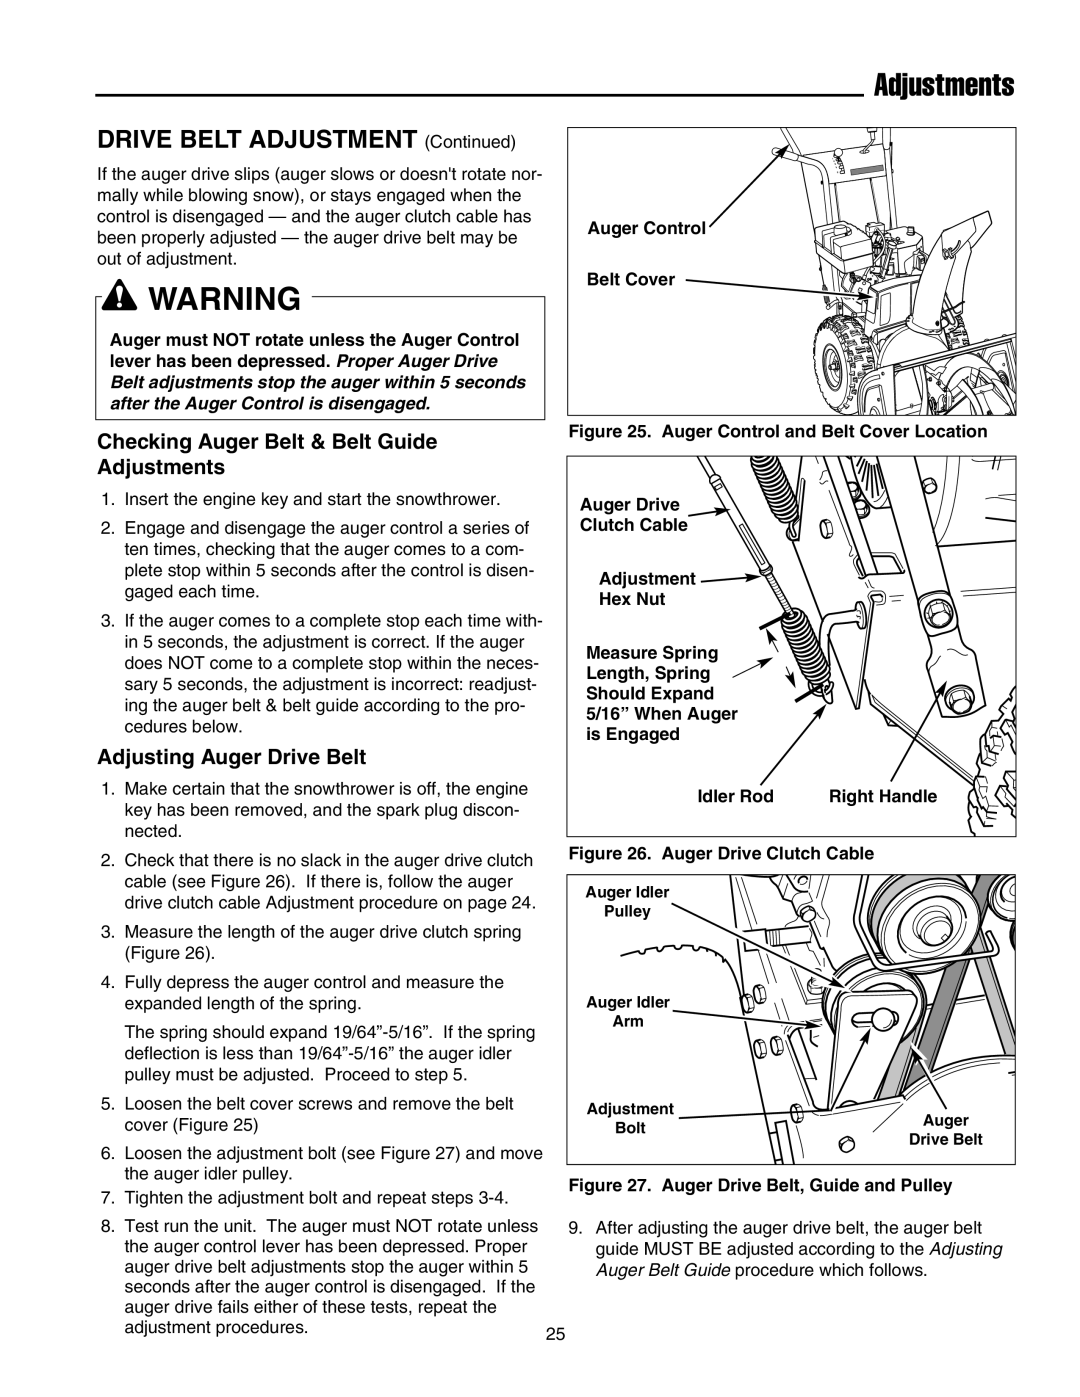
Auger Control

Belt Cover

Figure 25. Auger Control and Belt Cover Location

Auger Drive

Clutch Cable

Adjustment

Hex Nut

Measure Spring Length, Spring Should Expand 5/16” When Auger is Engaged

Idler Rod

Right Handle

2.Check that there is no slack in the auger drive clutch cable (see Figure 26). If there is, follow the auger drive clutch cable Adjustment procedure on page 24.

3.Measure the length of the auger drive clutch spring (Figure 26).

4.Fully depress the auger control and measure the expanded length of the spring.

The spring should expand 19/64”-5/16”. If the spring deflection is less than 19/64”-5/16” the auger idler pulley must be adjusted. Proceed to step 5.

5.Loosen the belt cover screws and remove the belt cover (Figure 25)

6.Loosen the adjustment bolt (see Figure 27) and move the auger idler pulley.

7.Tighten the adjustment bolt and repeat steps 3-4.

8.Test run the unit. The auger must NOT rotate unless the auger control lever has been depressed. Proper auger drive belt adjustments stop the auger within 5 seconds after the auger control is disengaged. If the auger drive fails either of these tests, repeat the adjustment procedures.

Figure 26. Auger Drive Clutch Cable

Auger Idler


Pulley


Auger Idler


Arm


Adjustment

Auger

Bolt

Drive Belt


Figure 27. Auger Drive Belt, Guide and Pulley

9.After adjusting the auger drive belt, the auger belt guide MUST BE adjusted according to the Adjusting Auger Belt Guide procedure which follows.

25

Page 26
Image 26
Snapper 555 manual Checking Auger Belt & Belt Guide Adjustments, Adjusting Auger Drive Belt

555, 555M, 555M, 15225, E15225, 18245E, E18245, 860E, 860M specifications

Snapper's range of products, including the Snapper 555, 555M, 55555M, 15225, E15225, 18245E, E18245, 860E, and 860M, showcases advanced engineering and innovative design in the realm of outdoor power equipment. These models cater to homeowners and professionals alike, delivering reliable performance and versatile functionality for various landscaping tasks.

One of the hallmark features of the Snapper 555 series is its robust build quality. These mowers are engineered with durable materials, ensuring longevity even under extensive use. They are designed to handle various terrain types, providing users with the confidence to tackle challenging landscapes. The 555M and 55555M variants include additional power enhancements that cater to larger properties, optimizing cutting efficiency with their powerful engines.

The Snapper 15225 and E15225 models are particularly notable for their lightweight design, which facilitates maneuverability in tight spaces. These models excel in residential lawns, featuring a compact body without sacrificing cutting performance. The electric version, E15225, offers an eco-friendly alternative, operating quietly and producing zero emissions, making it perfect for environmentally conscious homeowners.

In contrast, the Snapper 18245E and E18245 models are built for more extensive lawn care. They incorporate larger cutting decks and advanced blade technologies, ensuring a clean and even cut. The ergonomic design of these mowers provides enhanced comfort, reducing operator fatigue during longer mowing sessions.

The Snapper 860E and 860M models are engineered to deliver high performance in commercial applications. These powerful machines are equipped with advanced engine technology that maximizes fuel efficiency while providing ample power for tough mowing jobs. Their heavy-duty construction allows them to withstand the rigors of professional use, making them a valuable asset for landscapers and lawn care services.

Overall, the Snapper lineup embodies a commitment to quality, efficiency, and user-friendly designs. Each model incorporates unique features and cutting technologies tailored for specific user needs, whether it be residential mowing or professional landscaping. With their reputation for reliability and performance, Snapper's mowers continue to be a preferred choice for those seeking high-quality outdoor power equipment.