Mower Blade Replacement

!

WARNING

!

3. Remove the blade (B, Figure 16).


DO NOT attempt any maintenance, adjustments or service

Make sure that

with engine and blade running. STOP engine and blade.

blade hub is seated

Disconnect spark plug wire and secure away from spark

between flanges

plug. Engine and components are HOT. Avoid serious


burns, allow sufficient time for all components to cool.

A

Wear heavy leather gloves when handling or working


around cutting blades. Blades are extremely sharp and can

C

cause severe injury.


Standard Blade Wear Limit

B


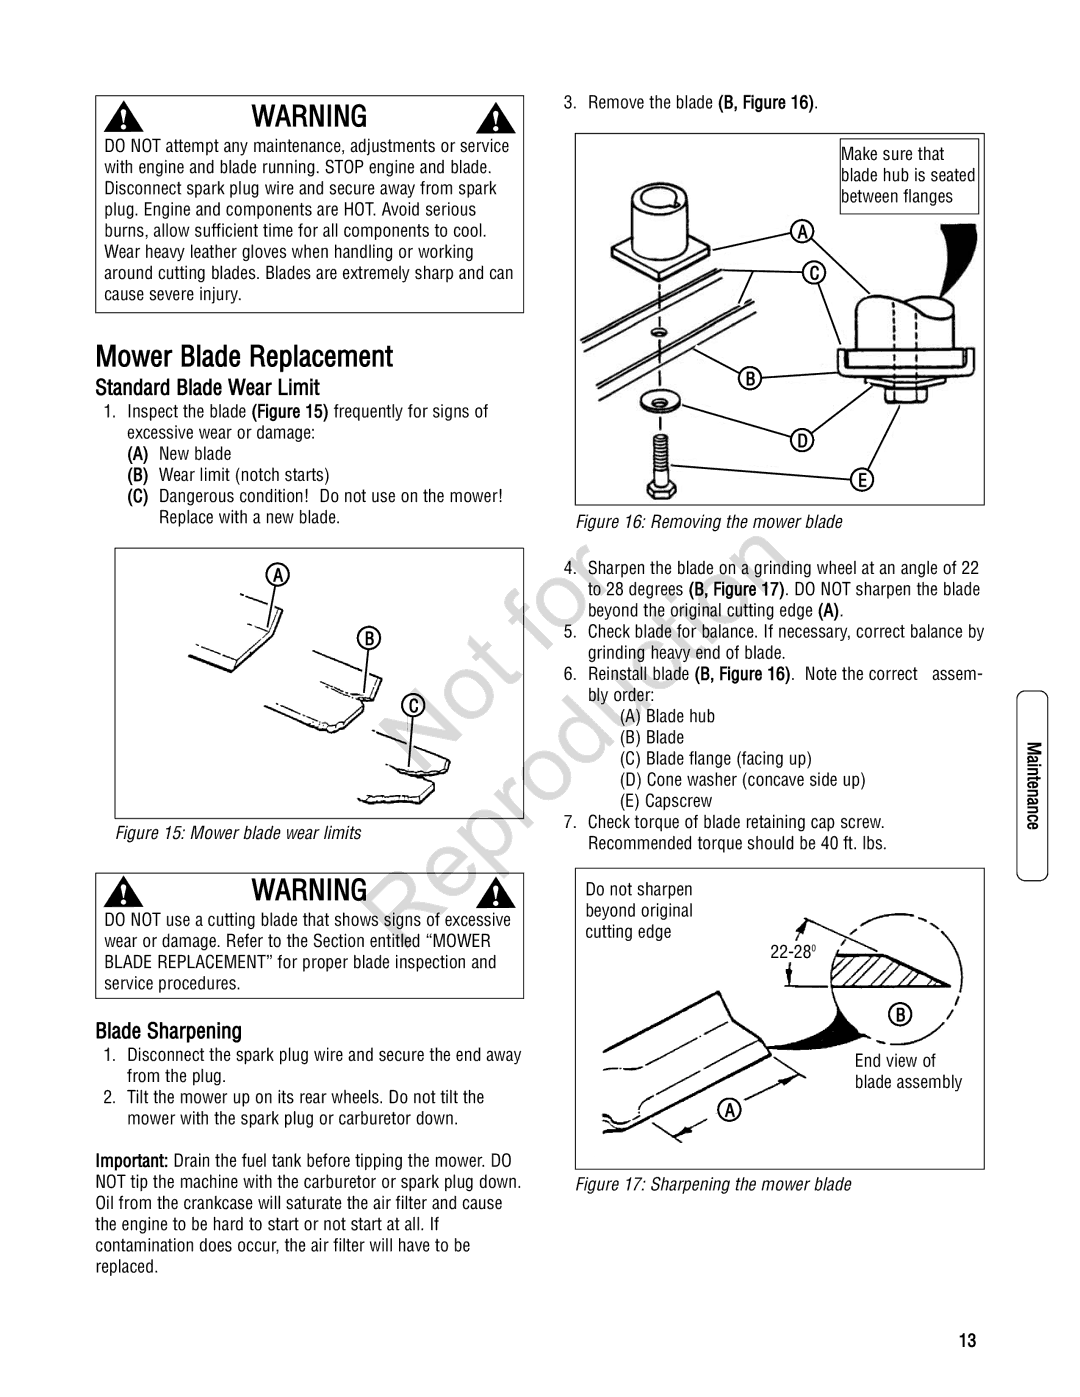
1. Inspect the blade (Figure 15) frequently for signs of


excessive wear or damage:


D


(A)

New blade


(B)

Wear limit (notch starts)


E


(C)

Dangerous condition! Do not use on the mower!


Replace with a new blade.


Figure 16: Removing the mower blade


A


4.

Sha pen the blade

a gri ding wheel at an angle of 22


to 28 degrees (B, Figure 17). DO NOT sharpen the blade


beyond he r g nal cutting edge (A).


B

5. Check blade f balance. If necessary, correct balance by


grinding heavy end of blade.


6.

Reinstall blade (B, Figure 16). Note the correct

assem-


C


bly order:


(A) Blade hub


(B) Blade


(C) Blade flange (facing up)


(D) Cone washer (concave side up)


(E) Capscrew


Figure 15: Mower blade wear limits


7. Check torque of blade retaining cap screw.


Recommended torque should be 40 ft. lbs.


!

WARNING

!


Do not sharpen


beyond original


DO NOT use a cutting blade that shows signs of excessive


cutting edge


wear or damage. Refer to the Section entitled “MOWER


22-280


BLADE REPLACEMENT” for proper blade inspection and


service procedures.

Reproduction


Blade Sharpening


B


1. Disconnect the spark plug wire and secure the end away


End view of

from the plug.


blade assembly

2. Tilt the mower up on its rear wheels. Do not tilt the


A


mower with the spark plug or carburetor down.


Important: Drain the fuel tank before tipping the mower. DO

NOT tip the machine with the carburetor or spark plug down. Figure 17: Sharpening the mower blade Oil from the crankcase will saturate the air filter and cause

the engine to be hard to start or not start at all. If contamination does occur, the air filter will have to be replaced.

Maintenance

13

Page 13
Image 13
Snapper 7800179, 7800195, 7800231, 7800232 specifications Standard Blade Wear Limit, Blade Sharpening

7800232, 7800179, 7800195, 7800231 specifications

The Snapper 7800 series, including models 7800231, 7800195, 7800179, and 7800232, represents a collection of high-performance lawn care equipment designed to meet the diverse needs of homeowners and professional landscapers alike. Each model in this series features unique specifications and characteristics that cater to various lawn care tasks.

One of the standout features of the Snapper 7800 series is its powerful engine options. These mowers are equipped with 8.75 to 7.25 ft-lb torque Briggs & Stratton engines that ensure reliable and consistent performance. With an emphasis on durability and ease of use, these engines provide ample power to tackle tough grass conditions while requiring less maintenance.

In terms of cutting technology, Snapper is known for its innovative design and user-friendly features. The 7800231 and 7800232 models, for instance, are equipped with the patented Compact Rear Discharge technology that allows for efficient grass clipping management. This feature ensures that clippings are evenly distributed, promoting a healthier lawn while minimizing cleanup time. Additionally, the 7800195 and 7800179 models offer side discharge as well as mulching options, giving users the flexibility to choose the best mowing style for their needs.

Comfort and ergonomics are also key aspects of the Snapper 7800 series. Each model is designed with adjustable handles and a comfortable grip, allowing for extended use without fatigue. The mowers are also lightweight and easily maneuverable, making them ideal for navigating around obstacles and tight spaces in your yard.

Safety features are prevalent in the Snapper 7800 series as well. With a built-in safety key and operator presence control, these mowers provide peace of mind, ensuring that the engine will stop if the user releases the handle. This important safety feature minimizes the risk of accidents, especially in busy residential areas or when children are nearby.

Moreover, the Snapper 7800 series is engineered with high-quality materials to provide longevity and durability. With a robust steel deck and weather-resistant components, these mowers are built to withstand the rigors of regular use in various weather conditions.

In summary, the Snapper 7800 series, including the models 7800231, 7800195, 7800179, and 7800232, offers a combination of power, versatility, and user-friendly design. Whether you are a homeowner looking to maintain a well-manicured lawn or a professional landscaper needing reliable equipment, the Snapper 7800 series stands out with its advanced technologies, ergonomic features, and commitment to safety and performance.