Maintenance

!

WARNING


!


Battery Testing


Check the battery’s state of charge using a voltmeter.


DO NOT attempt any maintenance, adjustments or service


Remember to hook the positive lead to the battery’s positive

with engine and blade running. STOP engine and blade.


terminal, and the negative lead to the negative terminal.


Disconnect spark plug wire and secure away from spark


Check the reading against the chart below. If the voltage

plug. Engine and components are HOT. Avoid serious


reads less than 12.80 volts, charge the battery. Refer to the

burns, allow sufficient time for all components to cool.


Section entitled “Battery Charging”.


Battery Service


Battery Condition


New Battery Preparation


State of Charge


Digital Voltmeter


1. Remove the battery from the carton.


100% Charged


12.80v


2. Place the battery in a well ventilated area on a level


75% Charged


12.40v


non-concrete surface.


50% Charged


12.10v


3. Test the battery. Refer to the Section entitled “Battery


Testing”. If the battery needs charging, charge the


25% Charged


11.90v


battery. Refer to the Section entitled “Battery Charging”.


0% Charged


Less than 11.80v


4. Connect the positive (+) lead (red) first, from the battery


harness to the positive terminal (+) on the battery using


Battery Charging


the bolt and nut plate supplied with the battery. Connect


the negative (-) lead (black) last, to the negative terminal


To charge the battery:


Reproduction


(-) on the battery using the bolt and nut plate. Apply a


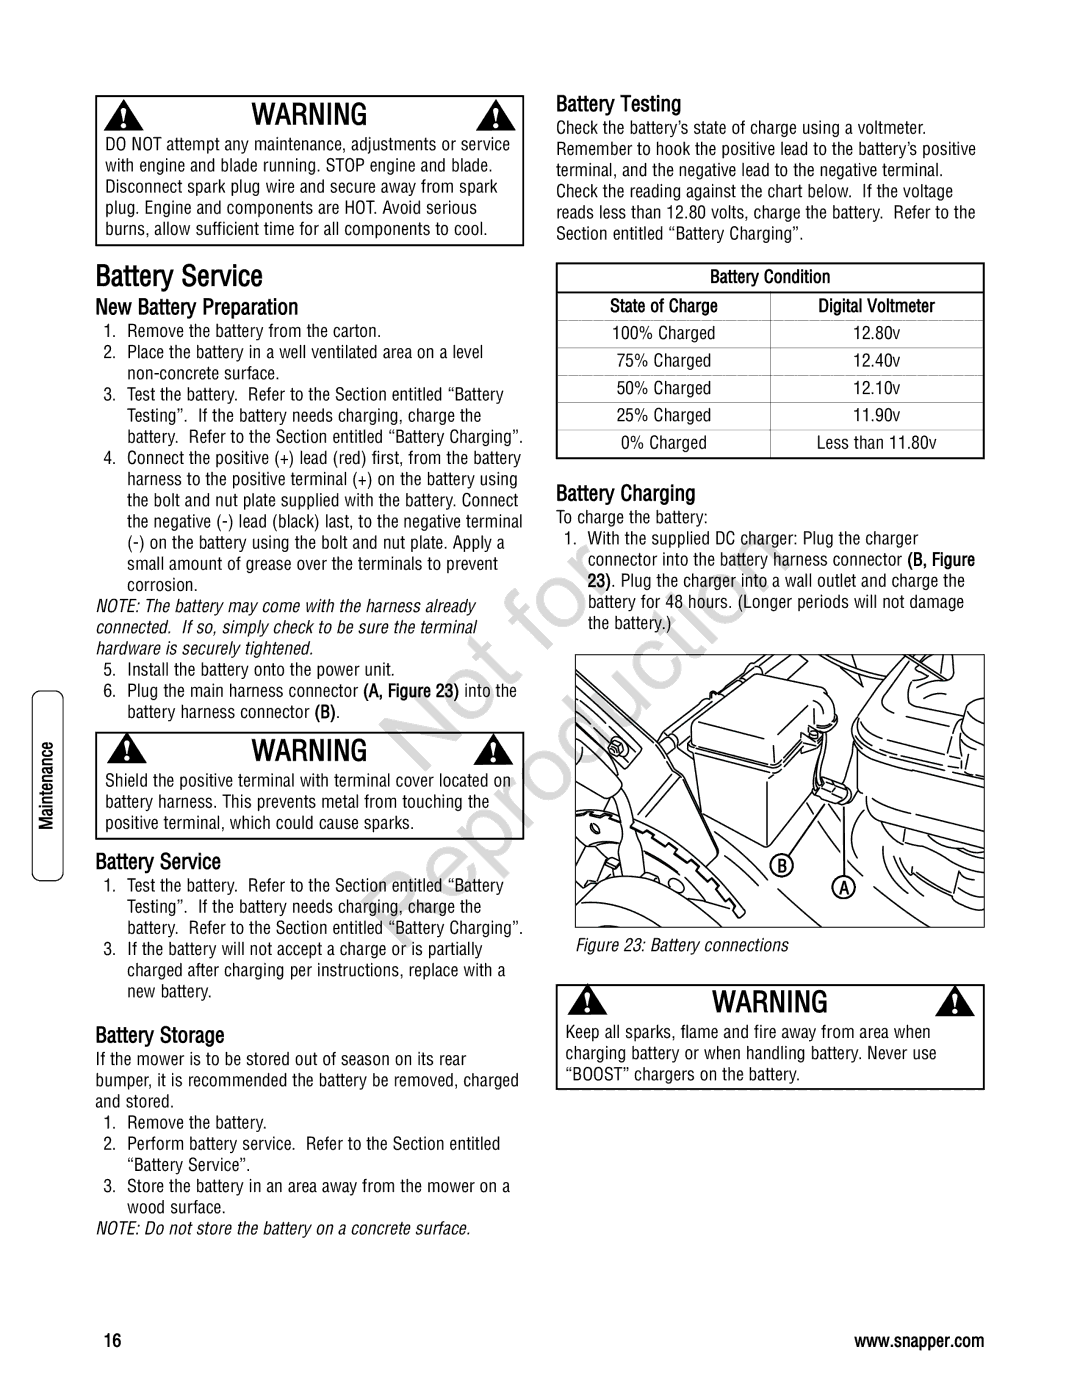
1. With the supplied DC charger: Plug the charger


small amount of grease over the terminals to prevent


connector into the battery harness connector (B, Figure

corrosion.


23). Plug the charger i

to a wall outlet and charge the

NOTE: The battery may come with the harness already


battery for 48 h

urs. (L

nger periods will not damage

connected. If so, simply check to be sure the terminal


the ba ery.)


hardware is securely tightened.


5. Install the battery onto the power unit.


6. Plug the main harness connector (A, Figure 23) in

he


battery harness connector (B).


!

WARNING


!


Shield the positive terminal with terminal cover located


battery harness. This prevents metal from touching the


positive terminal, which could cause sparks.


Battery Service


B


1. Test the battery. Refer to the Section ntitl “Battery


A


Testing”. If the battery needs charging, charge the


battery. Refer to the Section entitled “Battery Charging”.


Figure 23: Battery connections


3. If the battery will not accept a charge or is partially


charged after charging per instructions, replace with a


new battery.


!

WARNING

!


Battery Storage


Keep all sparks, flame and fire away from area when


If the mower is to be stored out of season on its rear


charging battery or when handling battery. Never use


“BOOST” chargers on the battery.


bumper, it is recommended the battery be removed, charged


and stored.


1.Remove the battery.

2.Perform battery service. Refer to the Section entitled “Battery Service”.

3.Store the battery in an area away from the mower on a

wood surface.

NOTE: Do not store the battery on a concrete surface.

16

www.snapper.com

Page 16
Image 16
Snapper 7800195, 7800179, 7800231, 7800232 Battery Service, New Battery Preparation, Battery Testing, Battery Storage

7800232, 7800179, 7800195, 7800231 specifications

The Snapper 7800 series, including models 7800231, 7800195, 7800179, and 7800232, represents a collection of high-performance lawn care equipment designed to meet the diverse needs of homeowners and professional landscapers alike. Each model in this series features unique specifications and characteristics that cater to various lawn care tasks.

One of the standout features of the Snapper 7800 series is its powerful engine options. These mowers are equipped with 8.75 to 7.25 ft-lb torque Briggs & Stratton engines that ensure reliable and consistent performance. With an emphasis on durability and ease of use, these engines provide ample power to tackle tough grass conditions while requiring less maintenance.

In terms of cutting technology, Snapper is known for its innovative design and user-friendly features. The 7800231 and 7800232 models, for instance, are equipped with the patented Compact Rear Discharge technology that allows for efficient grass clipping management. This feature ensures that clippings are evenly distributed, promoting a healthier lawn while minimizing cleanup time. Additionally, the 7800195 and 7800179 models offer side discharge as well as mulching options, giving users the flexibility to choose the best mowing style for their needs.

Comfort and ergonomics are also key aspects of the Snapper 7800 series. Each model is designed with adjustable handles and a comfortable grip, allowing for extended use without fatigue. The mowers are also lightweight and easily maneuverable, making them ideal for navigating around obstacles and tight spaces in your yard.

Safety features are prevalent in the Snapper 7800 series as well. With a built-in safety key and operator presence control, these mowers provide peace of mind, ensuring that the engine will stop if the user releases the handle. This important safety feature minimizes the risk of accidents, especially in busy residential areas or when children are nearby.

Moreover, the Snapper 7800 series is engineered with high-quality materials to provide longevity and durability. With a robust steel deck and weather-resistant components, these mowers are built to withstand the rigors of regular use in various weather conditions.

In summary, the Snapper 7800 series, including the models 7800231, 7800195, 7800179, and 7800232, offers a combination of power, versatility, and user-friendly design. Whether you are a homeowner looking to maintain a well-manicured lawn or a professional landscaper needing reliable equipment, the Snapper 7800 series stands out with its advanced technologies, ergonomic features, and commitment to safety and performance.