Section 4 - ADJUSTMENT & REPAIR

4.5BATTERY

4.5.1. BATTERY REMOVAL

1.Raise operator's seat.

2.Remove the two adjusting knobs.

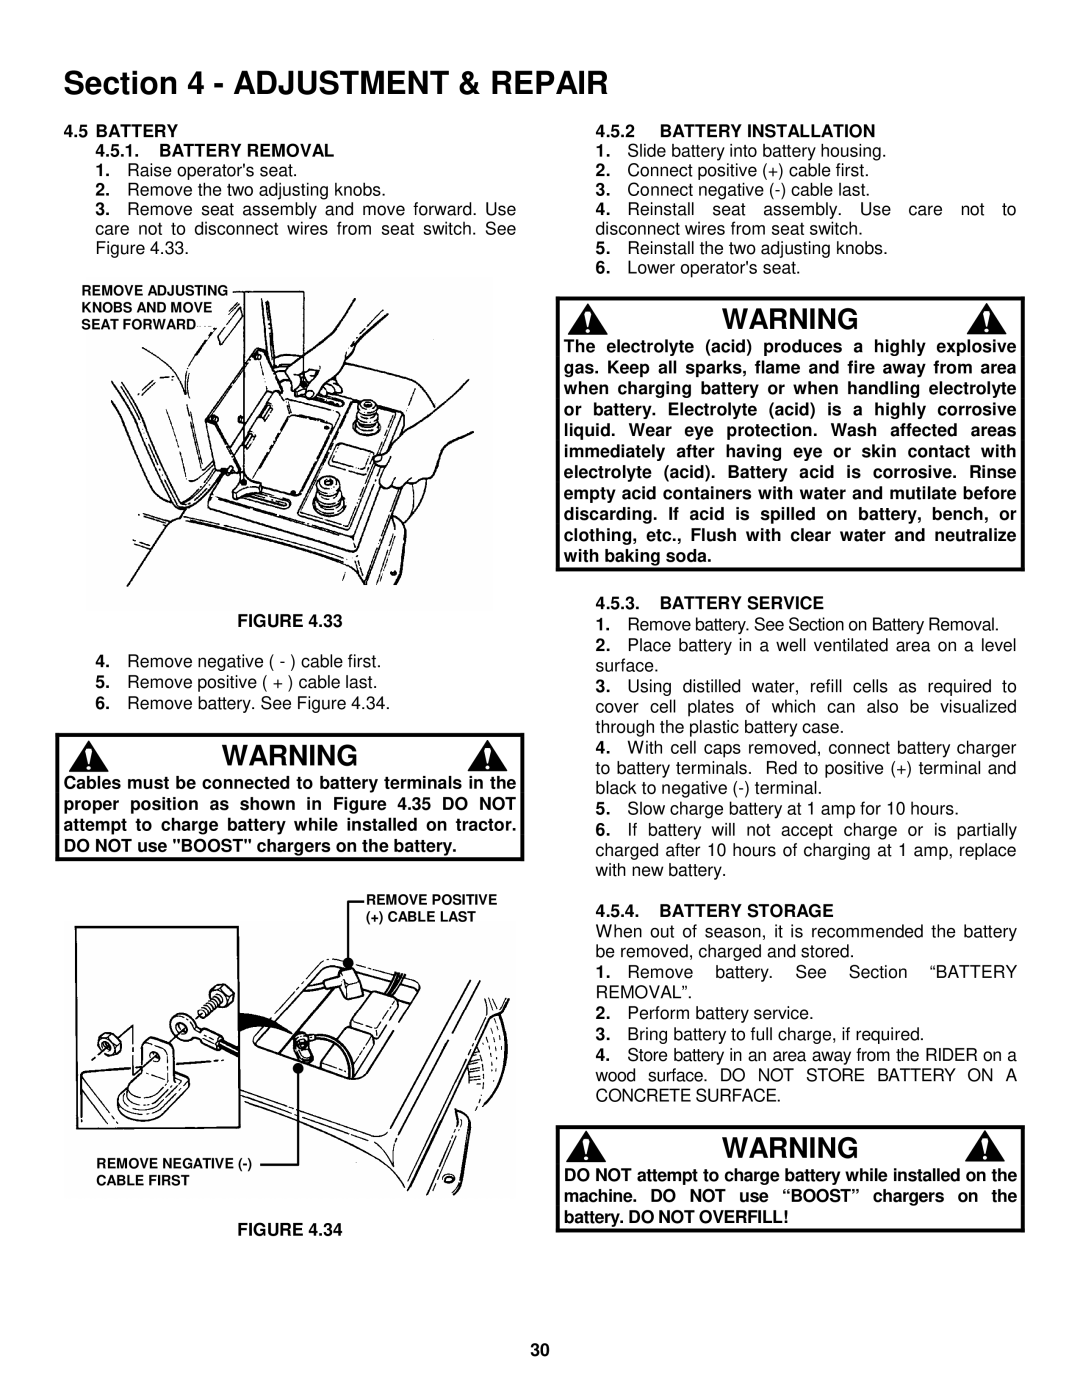
3.Remove seat assembly and move forward. Use care not to disconnect wires from seat switch. See Figure 4.33.

REMOVE ADJUSTING

KNOBS AND MOVE

SEAT FORWARD

FIGURE 4.33

4.Remove negative ( - ) cable first.

5.Remove positive ( + ) cable last.

6.Remove battery. See Figure 4.34.

WARNING

Cables must be connected to battery terminals in the proper position as shown in Figure 4.35 DO NOT attempt to charge battery while installed on tractor. DO NOT use "BOOST" chargers on the battery.

REMOVE POSITIVE

(+) CABLE LAST

REMOVE NEGATIVE (-)

CABLE FIRST

FIGURE 4.34

4.5.2BATTERY INSTALLATION

1.Slide battery into battery housing.

2.Connect positive (+) cable first.

3.Connect negative (-) cable last.

4.Reinstall seat assembly. Use care not to disconnect wires from seat switch.

5.Reinstall the two adjusting knobs.

6.Lower operator's seat.

WARNING

The electrolyte (acid) produces a highly explosive gas. Keep all sparks, flame and fire away from area when charging battery or when handling electrolyte or battery. Electrolyte (acid) is a highly corrosive liquid. Wear eye protection. Wash affected areas immediately after having eye or skin contact with electrolyte (acid). Battery acid is corrosive. Rinse empty acid containers with water and mutilate before discarding. If acid is spilled on battery, bench, or clothing, etc., Flush with clear water and neutralize with baking soda.

4.5.3.BATTERY SERVICE

1.Remove battery. See Section on Battery Removal.

2.Place battery in a well ventilated area on a level surface.

3.Using distilled water, refill cells as required to cover cell plates of which can also be visualized through the plastic battery case.

4.With cell caps removed, connect battery charger to battery terminals. Red to positive (+) terminal and black to negative (-) terminal.

5.Slow charge battery at 1 amp for 10 hours.

6.If battery will not accept charge or is partially charged after 10 hours of charging at 1 amp, replace with new battery.

4.5.4.BATTERY STORAGE

When out of season, it is recommended the battery be removed, charged and stored.

1.Remove battery. See Section “BATTERY REMOVAL”.

2.Perform battery service.

3.Bring battery to full charge, if required.

4.Store battery in an area away from the RIDER on a wood surface. DO NOT STORE BATTERY ON A CONCRETE SURFACE.

WARNING

DO NOT attempt to charge battery while installed on the machine. DO NOT use “BOOST” chargers on the battery. DO NOT OVERFILL!

30

Page 29
Image 29
Snapper ELT150H33IBV Battery Battery Removal, Battery Installation, Battery Service, Battery Storage

ELT150H33IBV specifications

The Snapper ELT150H33IBV is a versatile and powerful lawn mower designed to meet the needs of homeowners and landscape professionals alike. With a robust engine and a range of innovative features, this machine ensures efficient grass cutting and exceptional performance across various terrains.

At the heart of the ELT150H33IBV is its reliable 150cc engine, which delivers ample power for tackling even the toughest grasses. This engine is designed for fuel efficiency, allowing users to mow their lawns without frequent refueling stops. The recoil start system ensures that the mower is easy to start, providing convenience for users of all experience levels.

One of the standout features of the Snapper ELT150H33IBV is its 33-inch cutting deck. This compact size allows for easy maneuvering in tight spaces, making it ideal for residential yards with intricate landscaping. The cutting deck is constructed with durable materials that withstand the rigors of regular use while ensuring a high-quality cut.

The mower offers multiple cutting height adjustments, allowing users to customize the height of their grass according to their preferences or lawn care needs. This feature is particularly useful for maintaining different types of grass and ensuring a healthy lawn throughout the mowing season.

In terms of technology, the Snapper ELT150H33IBV incorporates a unique Blade Brake system, which enhances safety by stopping the blade immediately when the user releases the handlebar. This ensures that users can quickly stop mowing without needing to turn off the engine, reducing the risk of accidents. Additionally, the mower is equipped with a reliable drive system that ensures smooth operation and improved traction on various surfaces.

The Snapper ELT150H33IBV is designed with user comfort in mind, featuring adjustable handles for better ergonomics. This reduces fatigue during prolonged use, allowing for a more enjoyable mowing experience. Furthermore, the mower's compact design facilitates easy storage, making it an excellent choice for homeowners with limited space.

Overall, the Snapper ELT150H33IBV combines power, versatility, and user-friendly features to provide a reliable lawn care solution. Its advanced technology and robust construction make it a standout choice for anyone looking to maintain a pristine lawn effortlessly. Whether you're a seasoned gardener or a first-time mower, the Snapper ELT150H33IBV offers the performance and reliability you need to tackle any lawn care challenge.