SET-UP INSTRUCTIONS & PRE-OPERATION CHECKLIST SNAPPER ZERO TURNING Z-RIDER with MID MOUNT MOWER

INTRODUCTION: These instructions cover the set-up of the Snapper Mid Mount Z-Rider Mower. Complete each of the following steps carefully. Review and complete each item as instructed on the Pre-Operation checklist. The Snapper Product Registration card must be filled out and sent to Customer Service department at Snapper when completed.

IMPORTANT: The battery for this unit is maintenance-free. It is filled with acid and is sealed. Do not attempt to open the battery. Pay close attention to the precautionary statements on the battery and in these instructions. If charging is needed (see below), you will need an automotive type battery charger to activate the battery for use.

STEP 1: Remove machine from the container.

STEP 2: Install roll bar protective structure:

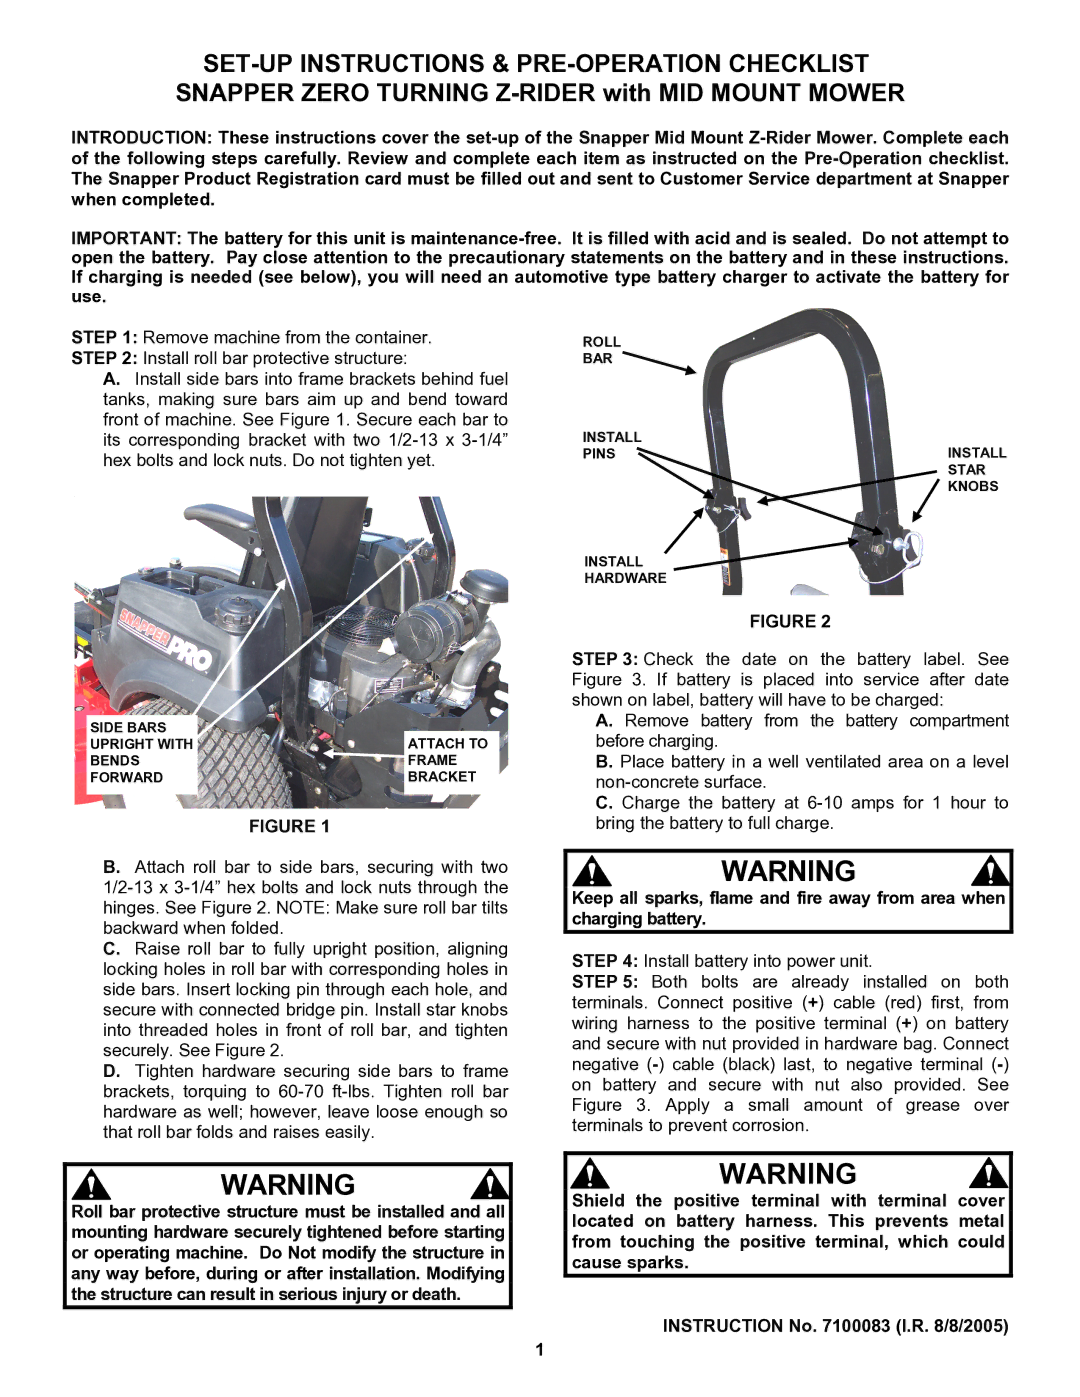
A.Install side bars into frame brackets behind fuel tanks, making sure bars aim up and bend toward front of machine. See Figure 1. Secure each bar to its corresponding bracket with two 1/2-13 x 3-1/4” hex bolts and lock nuts. Do not tighten yet.

SIDE BARS

ATTACH TO

UPRIGHT WITH

BENDS

FRAME

FORWARD

BRACKET

FIGURE 1

B.Attach roll bar to side bars, securing with two 1/2-13 x 3-1/4” hex bolts and lock nuts through the hinges. See Figure 2. NOTE: Make sure roll bar tilts backward when folded.

C.Raise roll bar to fully upright position, aligning locking holes in roll bar with corresponding holes in side bars. Insert locking pin through each hole, and secure with connected bridge pin. Install star knobs into threaded holes in front of roll bar, and tighten securely. See Figure 2.

D.Tighten hardware securing side bars to frame brackets, torquing to 60-70 ft-lbs. Tighten roll bar hardware as well; however, leave loose enough so that roll bar folds and raises easily.

ROLL

BAR

INSTALL

PINSINSTALL STAR KNOBS

INSTALL

HARDWARE

FIGURE 2

STEP 3: Check the date on the battery label. See Figure 3. If battery is placed into service after date shown on label, battery will have to be charged:

A. Remove battery from the battery compartment before charging.

B. Place battery in a well ventilated area on a level non-concrete surface.

C. Charge the battery at 6-10 amps for 1 hour to bring the battery to full charge.

WARNING

Keep all sparks, flame and fire away from area when charging battery.

STEP 4: Install battery into power unit.

STEP 5: Both bolts are already installed on both terminals. Connect positive (+) cable (red) first, from wiring harness to the positive terminal (+) on battery and secure with nut provided in hardware bag. Connect negative (-) cable (black) last, to negative terminal (-) on battery and secure with nut also provided. See Figure 3. Apply a small amount of grease over terminals to prevent corrosion.

WARNING

Roll bar protective structure must be installed and all mounting hardware securely tightened before starting or operating machine. Do Not modify the structure in any way before, during or after installation. Modifying the structure can result in serious injury or death.

WARNING

Shield the positive terminal with terminal cover located on battery harness. This prevents metal from touching the positive terminal, which could cause sparks.

INSTRUCTION No. 7100083 (I.R. 8/8/2005)

1

Page 1
Image 1
Snapper Mount Mower manual Side Bars

Mount Mower specifications

The Snapper Mount Mower has become a standout choice for both residential and commercial lawn care professionals, known for its innovative features, powerful performance, and user-friendly design. This mower is constructed with a focus on efficiency and durability, making it a preferred option for anyone looking to maintain a well-manicured lawn.

One of the key highlights of the Snapper Mount Mower is its robust engine options. Equipped with either a reliable gas engine or a quiet yet efficient electric motor, the mower provides ample power to handle various terrain types. The commercial-grade engines ensure longevity and performance while reducing noise levels - an essential factor for suburban areas.

The mower comes with a unique floating deck design, which allows it to adapt effortlessly to uneven ground surfaces. This design feature helps the blades maintain optimal contact with the grass, resulting in a more even and clean cut. The Snapper Mount Mower is also equipped with a rear discharge system, allowing for efficient grass dispersal without the buildup of clippings, ensuring a pristine finish.

Another feature that sets this mower apart is its user-friendly control panel. The intuitive controls are strategically positioned for ease of use, allowing operators to adjust speed and blade height without losing focus on the task at hand. The adjustable cutting height ranges from 1.5 to 4 inches, giving users the flexibility to customize their mowing experience based on grass type and desired finish.

In terms of maneuverability, the Snapper Mount Mower shines with its zero-turn radius capability. This allows for quick navigation around obstacles like trees and garden beds, making mowing faster and more efficient. The sturdy tires provide excellent traction, allowing the mower to traverse various terrains with ease.

Safety features include an automatic engine shut-off when the operator leaves the seat and reinforced cutting decks designed to withstand rough conditions. The Snapper Mount Mower is also designed for easy maintenance, featuring accessible components that simplify tasks such as oil changes and blade replacements.

Innovation continues with advanced technology integration, including options for Bluetooth connectivity that allow users to monitor mower performance and maintenance schedules through a dedicated smartphone app.

In summary, the Snapper Mount Mower combines powerful performance, innovative design, and user-centered features, making it a reliable tool for achieving a beautifully maintained lawn. With its durability and efficiency, this mower not only meets but exceeds the expectations of lawn care enthusiasts and professionals alike.