Basic Operations
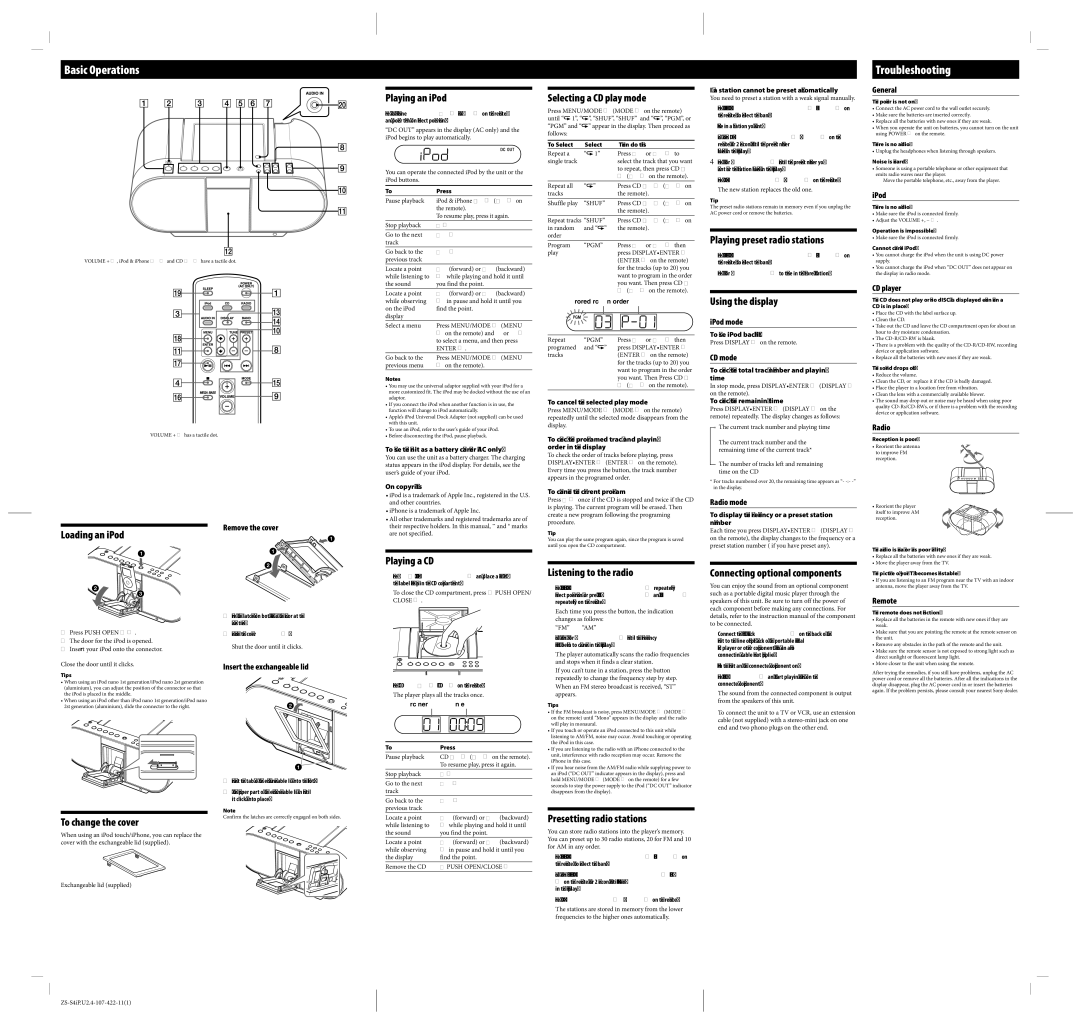
VOLUME + , iPod & iPhone and CD have a tactile dot.
VOLUME + has a tactile dot.
Remove the cover
Loading an iPod
Press the latches on both sides of the door at the same time.
Playing an iPod
Press iPod & iPhone (iPod on the remote) and power turns on (direct power-on).
“DC OUT” appears in the display (AC only) and the iPod begins to play automatically.
You can operate the connected iPod by the unit or the iPod buttons.
To | Press |
Pause playback | iPod & iPhone (on |
| the remote). |
| To resume play, press it again. |
Stop playback | |
Go to the next | |
track | |
Go back to the | |
previous track | |
Locate a point | (forward) or (backward) |
while listening to | while playing and hold it until |
the sound | you find the point. |
Locate a point | (forward) or (backward) |
while observing | in pause and hold it until you |
on the iPod | find the point. |
display | |
Select a menu | Press MENU/MODE (MENU |
| on the remote) and or |
| to select a menu, and then press |
| ENTER . |
Go back to the | Press MENU/MODE (MENU |
previous menu | on the remote). |
Notes
•You may use the universal adaptor supplied with your iPod for a more customized fit. The iPod may be docked without the use of an adaptor.
•If you connect the iPod when another function is in use, the function will change to iPod automatically.
•Apple’s iPod Universal Dock Adapter (not supplied) can be used with this unit.
•To use an iPod, refer to the user’s guide of your iPod.
•Before disconnecting the iPod, pause playback.
To use the unit as a battery charger (AC only)
You can use the unit as a battery charger. The charging status appears in the iPod display. For details, see the user’s guide of your iPod.
On copyrights
•iPod is a trademark of Apple Inc., registered in the U.S. and other countries.
•iPhone is a trademark of Apple Inc.
•All other trademarks and registered trademarks are of their respective holders. In this manual, ™ and ® marks are not specified.
Playing a CD
1Press PUSH OPEN/CLOSE and place a disc with the label side up in the CD compartment.
To close the CD compartment, press PUSH OPEN/ CLOSE .
Selecting a CD play mode
Press MENU/MODE (MODE on the remote) until “ 1”, “
1”, “ ”, “SHUF”, “SHUF” and “
 ”, “PGM”, or “PGM” and “
 ” appear in the display. Then proceed as follows:
To Select | Select | Then do this |
Repeat a | “ | 1” | Press or to |
single track | | | select the track that you want |
| | | to repeat, then press CD |
| | | ( on the remote). |
Repeat all | “ | ” | Press CD ( on |
tracks | | | the remote). |
Shuffle play | “SHUF” | Press CD ( on |
| | | the remote). |
Repeat tracks “SHUF” | Press CD ( on |
in random | and “ ” | the remote). |
order | | | |
Program | “PGM” | Press or then |
play | | | press DISPLAY•ENTER |
(ENTER on the remote) for the tracks (up to 20) you want to program in the order you want. Then press CD ( on the remote).
Programed track Playing order
Repeat | “PGM” | Press or then |
programed | and “ ” | press DISPLAY•ENTER |
tracks | | (ENTER on the remote) |
| | for the tracks (up to 20) you |
| | want to program in the order |
| | you want. Then Press CD |
| | ( on the remote). |
To cancel the selected play mode
Press MENU/MODE (MODE on the remote) repeatedly until the selected mode disappears from the display.
To check the programed track and playing order in the display
To check the order of tracks before playing, press DISPLAY•ENTER (ENTER on the remote). Every time you press the button, the track number appears in the programed order.
To change the current program
Press once if the CD is stopped and twice if the CD is playing. The current program will be erased. Then create a new program following the programing procedure.
Tip
You can play the same program again, since the program is saved until you open the CD compartment.
Listening to the radio
1 Press RADIO•BAND•AUTO PRESET repeatedly |
(direct power-on) or press RADIO and BAND |
repeatedly on the remote. |
Each time you press the button, the indication |
changes as follows: |
“FM” “AM” |
If a station cannot be preset automatically
You need to preset a station with a weak signal manually.
1Press RADIO•BAND•AUTO PRESET (BAND on the remote) to select the band.
2Tune in a station you want.
3Hold down DISPLAY•ENTER (ENTER on the remote) for 2 seconds until the preset number flashes in the display.
4Press PRESET + or – until the preset number you want for the station flashes in the display.
5Press DISPLAY•ENTER (ENTER on the remote). The new station replaces the old one.
Tip
The preset radio stations remain in memory even if you unplug the AC power cord or remove the batteries.
Playing preset radio stations
1Press RADIO•BAND•AUTO PRESET (BAND on the remote) to select the band.
2Press PRESET + or – to tune in the stored station.
Using the display
iPod mode
To use iPod backlight
Press DISPLAY on the remote.
CD mode
To check the total track number and playing time
In stop mode, press DISPLAY•ENTER (DISPLAY on the remote).
To check the remaining time
Press DISPLAY•ENTER (DISPLAY on the remote) repeatedly. The display changes as follows:
The current track number and playing time
The current track number and the remaining time of the current track*
The number of tracks left and remaining time on the CD
*For tracks numbered over 20, the remaining time appears as “- -:- -” in the display.
Radio mode
To display the frequency or a preset station number
Each time you press DISPLAY•ENTER (DISPLAY on the remote), the display changes to the frequency or a preset station number ( if you have preset any).
Connecting optional components
You can enjoy the sound from an optional component such as a portable digital music player through the speakers of this unit. Be sure to turn off the power of each component before making any connections. For details, refer to the instruction manual of the component to be connected.
Troubleshooting
General
The power is not on.
•Connect the AC power cord to the wall outlet securely.
•Make sure the batteries are inserted correctly.
•Replace all the batteries with new ones if they are weak.
•When you operate the unit on batteries, you cannot turn on the unit using POWER on the remote.
There is no audio.
• Unplug the headphones when listening through speakers.
Noise is heard.
•Someone is using a portable telephone or other equipment that
emits radio waves near the player.
Move the portable telephone, etc., away from the player.
iPod
There is no audio.
•Make sure the iPod is connected firmly.
•Adjust the VOLUME +, − .
Operation is impossible.
• Make sure the iPod is connected firmly.
Cannot charge iPod.
•You cannot charge the iPod when the unit is using DC power supply.
•You cannot charge the iPod when “DC OUT” does not appear on the display in radio mode.
CD player
The CD does not play or “no dISC” is displayed even when a CD is in place.
•Place the CD with the label surface up.
•Clean the CD.
•Take out the CD and leave the CD compartment open for about an hour to dry moisture condensation.
•The CD-R/CD-RW is blank.
•There is a problem with the quality of the CD-R/CD-RW, recording device or application software.
•Replace all the batteries with new ones if they are weak.
The sound drops out.
•Reduce the volume.
•Clean the CD, or replace it if the CD is badly damaged.
•Place the player in a location free from vibration.
•Clean the lens with a commercially available blower.
•The sound may drop out or noise may be heard when using poor quality CD-Rs/CD-RWs, or if there is a problem with the recording device or application software.
Radio
Reception is poor.
• Reorient the antenna to improve FM reception.
• Reorient the player itself to improve AM reception.
The audio is weak or has poor quality.
•Replace all the batteries with new ones if they are weak.
•Move the player away from the TV.
The picture of your TV becomes unstable.
•If you are listening to an FM program near the TV with an indoor antenna, move the player away from the TV.
Remote
The remote does not function.
• Replace all the batteries in the remote with new ones if they are |
weak. |
Press PUSH OPEN .
The door for the iPod is opened. Insert your iPod onto the connector.
Close the door until it clicks.
Tips
•When using an iPod nano 1st generation/iPod nano 2st generation (aluminium), you can adjust the position of the connector so that the iPod is placed in the middle.
•When using an iPod other than iPod nano 1st generation/iPod nano 2st generation (aluminium), slide the connector to the right.
To change the cover
When using an iPod touch/iPhone, you can replace the cover with the exchangeable lid (supplied).
Remove the cover . Shut the door until it clicks.
Insert the exchangeable lid
Inset the tabs of the exchangeable lid into the slots.
Push the upper part of the exchangeable lid in until it clicks into place.
Note
Confirm the latches are correctly engaged on both sides.
2Press CD (CD on the remote). The player plays all the tracks once.
Track number Playing time
To | Press |
Pause playback | CD (on the remote). |
| To resume play, press it again. |
Stop playback | |
Go to the next | |
track | |
Go back to the | |
previous track | |
Locate a point | (forward) or (backward) |
while listening to | while playing and hold it until |
the sound | you find the point. |
Locate a point | (forward) or (backward) |
while observing | in pause and hold it until you |
the display | find the point. |
Remove the CD | PUSH OPEN/CLOSE |
2 Hold down TUNE + or – until the frequency |
digits begin to change in the display. |
The player automatically scans the radio frequencies |
and stops when it finds a clear station. |
If you can’t tune in a station, press the button |
repeatedly to change the frequency step by step. |
When an FM stereo broadcast is received, “ST” |
appears. |
Tips
•If the FM broadcast is noisy, press MENU/MODE (MODE on the remote) until “Mono” appears in the display and the radio will play in monaural.
•If you touch or operate an iPod connected to this unit while listening to AM/FM, noise may occur. Avoid touching or operating the iPod in this case.
•If you are listening to the radio with an iPhone connected to the unit, interference with radio reception may occur. Remove the iPhone in this case.
•If you hear noise from the AM/FM radio while supplying power to
an iPod (“DC OUT” indicator appears in the display), press and hold MENU/MODE (MODE on the remote) for a few seconds to stop the power supply to the iPod (“DC OUT” indicator disappears from the display).
Presetting radio stations
You can store radio stations into the player’s memory. You can preset up to 30 radio stations, 20 for FM and 10 for AM in any order.
1 | Press RADIO•BAND•AUTO PRESET (BAND on |
| the remote) to select the band. |
2 | Hold down RADIO•BAND•AUTO PRESET (RADIO |
| on the remote) for 2 seconds until “AUTO” flashes |
1Connect the AUDIO IN jack on the back of the unit to the line output jack of the portable digital music player or other components using an audio connecting cable (not supplied).
2Turn the unit and the connected component on.
3Press AUDIO IN and start playing sound on the connected component.
The sound from the connected component is output from the speakers of this unit.
To connect the unit to a TV or VCR, use an extension cable (not supplied) with a stereo-mini jack on one end and two phono plugs on the other end.
• Make sure that you are pointing the remote at the remote sensor on |
the unit. |
• Remove any obstacles in the path of the remote and the unit. |
• Make sure the remote sensor is not exposed to strong light such as |
direct sunlight or fluorescent lamp light. |
• Move closer to the unit when using the remote. |
After trying the remedies, if you still have problems, unplug the AC power cord or remove all the batteries. After all the indications in the display disappear, plug the AC power cord in or insert the batteries again. If the problem persists, please consult your nearest Sony dealer.