Spectra T50e Quick Start Guide
1
Unpack and
Verify the
Components
Install the Library
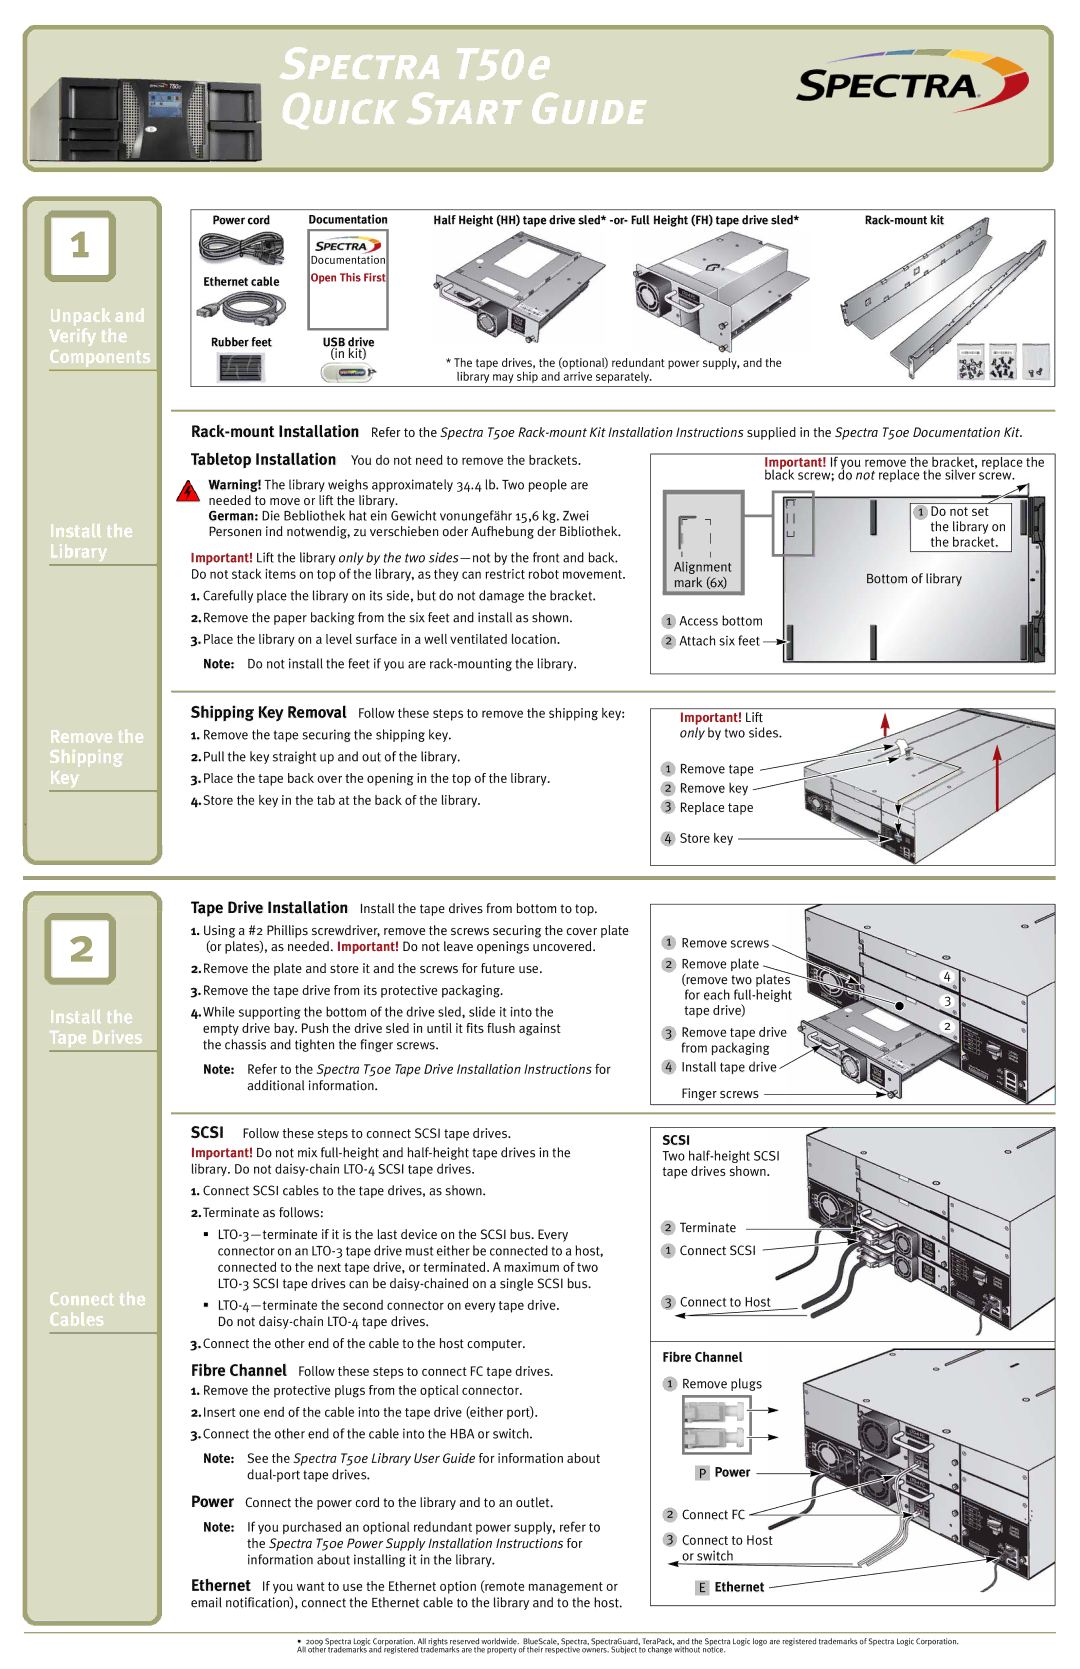
Power cord | Documentation | Half Height (HH) tape drive sled* | ||||
|
|
|
|
|
|
|
|
| Documentation |
|
|
|
|
Ethernet cable | Open This First |
|
|
|
| |
|
|
|
|
|
| |
|
|
|
|
|
|
|
Rubber feet |
| USB drive |
|
|
|
|
|
|
|
|
| ||
|
| (in kit) | * The tape drives, the (optional) redundant power supply, and the |
|
|
|
|
|
|
|
|
| |
|
|
| library may ship and arrive separately. |
|
|
|
|
|
|
|
|
|
|
Tabletop Installation You do not need to remove the brackets. |
|
|
|
|
|
| Important! If you | remove the bracket, replace the | |||||||||||
|
|
|
|
| black screw; do | not | replace the silver | screw. | |||||||||||
Warning! The library weighs approximately 34.4 lb. Two people are |
|
|
|
|
| ||||||||||||||
|
|
|
|
|
|
| |||||||||||||
|
|
|
|
|
|
|
|
|
|
|
|
|
|
|
|
|
| ||
needed to move or lift the library. |
|
|
|
|
|
|
|
|
|
|
|
|
|
|
|
|
|
| |
|
|
|
|
|
|
|
|
|
|
|
|
|
|
|
|
|
| ||
German: Die Bebliothek hat ein Gewicht vonungefähr 15,6 kg. Zwei |
|
|
|
|
|
|
|
|
|
|
|
|
|
| 1 Do not set |
| |||
Personen ind notwendig, zu verschieben oder Aufhebung der Bibliothek. |
|
|
|
|
|
|
|
|
|
|
|
|
|
| the library on |
| |||
Important! Lift the library only by the two |
|
|
|
|
|
|
|
|
|
|
|
|
|
| the bracket. |
| |||
|
|
|
|
|
|
|
|
|
|
| |||||||||
|
|
|
|
|
|
|
|
|
|
|
|
|
|
|
|
|
| ||
Alignment |
|
|
|
|
|
|
|
|
|
|
|
|
| ||||||
Do not stack items on top of the library, as they can restrict robot movement. |
|
|
|
|
|
|
| Bottom of library | |||||||||||
mark (6x) |
|
|
|
|
|
|
| ||||||||||||
|
|
|
|
|
|
|
|
| |||||||||||
|
|
|
|
|
|
|
|
|
|
|
|
|
|
| |||||
1.Carefully place the library on its side, but do not damage the bracket.
2. Remove the paper backing from the six feet and install as shown. 3. Place the library on a level surface in a well ventilated location.
Note: Do not install the feet if you are
Remove the
Shipping
Key
L
Shipping Key Removal Follow these steps to remove the shipping key: |
|
|
|
|
|
| |
| Important! Lift |
|
|
|
| ||
1. Remove the tape securing the shipping key. |
| only by two sides. |
|
|
|
| |
|
|
|
|
| |||
|
|
|
|
| |||
2. Pull the key straight up and out of the library. | 1 | Remove tape |
|
|
|
| |
3. Place the tape back over the opening in the top of the library. |
|
|
|
| |||
2 | Remove key |
|
|
|
| ||
4. Store the key in the tab at the back of the library. |
|
|
|
| |||
3 | Replace tape |
|
|
|
| ||
|
|
|
|
| |||
|
|
|
|
| |||
| 4 | Store key |
|
|
|
|
|
|
|
|
|
|
| ||
|
|
|
|
|
| ||
|
|
|
|
|
| ||
|
|
|
|
|
|
|
|
2
Install the Tape Drives
Install the tape drives from bottom to top.
1.Using a #2 Phillips screwdriver, remove the screws securing the cover plate (or plates), as needed. Important! Do not leave openings uncovered.
2.Remove the plate and store it and the screws for future use.
3.Remove the tape drive from its protective packaging.
4.While supporting the bottom of the drive sled, slide it into the empty drive bay. Push the drive sled in until it fits flush against the chassis and tighten the finger screws.
Note: Refer to the Spectra T50e Tape Drive Installation Instructions for additional information.
1 Remove screws
2Remove plate (remove two plates ![]() for each
for each
3Remove tape drive from packaging
4Install tape drive Finger screws
4
3
2
Connect the Cables
SCSI Follow these steps to connect SCSI tape drives. Important! Do not mix
1.Connect SCSI cables to the tape drives, as shown.
2.Terminate as follows:
3.Connect the other end of the cable to the host computer.
Follow these steps to connect FC tape drives.
1.Remove the protective plugs from the optical connector.
2.Insert one end of the cable into the tape drive (either port).
3.Connect the other end of the cable into the HBA or switch.
Note: See the Spectra T50e Library User Guide for information about
Power Connect the power cord to the library and to an outlet.
Note: If you purchased an optional redundant power supply, refer to the Spectra T50e Power Supply Installation Instructions for information about installing it in the library.
Ethernet If you want to use the Ethernet option (remote management or email notification), connect the Ethernet cable to the library and to the host.
SCSI | |
Two | |
tape drives shown. | |
2 | Terminate |
1 | Connect SCSI |
3 | Connect to Host |
Fibre Channel | |
1 | Remove plugs |
| P Power |
2 | Connect FC |
3 | Connect to Host |
| or switch |
| E Ethernet |
•2009 Spectra Logic Corporation. All rights reserved worldwide. BlueScale, Spectra, SpectraGuard, TeraPack, and the Spectra Logic logo are registered trademarks of Spectra Logic Corporation. All other trademarks and registered trademarks are the property of their respective owners. Subject to change without notice.