PART NAMES & FUNCTIONS
|
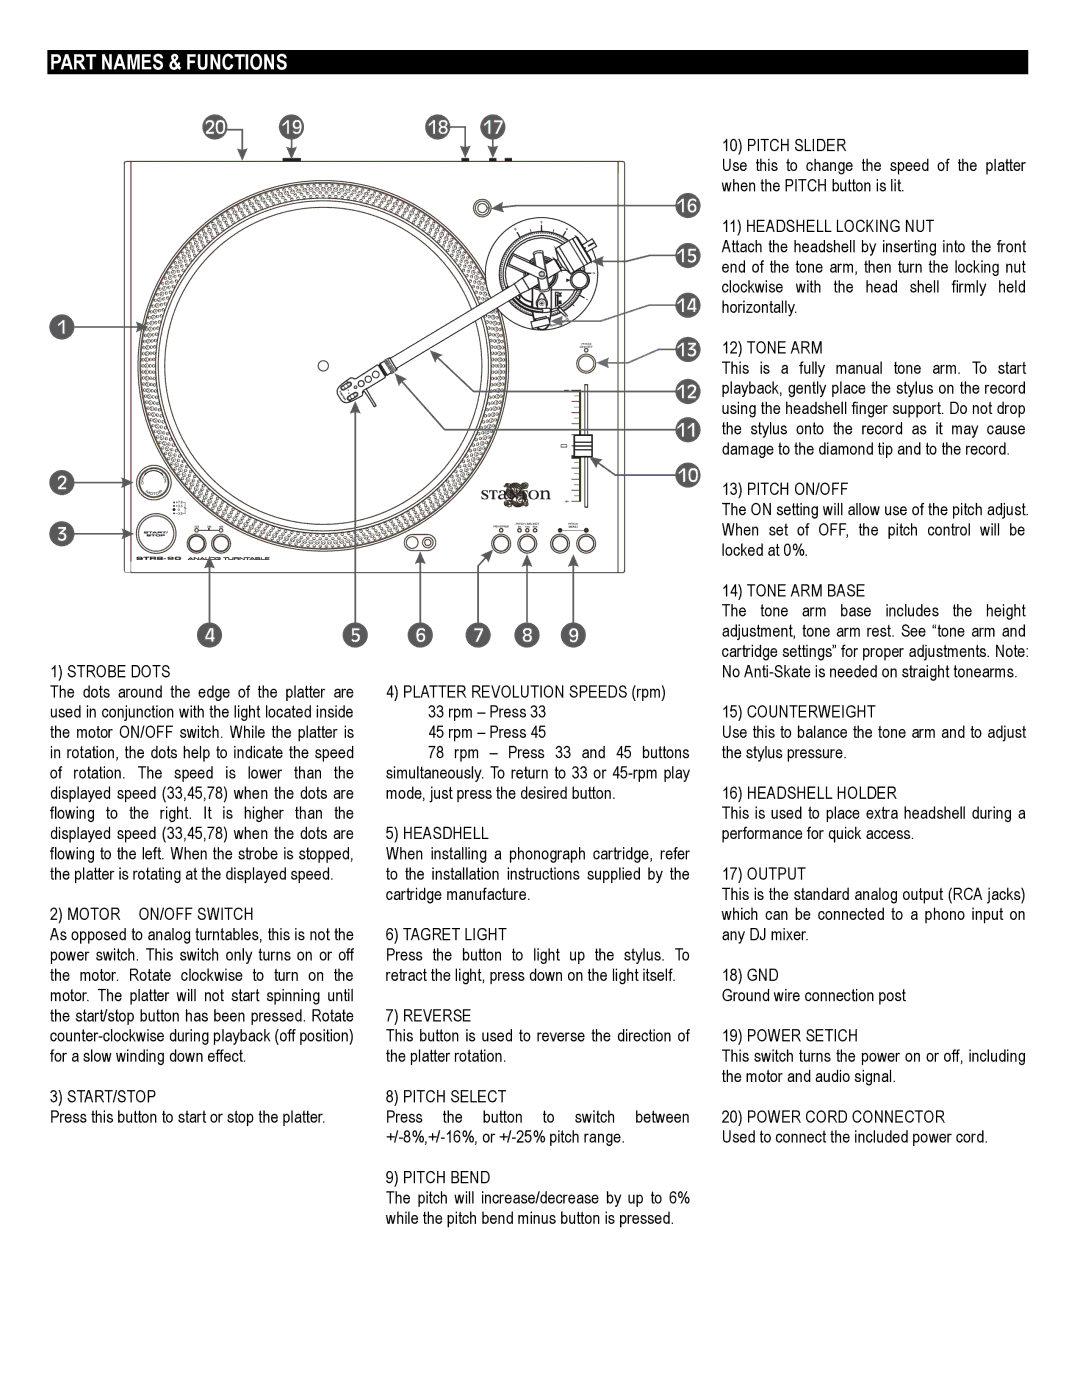
| 10) PITCH SLIDER | |
|
| Use this to change the speed of the platter | |
|
| when the PITCH button is lit. | |
|
| 11) HEADSHELL LOCKING NUT | |
|
| Attach the headshell by inserting into the front | |
|
| end of the tone arm, then turn the locking nut | |
|
| clockwise with the head shell firmly held | |
|
| horizontally. | |
|
| 12) TONE ARM | |
|
| This is a fully manual tone arm. To start | |
|
| playback, gently place the stylus on the record | |
|
| using the headshell finger support. Do not drop | |
|
| the stylus onto the record as it may cause | |
|
| damage to the diamond tip and to the record. | |
|
| 13) PITCH ON/OFF | |
|
| The ON setting will allow use of the pitch adjust. | |
|
| When set of OFF, the pitch control will be | |
|
| locked at 0%. | |
|
| 14) TONE ARM BASE | |
|
| The tone arm base includes the height | |
|
| adjustment, tone arm rest. See “tone arm and | |
|
| cartridge settings” for proper adjustments. Note: | |
1) STROBE DOTS | 4) PLATTER REVOLUTION SPEEDS (rpm) | No | |
The dots around the edge of the platter are | 15) COUNTERWEIGHT | ||
used in conjunction with the light located inside | 33 rpm – Press 33 | ||
the motor ON/OFF switch. While the platter is | 45 rpm – Press 45 | Use this to balance the tone arm and to adjust | |
in rotation, the dots help to indicate the speed | 78 rpm – Press 33 and 45 buttons | the stylus pressure. | |
of rotation. The speed is lower than the | simultaneously. To return to 33 or | 16) HEADSHELL HOLDER | |
displayed speed (33,45,78) when the dots are | mode, just press the desired button. | ||
flowing to the right. It is higher than the |
| This is used to place extra headshell during a | |
displayed speed (33,45,78) when the dots are | 5) HEASDHELL | performance for quick access. | |
flowing to the left. When the strobe is stopped, | When installing a phonograph cartridge, refer | 17) OUTPUT | |
the platter is rotating at the displayed speed. | to the installation instructions supplied by the | ||
| cartridge manufacture. | This is the standard analog output (RCA jacks) | |
2) MOTOR ON/OFF SWITCH |
| which can be connected to a phono input on | |
As opposed to analog turntables, this is not the | 6) TAGRET LIGHT | any DJ mixer. | |
power switch. This switch only turns on or off | Press the button to light up the stylus. To | 18) GND | |
the motor. Rotate clockwise to turn on the | retract the light, press down on the light itself. | ||
motor. The platter will not start spinning until | 7) REVERSE | Ground wire connection post | |
the start/stop button has been pressed. Rotate | 19) POWER SETICH | ||
This button is used to reverse the direction of | |||
for a slow winding down effect. | the platter rotation. | This switch turns the power on or off, including | |
3) START/STOP | 8) PITCH SELECT | the motor and audio signal. | |
20) POWER CORD CONNECTOR | |||
Press this button to start or stop the platter. | Press the button to switch between | ||
| Used to connect the included power cord. | ||
| 9) PITCH BEND |
| |
| The pitch will increase/decrease by up to 6% |
| |
| while the pitch bend minus button is pressed. |
|