ASSEMBLY
![]() WARNING:
WARNING:
Always disconnect the bench grinder from the power source before performing any assembly or adjustment. Failure to do so could result in accidental starting resulting in possible serious personal injury.
SPARK DEFLECTOR
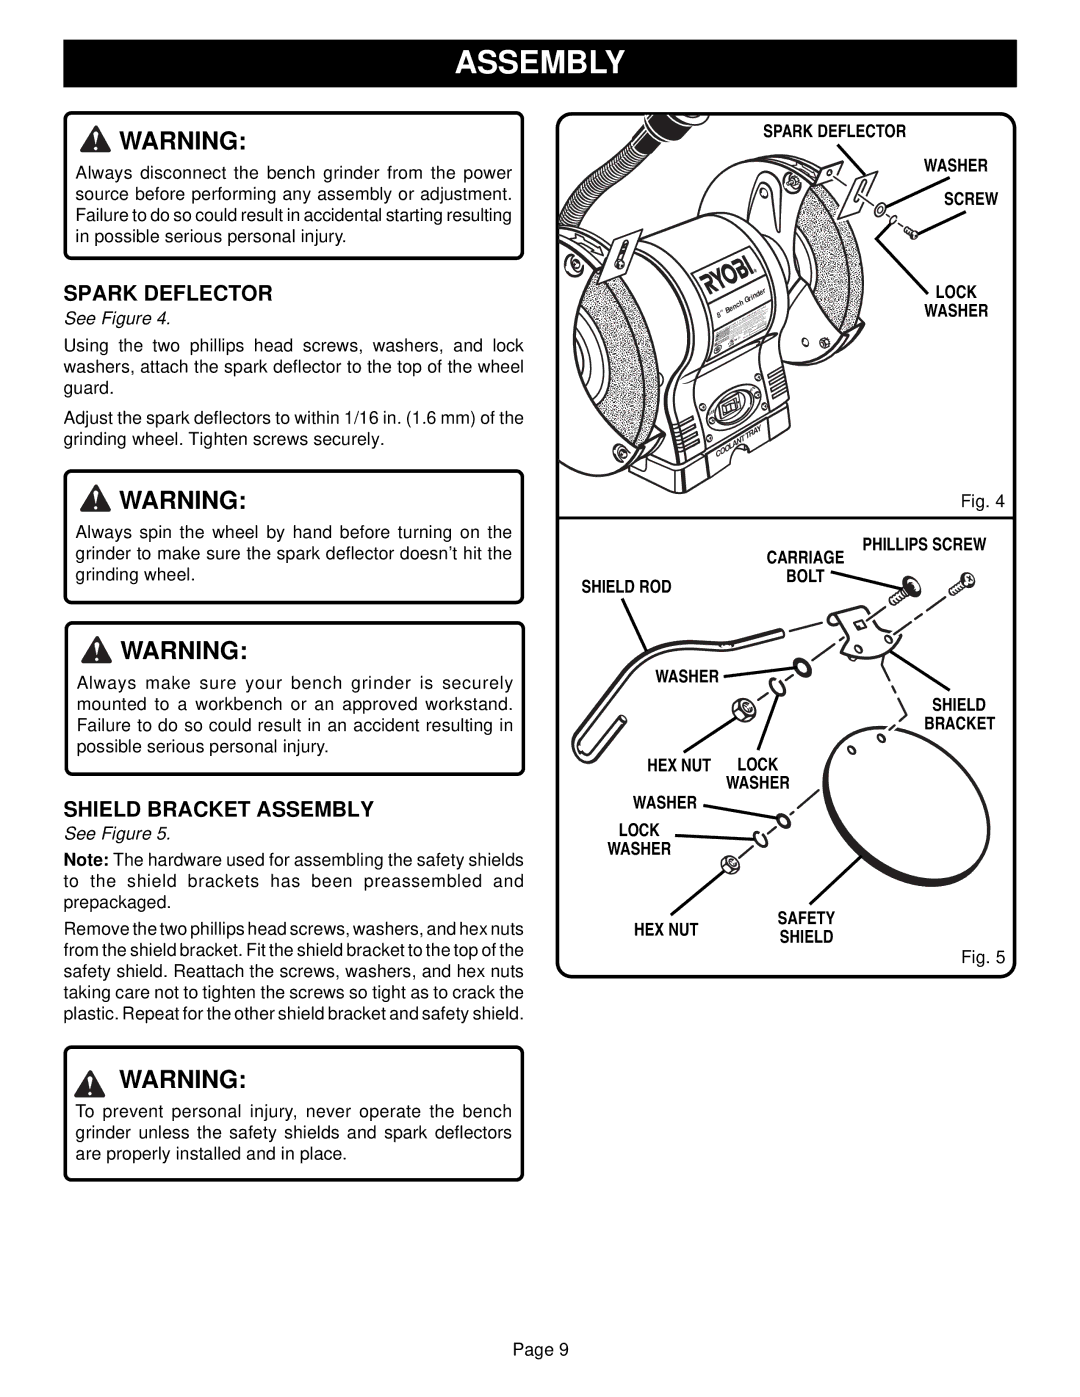
See Figure 4.
Using the two phillips head screws, washers, and lock washers, attach the spark deflector to the top of the wheel guard.
Adjust the spark deflectors to within 1/16 in. (1.6 mm) of the grinding wheel. Tighten screws securely.
![]() WARNING:
WARNING:
SPARK DEFLECTOR
WASHER
SCREW
|
|
|
|
|
|
| G |
|
| r | LOCK | |
|
|
|
|
|
|
|
|
|
| e |
| |
|
|
|
|
|
|
|
|
|
| d |
|
|
|
|
|
|
| h | rin |
| WASHER | ||||
8 |
|
|
| c | 3600 | RPM/TR/MN |
| |||||
| B | n |
|
|
|
|
|
| Arbor |
| ||
” | e |
|
|
|
|
|
| 1/2” |
|
| ||
|
|
|
|
|
|
|
|
|
|
| ||
|
|
|
|
| 2.1A |
|
|
|
|
|
| |
|
| AC 60Hz |
|
|
|
|
|
|
|
| ||
| 120V |
|
|
|
|
|
|
|
|
|
| |
BGH615 NI | NG |
|
|
|
|
|
|
|
|
|
| |
|
|
|
|
|
|
|
|
|
|
| ||
WAR | MENT |
|
|
|
|
|
|
|
|
|
| |
AVER | TISSE | CIA |
|
| 48467 | 43F1 |
|
|
|
|
|
|
RTEN |
|
|
|
|
|
|
|
| ||||
ADVE |
|
|
| E |
|
|
|
|
|
|
| |
|
|
|
|
|
|
|
| 0N |
|
|
| |
0FF |
|
|
|
|
|
|
|
|
|
|
|
|
|
|
|
|
|
|
|
|
|
| Y |
| |
|
|
|
|
|
|
|
|
| A |
|
| |
|
|
|
|
|
|
|
| R |
|
|
| |
|
|
|
|
|
|
| TT |
|
|
|
| |
|
|
|
| N |
|
|
|
|
| |||
|
|
| A |
|
|
|
|
|
|
| ||
|
| L |
|
|
|
|
|
|
|
|
| |
| O |
|
|
|
|
|
|
|
|
|
| |
O |
|
|
|
|
|
|
|
|
|
|
| |
C |
|
|
|
|
|
|
|
|
|
|
|
|
Fig.
Always spin the wheel by hand before turning on the |
| PHILLIPS SCREW |
grinder to make sure the spark deflector doesn’t hit the |
| |
| CARRIAGE | |
grinding wheel. | SHIELD ROD | BOLT |
|
|
![]() WARNING:
WARNING:
Always make sure your bench grinder is securely mounted to a workbench or an approved workstand. Failure to do so could result in an accident resulting in possible serious personal injury.
SHIELD BRACKET ASSEMBLY
See Figure 5.
Note: The hardware used for assembling the safety shields to the shield brackets has been preassembled and prepackaged.
Remove the two phillips head screws, washers, and hex nuts from the shield bracket. Fit the shield bracket to the top of the safety shield. Reattach the screws, washers, and hex nuts taking care not to tighten the screws so tight as to crack the plastic. Repeat for the other shield bracket and safety shield.
WARNING:
To prevent personal injury, never operate the bench grinder unless the safety shields and spark deflectors are properly installed and in place.
WASHER
SHIELD
BRACKET
HEX NUT LOCK
WASHER | WASHER | |
| ||
LOCK |
| |
WASHER |
| |
HEX NUT | SAFETY | |
SHIELD | ||
|
Fig. 5
Page 9
