StarTech.com ST121UTPDVGB, ST121UTPDVI instruction manual Packaging Contents, System Requirements

Models: ST121UTPDVGB ST121UTPDVEU ST121UTPDVI

1 2
Download 2 pages 32.36 Kb
Page 1
Image 1

Instruction Manual

DVI Video Extender over CAT5 UTP

ST121UTPDVI / ST121UTPDVGB / ST121UTPDVEU

DE: Bedienungsanleitung - de.startech.com

Local Unit

FR: Guide de l'utilisateur - fr.startech.com


ES: Guía del usuario - es.startech.com


IT: Guida per l'uso - it.startech.com


NL: Gebruiksaanwijzing - nl.startech.com


PT: Guia do usuário - pt.startech.com


Packaging Contents

1 x DVI Extender Local Unit

1 x DVI Extender Remote Unit

2 x Power Adapter

1 x Instruction Manual

Remote Unit

System Requirements

DVI enabled video source device (i.e. computer, PVR/DVR, etc)

DVI enabled video display device (i.e. monitor, projector, etc)

Available AC electrical out at local/remote locations

Preparing Your Site

Installation

1.Determine where the local video source (i.e. computer) will be located and set up the device.

2.Determine where the remote display will be located and place/ mount the display appropriately.

3.If you are using surface cabling, ensure you have enough Cat5 unshielded twisted pair (UTP) Ethernet cabling to connect the Local Unit to the Remote Unit’s location, and that each end is terminated with a RJ45 Ethernet connector. The cabling should not go through any networking equipment (i.e. router, switch).

OR

If you are using premise cabling, ensure that the Cat5 unshielded twisted pair (UTP) Ethernet Cabling between the Local Unit and the Remote Unit has been properly terminated in a wall outlet in each location and there is a patch cable long enough to connect the Remote Unit and the Local Unit to their respective outlets. The cabling should not go through any networking equipment (i.e. router, switch).

1.Turn off the video source (i.e. computer) and the intended display device (i.e. monitor).

2.Position the Remote Unit near the intended display.

3.Position the Local Unit near the video source.

Please note that both units will require a power connection, so please ensure that each unit is situated near an available power outlet.

4.Connect the video source to the “DVI In” port on the rear panel of the Local Unit, using a DVI-D male/male cable.

5.Connect the intended display to the “DVI Out” port located on the rear panel of the Remote Unit using a DVI-D male/male cable.

6.Connect the Local Unit to the Remote Unit, using standard RJ45 terminated CAT5 cable (see Preparing Your Site).

7.Connect the power adapters (provided) to both Local and Remote Units.

8.Turn on the display device first, followed by the video source.

For the most up-to-date information, please visit: www.startech.com

Manual Revision: 02/07/2012

Page 1
Image 1
StarTech.com ST121UTPDVGB, ST121UTPDVI instruction manual Packaging Contents, System Requirements, Preparing Your Site

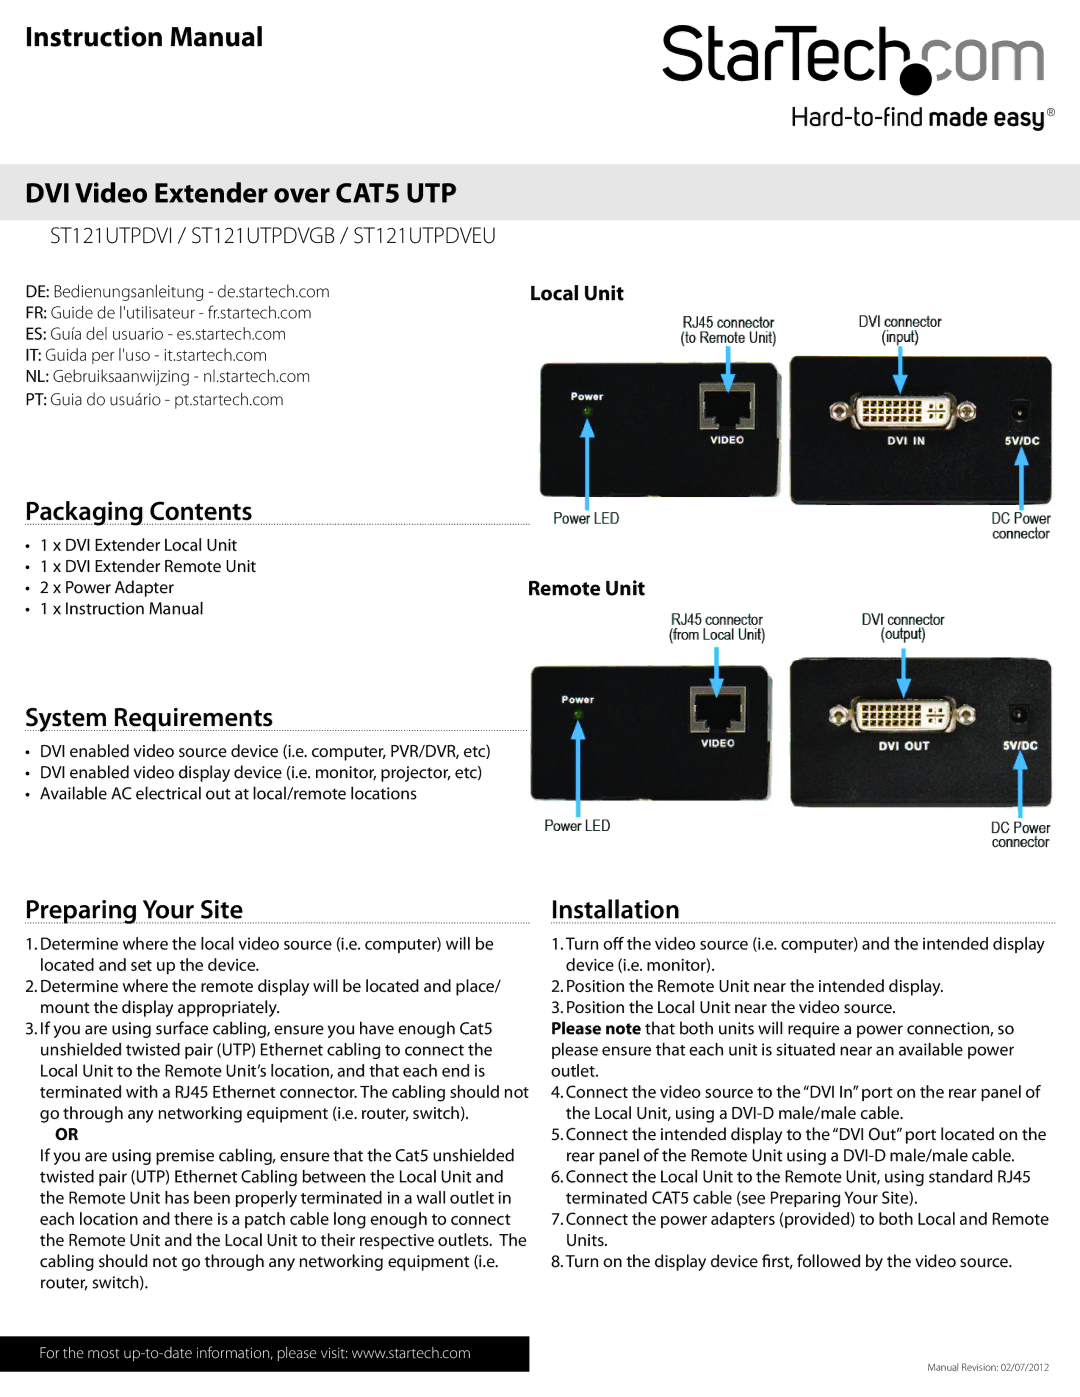
ST121UTPDVGB, ST121UTPDVEU, ST121UTPDVI specifications

StarTech.com has long been a reliable provider of connectivity solutions, and its line of HDMI over Cat5/6 extenders, including the ST121UTPDVI, ST121UTPDVEU, and ST121UTPDVGB, showcases the company's commitment to delivering high-performance video and audio transmission over extended distances. These extenders are designed to transmit DVI signals over standard Cat5 or Cat6 cabling, making them ideal for various applications in homes, offices, or commercial venues.

A standout feature of the ST121UTPDVI and its variants is their ability to extend DVI video signals up to 150 meters (492 feet) while maintaining the quality of the original video. This capability is particularly beneficial in settings where long-distance connections are imperative, such as in conference rooms, digital signage, or control rooms. The extenders support resolutions up to 1920x1200, ensuring that users do not compromise on image quality, even when transmitting over long distances.

The ST121UTPDVI series employs advanced technology, including built-in equalization and signal boosting, which provide a stable connection by automatically adjusting for different cable lengths and types. This technology allows users to achieve optimal performance without the need for manual adjustments or complicated configurations.

Additionally, the extenders feature a compact and rugged design that makes installation simple and straightforward. With a plug-and-play setup, users can easily connect the transmitter and receiver units with minimal effort, making these devices accessible to both tech-savvy individuals and those less familiar with audio-visual equipment.

Compatibility is another significant advantage of the StarTech.com extenders. The devices are designed to work seamlessly with a range of operating systems and display devices, including monitors, projectors, and televisions. This versatility means they can be integrated into various setups without the need for additional software or drivers.

Other notable features include LED indicators for power and signal status, which provide visual confirmation of operational status, and a durable construction that ensures longevity even in active environments. Whether it’s for enhancing corporate presentations, educational environments, or retail displays, the ST121UTPDVI series stands out as a reliable solution for high-quality DVI signal extension.

In summary, StarTech.com’s ST121UTPDVI, ST121UTPDVEU, and ST121UTPDVGB extenders represent a powerful combination of technology, performance, and ease of use, catering to the needs of users looking for efficient video transmission solutions.