PREPARING THE STAND MIXER FOR USE
Before preparing the mixer for use, be sure the speed control dial is in the OFF position and the electric cord is unplugged. Be sure to wash bowls and attachments before initial use.
ATTACHING THE TURNTABLE
Place the revolving turntable into the base of the stand by pressing the turntable into the center hole of the adjustable slot until it snaps into place.
ADJUSTING THE TURNTABLE
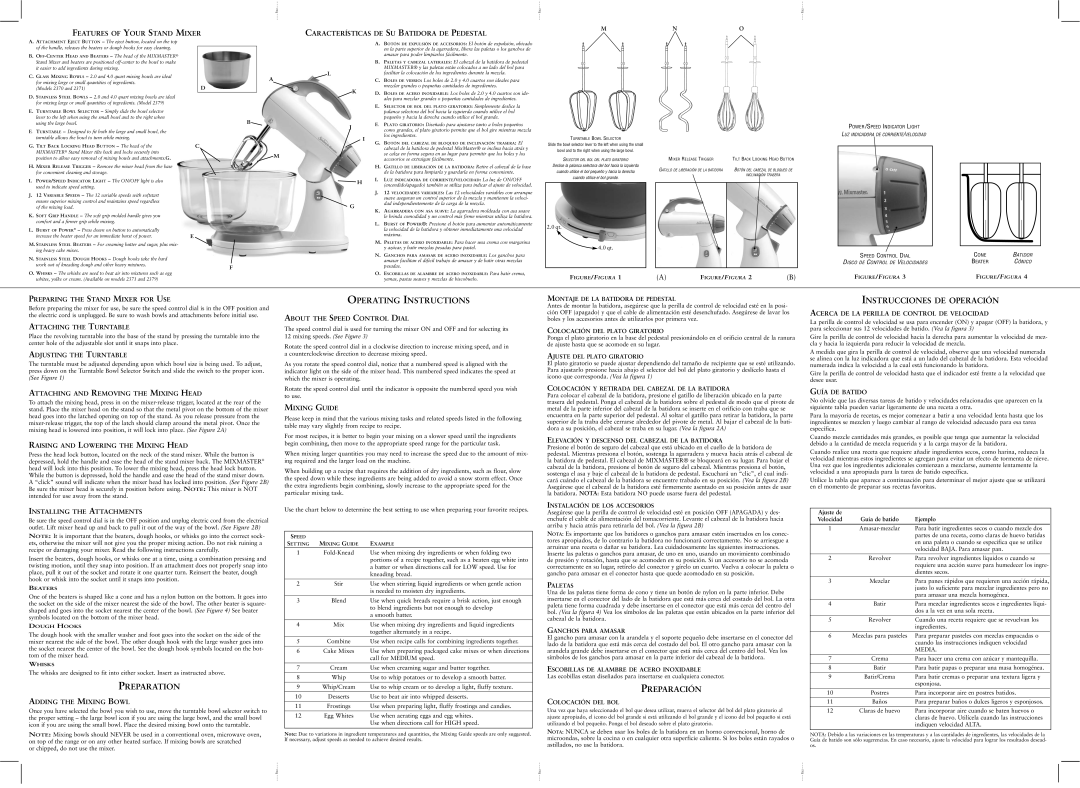
The turntable must be adjusted depending upon which bowl size is being used. To adjust, press down on the Turntable Bowl Selector Switch and slide the switch to the proper icon. (See Figure 1)
ATTACHING AND REMOVING THE MIXING HEAD
To attach the mixing head, press in on the mixer-release trigger, located at the rear of the stand. Place the mixer head on the stand so that the metal pivot on the bottom of the mixer head goes into the latched opening on top of the stand. As you release pressure from the mixer-release trigger, the top of the latch should clamp around the metal pivot. Once the mixing head is lowered into position, it will lock into place. (See Figure 2A)
RAISING AND LOWERING THE MIXING HEAD
Press the head lock button, located on the neck of the stand mixer. While the button is depressed, hold the handle and ease the head of the stand mixer back. The MIXMASTER® head will lock into this position. To lower the mixing head, press the head lock button. While the button is depressed, hold the handle and ease the head of the stand mixer down. A “click” sound will indicate when the mixer head has locked into position. (See Figure 2B) Be sure the mixer head is securely in position before using. NOTE: This mixer is NOT intended for use away from the stand.
INSTALLING THE ATTACHMENTS
Be sure the speed control dial is in the OFF position and unplug electric cord from the electrical outlet. Lift mixer head up and back to pull it out of the way of the bowl. (See Figure 2B)
NOTE: It is important that the beaters, dough hooks, or whisks go into the correct sock- ets, otherwise the mixer will not give you the proper mixing action. Do not risk ruining a recipe or damaging your mixer. Read the following instructions carefully.
Insert the beaters, dough hooks, or whisks one at a time, using a combination pressing and twisting motion, until they snap into position. If an attachment does not properly snap into place, pull it out of the socket and rotate it one quarter turn. Reinsert the beater, dough hook or whisk into the socket until it snaps into position.
BEATERS
One of the beaters is shaped like a cone and has a nylon button on the bottom. It goes into the socket on the side of the mixer nearest the side of the bowl. The other beater is square- shaped and goes into the socket nearest the center of the bowl. (See Figure 4) See beater symbols located on the bottom of the mixer head.
DOUGH HOOKS
The dough hook with the smaller washer and foot goes into the socket on the side of the mixer nearest the side of the bowl. The other dough hook with the large washer goes into the socket nearest the center of the bowl. See the dough hook symbols located on the bot- tom of the mixer head.
WHISKS
The whisks are designed to fit into either socket. Insert as instructed above.
PREPARATION
ADDING THE MIXING BOWL
Once you have selected the bowl you wish to use, move the turntable bowl selector switch to the proper setting – the large bowl icon if you are using the large bowl, and the small bowl icon if you are using the small bowl. Place the desired mixing bowl onto the turntable.
NOTE: Mixing bowls should NEVER be used in a conventional oven, microwave oven, on top of the range or on any other heated surface. If mixing bowls are scratched
or chipped, do not use the mixer.
OPERATING INSTRUCTIONS
ABOUT THE SPEED CONTROL DIAL
The speed control dial is used for turning the mixer ON and OFF and for selecting its 12 mixing speeds. (See Figure 3)
Rotate the speed control dial in a clockwise direction to increase mixing speed, and in a counterclockwise direction to decrease mixing speed.
As you rotate the speed control dial, notice that a numbered speed is aligned with the indicator light on the side of the mixer head. This numbered speed indicates the speed at which the mixer is operating.
Rotate the speed control dial until the indicator is opposite the numbered speed you wish to use.
MIXING GUIDE
Please keep in mind that the various mixing tasks and related speeds listed in the following table may vary slightly from recipe to recipe.
For most recipes, it is better to begin your mixing on a slower speed until the ingredients begin combining, then move to the appropriate speed range for the particular task.
When mixing larger quantities you may need to increase the speed due to the amount of mix- ing required and the larger load on the machine.
When building up a recipe that requires the addition of dry ingredients, such as flour, slow the speed down while these ingredients are being added to avoid a snow storm effect. Once the extra ingredients begin combining, slowly increase to the appropriate speed for the particular mixing task.
Use the chart below to determine the best setting to use when preparing your favorite recipes.
SPEED | | |
SETTING | MIXING GUIDE | EXAMPLE |
1 | Fold-Knead | Use when mixing dry ingredients or when folding two |
| | portions of a recipe together, such as a beaten egg white into |
| | a batter or when directions call for LOW speed. Use for |
| | kneading bread. |
| | |
2 | Stir | Use when stirring liquid ingredients or when gentle action |
| | is needed to moisten dry ingredients. |
| | |
3 | Blend | Use when quick breads require a brisk action, just enough |
| | to blend ingredients but not enough to develop |
| | a smooth batter. |
| | |
4 | Mix | Use when mixing dry ingredients and liquid ingredients |
| | together alternately in a recipe. |
| | |
5 | Combine | Use when recipe calls for combining ingredients together. |
| | |
6 | Cake Mixes | Use when preparing packaged cake mixes or when directions |
| | call for MEDIUM speed. |
| | |
7 | Cream | Use when creaming sugar and butter together. |
| | |
8 | Whip | Use to whip potatoes or to develop a smooth batter. |
| | |
9 | Whip/Cream | Use to whip cream or to develop a light, fluffy texture. |
| | |
10 | Desserts | Use to beat air into whipped desserts. |
| | |
11 | Frostings | Use when preparing light, fluffy frostings and candies. |
| | |
12 | Egg Whites | Use when aerating eggs and egg whites. |
| | Use when directions call for HIGH speed. |
| | |
Note: Due to variations in ingredient temperatures and quantities, the Mixing Guide speeds are only suggested. If necessary, adjust speeds as needed to achieve desired results.
MONTAJE DE LA BATIDORA DE PEDESTAL
Antes de montar la batidora, asegúrese que la perilla de control de velocidad esté en la posi- ción OFF (apagado) y que el cable de alimentación esté desenchufado. Asegúrese de lavar los boles y los accesorios antes de utilizarlos por primera vez.
COLOCACIÓN DEL PLATO GIRATORIO
Ponga el plato giratorio en la base del pedestal presionándolo en el orificio central de la ranura de ajuste hasta que se acomode en su lugar.
AJUSTE DEL PLATO GIRATORIO
El plato giratorio se puede ajustar dependiendo del tamaño de recipiente que se esté utilizando. Para ajustarlo presione hacia abajo el selector del bol del plato giratorio y deslícelo hasta el icono que corresponda. (Vea la figura 1)
COLOCACIÓN Y RETIRADA DEL CABEZAL DE LA BATIDORA
Para colocar el cabezal de la batidora, presione el gatillo de liberación ubicado en la parte trasera del pedestal. Ponga el cabezal de la batidora sobre el pedestal de modo que el pivote de metal de la parte inferior del cabezal de la batidora se inserte en el orificio con traba que se encuentra en la parte superior del pedestal. Al soltar el gatillo para retirar la batidora, la parte superior de la traba debe cerrarse alrededor del pivote de metal. Al bajar el cabezal de la bati- dora a su posición, el cabezal se traba en su lugar. (Vea la figura 2A)
ELEVACIÓN Y DESCENSO DEL CABEZAL DE LA BATIDORA
Presione el botón de seguro del cabezal que está ubicado en el cuello de la batidora de pedestal. Mientras presiona el botón, sostenga la agarradera y mueva hacia atrás el cabezal de la batidora de pedestal. El cabezal de MIXMASTER® se bloqueará en su lugar. Para bajar el cabezal de la batidora, presione el botón de seguro del cabezal. Mientras presiona el botón, sostenga el asa y baje el cabezal de la batidora de pedestal. Escuchará un “clic”, el cual indi- cará cuándo el cabezal de la batidora se encuentre trabado en su posición. (Vea la figura 2B) Asegúrese que el cabezal de la batidora esté firmemente asentado en su posición antes de usar la batidora. NOTA: Esta batidora NO puede usarse fuera del pedestal.
INSTALACIÓN DE LOS ACCESORIOS
Asegúrese que la perilla de control de velocidad esté en posición OFF (APAGADA) y des- enchufe el cable de alimentación del tomacorriente. Levante el cabezal de la batidora hacia arriba y hacia atrás para retirarla del bol. (Vea la figura 2B)
NOTA: Es importante que los batidores o ganchos para amasar estén insertados en los conec- tores apropiados, de lo contrario la batidora no funcionará correctamente. No se arriesgue a arruinar una receta o dañar su batidora. Lea cuidadosamente las siguientes instrucciones.
Inserte las paletas o ganchos para amasar, de uno en uno, usando un movimiento combinado de presión y rotación, hasta que se acomoden en su posición. Si un accesorio no se acomoda correctamente en su lugar, retírelo del conector y gírelo un cuarto. Vuelva a colocar la paleta o gancho para amasar en el conector hasta que quede acomodado en su posición.
PALETAS
Una de las paletas tiene forma de cono y tiene un botón de nylon en la parte inferior. Debe insertarse en el conector del lado de la batidora que está más cerca del costado del bol. La otra paleta tiene forma cuadrada y debe insertarse en el conector que está más cerca del centro del bol. (Vea la figura 4) Vea los símbolos de las paletas que están ubicados en la parte inferior del cabezal de la batidora.
GANCHOS PARA AMASAR
El gancho para amasar con la arandela y el soporte pequeño debe insertarse en el conector del lado de la batidora que está más cerca del costado del bol. El otro gancho para amasar con la arandela grande debe insertarse en el conector que está más cerca del centro del bol. Vea los símbolos de los ganchos para amasar en la parte inferior del cabezal de la batidora.
ESCOBILLAS DE ALAMBRE DE ACERO INOXIDABLE
Las ecobillas estan diseñados para insertarse en cualquiera conector.
PREPARACIÓN
COLOCACIÓN DEL BOL
Una vez que haya seleccionado el bol que desea utilizar, mueva el selector del bol del plato giratorio al ajuste apropiado, el icono del bol grande si está utilizando el bol grande y el icono del bol pequeño si está utilizando el bol pequeño. Ponga el bol deseado sobre el plato giratorio.
NOTA: NUNCA se deben usar los boles de la batidora en un horno convencional, horno de microondas, sobre la cocina o en cualquier otra superficie caliente. Si los boles están rayados o astillados, no use la batidora.
INSTRUCCIONES DE OPERACIÓN
ACERCA DE LA PERILLA DE CONTROL DE VELOCIDAD
La perilla de control de velocidad se usa para encender (ON) y apagar (OFF) la batidora, y para seleccionar sus 12 velocidades de batido. (Vea la figura 3)
Gire la perilla de control de velocidad hacia la derecha para aumentar la velocidad de mez- cla y hacia la izquierda para reducir la velocidad de mezcla.
A medida que gira la perilla de control de velocidad, observe que una velocidad numerada se alinea con la luz indicadora que está a un lado del cabezal de la batidora. Esta velocidad numerada indica la velocidad a la cual está funcionando la batidora.
Gire la perilla de control de velocidad hasta que el indicador esté frente a la velocidad que desee usar.
GUÍA DE BATIDO
No olvide que las diversas tareas de batido y velocidades relacionadas que aparecen en la siguiente tabla pueden variar ligeramente de una receta a otra.
Para la mayoría de recetas, es mejor comenzar a batir a una velocidad lenta hasta que los ingredientes se mezclen y luego cambiar al rango de velocidad adecuado para esa tarea específica.
Cuando mezcle cantidades más grandes, es posible que tenga que aumentar la velocidad debido a la cantidad de mezcla requerida y a la carga mayor de la batidora.
Cuando realice una receta que requiere añadir ingredientes secos, como harina, reduzca la velocidad mientras estos ingredientes se agregan para evitar un efecto de tormenta de nieve. Una vez que los ingredientes adicionales comienzan a mezclarse, aumente lentamente la velocidad a una apropiada para la tarea de batido específica.
Utilice la tabla que aparece a continuación para determinar el mejor ajuste que se utilizará en el momento de preparar sus recetas favoritas.
Ajuste de | | | |
Velocidad | Guía de batido | Ejemplo | |
| | | |
1 | Amasar-mezclar | Para batir ingredientes secos o cuando mezcle dos | |
| | partes de una receta, como claras de huevo batidas | |
| | en una paleta o cuando se especifica que se utilice | |
| | velocidad BAJA. Para amasar pan. | |
| | | |
2 | Revolver | Para revolver ingredientes líquidos o cuando se | |
| | requiere una acción suave para humedecer los ingre- | |
| | dientes secos. | |
| | | |
3 | Mezclar | Para panes rápidos que requieren una acción rápida, | |
| | justo lo suficiente para mezclar ingredientes pero no | |
| | para amasar una mezcla homogénea. | |
| | | |
4 | Batir | Para mezclar ingredientes secos e ingredientes líqui- | |
| | dos a la vez en una sola receta. | |
| | | |
5 | Revolver | Cuando una receta requiere que se revuelvan los | |
| | ingredientes. | |
| | | |
6 | Mezclas para pasteles | Para preparar pasteles con mezclas empacadas o | |
| | cuando las instrucciones indiquen velocidad | |
| | MEDIA. | |
| | | |
7 | Crema | Para hacer una crema con azúcar y mantequilla. | |
| | | |
8 | Batir | Para batir papas o preparar una masa homogénea. | |
| | | |
9 | Batir/Crema | Para batir cremas o preparar una textura ligera y | |
| | esponjosa. | |
| | | |
10 | Postres | Para incorporar aire en postres batidos. | |
| | | |
11 | Baños | Para preparar baños o dulces ligeros y esponjosos. | |
| | | |
12 | Claras de huevo | Para incorporar aire cuando se baten huevos o | |
| | claras de huevo. Utilícela cuando las instrucciones | |
| | indiquen velocidad ALTA. | |
| | | |
NOTA: Debido a las variaciones en las temperaturas y a las cantidades de ingredientes, las velocidades de la Guía de batido son sólo sugerencias. En caso necesario, ajuste la velocidad para lograr los resultados desead- os.