2 |
|
|
|
|
|
|
|
|
|
|
|
|
|
|
|
|
|
|
|
|
| T | a | b | l | e | o | f | C | o | n | t | e | n | t | s |
|
J2 PLUS BACK AND ACCESSORIES | 2 |
|
|
| |||||||||||||||||||||||||||||||||
INSTALLATION INSTRUCTIONS | 3 |
|
|
| |||||||||||||||||||||||||||||||||
|
|
| Side Plate Installation | 3 |
|
|
| ||||||||||||||||||||||||||||||
|
|
| Back Shell Installation | 5 |
|
|
| ||||||||||||||||||||||||||||||
|
|
| Seat to Back Angle Adjustment | 7 |
|
|
| ||||||||||||||||||||||||||||||
|
|
| Vanity Flap Adjustment | 7 |
|
|
| ||||||||||||||||||||||||||||||
|
|
| Growth Plate Adjustment | 8 |
|
|
| ||||||||||||||||||||||||||||||
|
|
| Lateral Bracket Installtion | 8 |
|
|
| ||||||||||||||||||||||||||||||
|
|
| Lateral Bracket Vertical Adjustment | 8 |
|
|
| ||||||||||||||||||||||||||||||
REMOVAL AND REPLACEMENT | 9 |
|
|
| |||||||||||||||||||||||||||||||||
EASY MAINTENANCE AND CLEANING | 10 |
|
|
| |||||||||||||||||||||||||||||||||
WARRANTY | 11 |
|
|
| |||||||||||||||||||||||||||||||||
The J2 Plus Back is designed to supply the clinician with the means to provide the client with a back support that can accommodate a heavier load capacity and provide all the benefits of a solid back support.
Maximum User weight 650lbs (293Kg).
CAUTION– Installing a back support on a wheelchair may affect the center of gravity of the wheel- chair and may cause the wheelchair to tip backwards potentially resulting in injury.
2)The J2 Plus back can be used up to 60 degrees tilt in space for stationary applications.
3)While using a J2 Plus back on a tilt in space chair, the chair should be returned to is upright position when the occupant is being propelled.
Always assess the need for
J2 PLUS BACK AND ACCESSORIES
I n s t a l l a t i o n | 3 | |
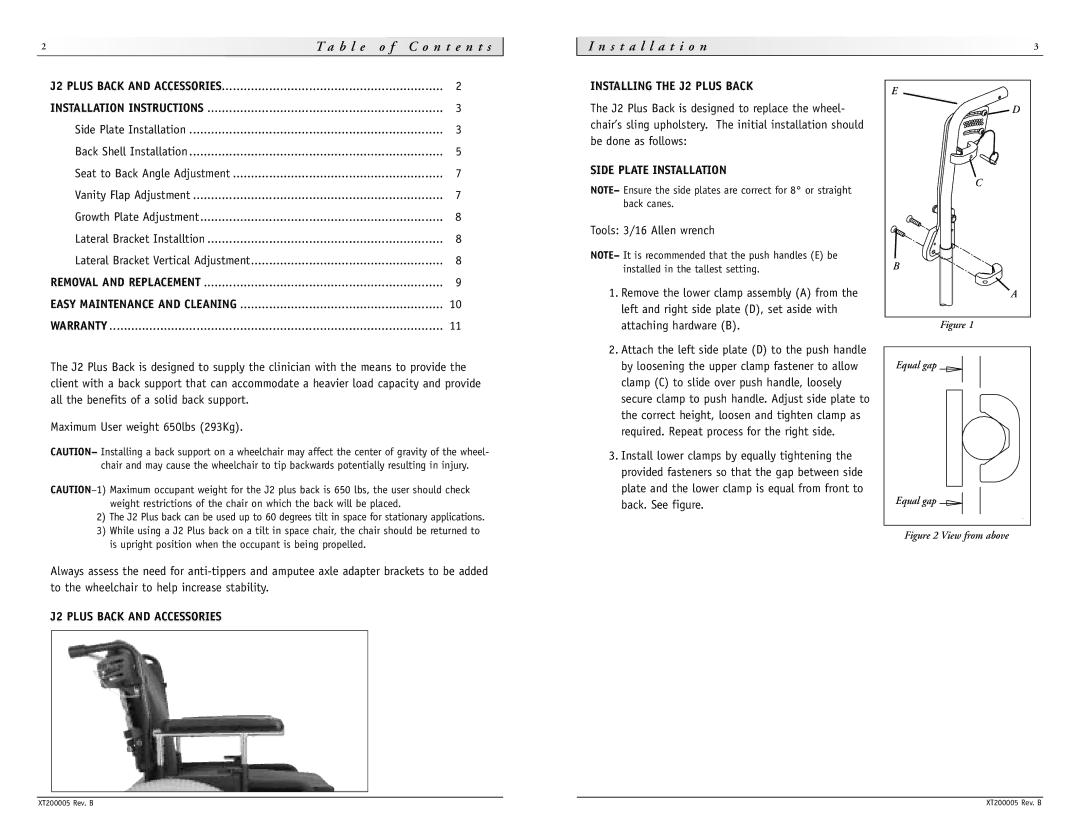
INSTALLING THE J2 PLUS BACK | E | |
| ||
The J2 Plus Back is designed to replace the wheel- | D | |
chair’s sling upholstery. The initial installation should |
| |
be done as follows: |
| |
SIDE PLATE INSTALLATION | C | |
NOTE– Ensure the side plates are correct for 8° or straight | ||
| ||
back canes. |
| |
Tools: 3/16 Allen wrench |
| |
NOTE– It is recommended that the push handles (E) be | B | |
installed in the tallest setting. | ||
1. Remove the lower clamp assembly (A) from the | A | |
left and right side plate (D), set aside with |
|
attaching hardware (B). | Figure 1 |
2. Attach the left side plate (D) to the push handle |
|
| |
by loosening the upper clamp fastener to allow | Equal gap |
clamp (C) to slide over push handle, loosely |
|
secure clamp to push handle. Adjust side plate to |
|
the correct height, loosen and tighten clamp as |
|
required. Repeat process for the right side. |
|
3.Install lower clamps by equally tightening the provided fasteners so that the gap between side
plate and the lower clamp is equal from front to | Equal gap |
back. See figure. |
Figure 2 View from above
XT200005 Rev. B | XT200005 Rev. B |