I V . A S S E M B L Y
I V . A S S E M B L Y
B. INSTALLING HUBS
1.Installation (Figs. 5 & 6)
a.Thread screw (4) partially through threaded hub (3) to position hubs on both sides of wheel.
b.Insert alignment tool or axle with key
(2)through hub and wheel assembly, aligning keyways.
c.Add washer (5) and thread nut (6) on alignment tool.
d.Tighten nut until both hubs are fully seated in wheel.
e.Install screws on hubs in sequence shown (Fig. 6) using 1/8” Allen wrench.
f.Remove screw (4) and alignment
tool (2).
C. ASSEMBLING COMPONENTS
1. Drive Side Assembly (Fig. 7) | |
a. | Mount handrim hub to handrim on dual |
| handrim side. |
b. | Add one washer (2a) to axle (1). |
c. | Insert axle with washer through bearings |
| in axle plate. |
d. | For Quickie & Zippie Series: |
| Add four washers (2b) to axle. |
| For Breezy Series: Move washers (2c) as |
| spacers for outer handrim (6) and wheel |
| assembly (4). Add or remove washers to |
| adjust spacing. |
e. | Add spacer (3) to axle. |
f. | Add wheel (4) to axle. |
g. | Add another washer (2c) to axle. |
h. | Insert key (5) into keyway on axle (1). |
4
6
![]() 5 3
5 3
1
2
Fig. 5
1 3
6
5
4 2
Fig. 6
6 2e
5
2b
7
2c
3
4
1 2a
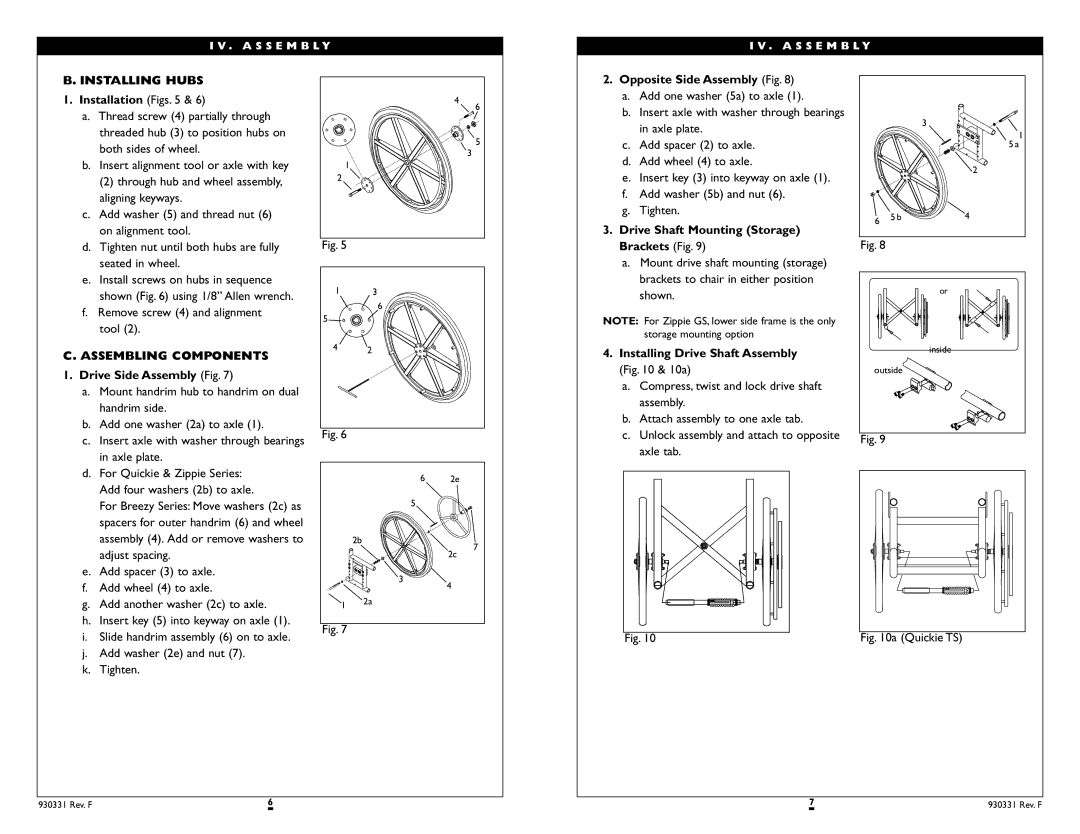
2.Opposite Side Assembly (Fig. 8)
a.Add one washer (5a) to axle (1).
b.Insert axle with washer through bearings in axle plate.
c.Add spacer (2) to axle.
d.Add wheel (4) to axle.
e.Insert key (3) into keyway on axle (1).
f.Add washer (5b) and nut (6).
g.Tighten.
3.Drive Shaft Mounting (Storage) Brackets (Fig. 9)
a.Mount drive shaft mounting (storage) brackets to chair in either position shown.
NOTE: For Zippie GS, lower side frame is the only storage mounting option
4.Installing Drive Shaft Assembly (Fig. 10 & 10a)
a.Compress, twist and lock drive shaft assembly.
b.Attach assembly to one axle tab.
c.Unlock assembly and attach to opposite axle tab.
3![]()
![]()
![]() 1 5 a
1 5 a
2
6 | 5 b | 4 |
|
|
Fig. 8
or
inside
outside
Fig. 9
i. | Slide handrim assembly (6) on to axle. |
j. | Add washer (2e) and nut (7). |
k. | Tighten. |
Fig. 7
Fig. 10 | Fig. 10a (Quickie TS) |
930331 Rev. F | 6 | 7 | 930331 Rev. F |