V . A D J U S T M E N T S
V . A D J U S T M E N T S
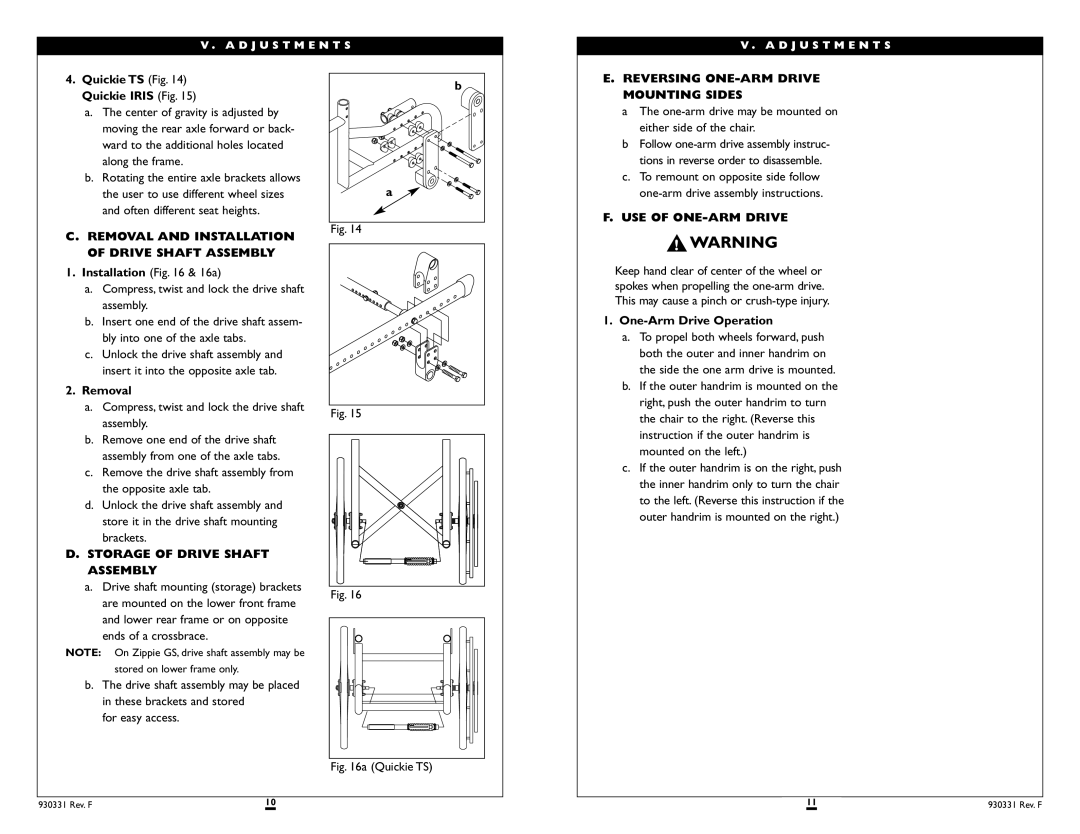
4.Quickie TS (Fig. 14) Quickie IRIS (Fig. 15)
a.The center of gravity is adjusted by moving the rear axle forward or back- ward to the additional holes located along the frame.
b.Rotating the entire axle brackets allows the user to use different wheel sizes and often different seat heights.
C.REMOVAL AND INSTALLATION OF DRIVE SHAFT ASSEMBLY
1.Installation (Fig. 16 & 16a)
a.Compress, twist and lock the drive shaft assembly.
b.Insert one end of the drive shaft assem- bly into one of the axle tabs.
c.Unlock the drive shaft assembly and insert it into the opposite axle tab.
2.Removal
a.Compress, twist and lock the drive shaft assembly.
b.Remove one end of the drive shaft assembly from one of the axle tabs.
c.Remove the drive shaft assembly from the opposite axle tab.
d.Unlock the drive shaft assembly and store it in the drive shaft mounting brackets.
D.STORAGE OF DRIVE SHAFT ASSEMBLY
a.Drive shaft mounting (storage) brackets are mounted on the lower front frame and lower rear frame or on opposite ends of a crossbrace.
NOTE: On Zippie GS, drive shaft assembly may be
stored on lower frame only.
b.The drive shaft assembly may be placed in these brackets and stored
for easy access.
b
a
Fig. 14
Fig. 15
Fig. 16
E.REVERSING ONE-ARM DRIVE MOUNTING SIDES
aThe one-arm drive may be mounted on either side of the chair.
bFollow
c.To remount on opposite side follow
F.USE OF ONE-ARM DRIVE
Keep hand clear of center of the wheel or spokes when propelling the
1.One-Arm Drive Operation
a.To propel both wheels forward, push both the outer and inner handrim on the side the one arm drive is mounted.
b.If the outer handrim is mounted on the right, push the outer handrim to turn the chair to the right. (Reverse this instruction if the outer handrim is mounted on the left.)
c.If the outer handrim is on the right, push the inner handrim only to turn the chair to the left. (Reverse this instruction if the outer handrim is mounted on the right.)
Fig. 16a (Quickie TS)
930331 Rev. F | 10 | 11 | 930331 Rev. F |
|
|
|
|