3. Preset for Use

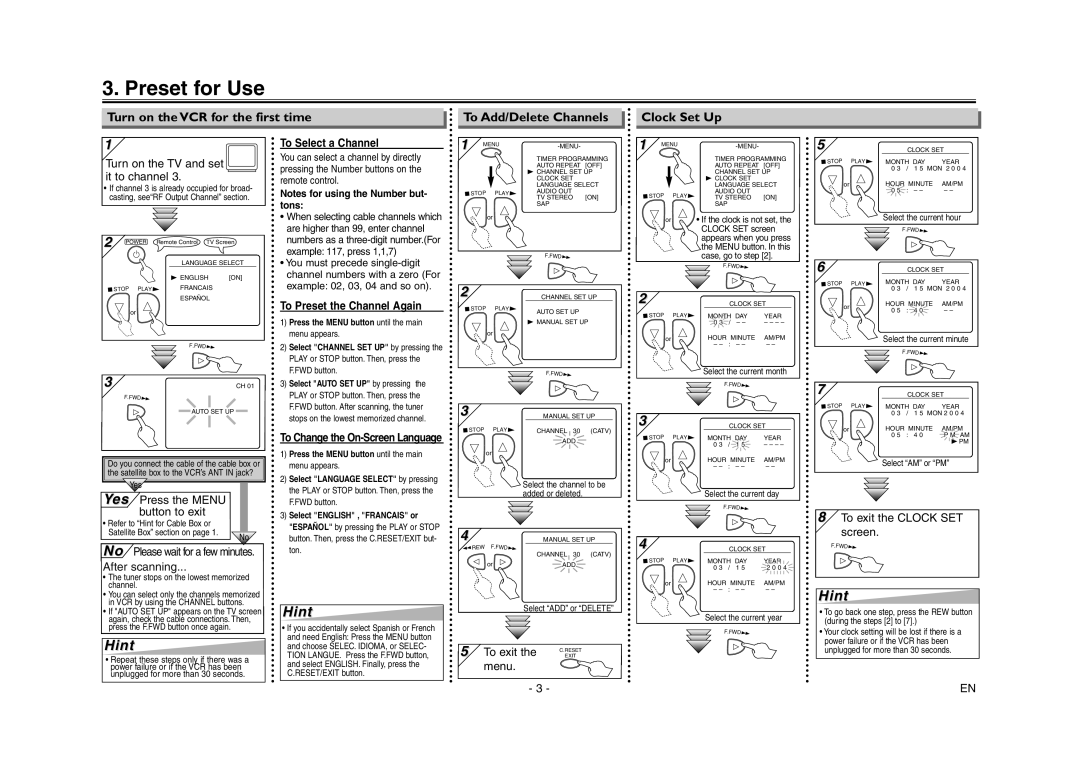
Turn on the VCR for the first time

To Add/Delete Channels

Clock Set Up

1

Turn on the TV and set it to channel 3.

If channel 3 is already occupied for broad- casting, see“RF Output Channel” section.

To Select a Channel

You can select a channel by directly pressing the Number buttons on the remote control.

Notes for using the Number but- tons:

1 MENU

STOP

PLAY

-MENU-

TIMER PROGRAMMING AUTO REPEAT [OFF]

BCHANNEL SET UP CLOCK SET LANGUAGE SELECT AUDIO OUT

TV STEREO [ON] SAP

1 MENU

STOP

PLAY

-MENU-

TIMER PROGRAMMING AUTO REPEAT [OFF] CHANNEL SET UP

BCLOCK SET LANGUAGE SELECT AUDIO OUT

TV STEREO [ON] SAP

55


CLOCK SET

STOP

PLAY

MONTH DAY

YEAR


0 3

/ 1 5 MON 2 0 0 4

or


HOUR MINUTE

AM/PM


0 5

: – –

– –

When selecting cable channels which

are higher than 99, enter channel

or

or • If the clock is not set, the CLOCK SET screen

Select the current hour

F.FWD

2

POWER

Remote Control

TV Screen


LANGUAGE SELECT


B ENGLISH

[ON]


STOP

PLAY

FRANCAIS


ESPAÑOL


or


F.FWD


3


CH 01


F.FWD


AUTO SET UP

Do you connect the cable of the cable box or the satellite box to the VCR’s ANT IN jack?

Yes

Yes Press the MENU button to exit

• Refer to “Hint for Cable Box or

Satellite Box” section on page 1.

No

No Please wait for a few minutes.

After scanning...

The tuner stops on the lowest memorized channel.

You can select only the channels memorized in VCR by using the CHANNEL buttons.

If "AUTO SET UP" appears on the TV screen again, check the cable connections. Then, press the F.FWD button once again.

Hint

Repeat these steps only if there was a power failure or if the VCR has been unplugged for more than 30 seconds.

numbers as a three-digit number.(For

example: 117, press 1,1,7)

• You must precede single-digit

channel numbers with a zero (For

example: 02, 03, 04 and so on).

To Preset the Channel Again

1)Press the MENU button until the main menu appears.

2)Select "CHANNEL SET UP" by pressing the PLAY or STOP button. Then, press the F.FWD button.

3)Select "AUTO SET UP" by pressing the PLAY or STOP button. Then, press the F.FWD button. After scanning, the tuner stops on the lowest memorized channel.

To Change the On-Screen Language

1)Press the MENU button until the main menu appears.

2)Select "LANGUAGE SELECT" by pressing the PLAY or STOP button. Then, press the F.FWD button.

3)Select "ENGLISH" , "FRANCAIS" or "ESPAÑOL" by pressing the PLAY or STOP button. Then, press the C.RESET/EXIT but- ton.

Hint

If you accidentally select Spanish or French and need English: Press the MENU button and choose SELEC. IDIOMA, or SELEC- TION LANGUE. Press the F.FWD button, and select ENGLISH. Finally, press the C.RESET/EXIT button.


F.FWD

2


CHANNEL SET UP

STOP

PLAY

AUTO SET UP


BMANUAL SET UP

or


F.FWD

3


MANUAL SET UP

STOP

PLAY

CHANNEL 30 (CATV)


ADD

or

Select the channel to be

added or deleted.

4


MANUAL SET UP

REW

F.FWD

CHANNEL 30

(CATV)


or

ADD


Select “ADD” or “DELETE”

5 To exit the

EXIT


C.RESET

menu.

appears when you press the MENU button. In this case, go to step [2].


F.FWD


2


CLOCK SET

STOP

PLAY

MONTH DAY

YEAR


0 3

/ – –

– – – –

or


HOUR MINUTE

AM/PM


– –

: – –

– –


Select the current month


F.FWD


3


CLOCK SET

STOP

PLAY

MONTH DAY

YEAR


0 3

/ 1 5

– – – –

or


HOUR MINUTE

AM/PM


– –

: – –

– –

Select the current day


F.FWD


4


CLOCK SET


STOP

PLAY

MONTH DAY

YEAR


0 3

/ 1 5

2 0 0

4

or


HOUR MINUTE

AM/PM


– –

: – –

– –


Select the current year


F.FWD


66


CLOCK SET

STOP

PLAY

MONTH DAY

YEAR


0 3

/ 1 5 MON 2 0 0 4

or


HOUR MINUTE

AM/PM


0 5

: 4 0

– –


Select the current minute


F.FWD


77


CLOCK SET

STOP

PLAY

MONTH DAY

YEAR


0 3 / 1 5 MON 2 0 0 4

or


HOUR MINUTE

AM/PM


0 5 : 4 0

P M AM


B PM


Select “AM” or “PM”

88 To exit the CLOCK SET screen.

F.FWD

HintHint

To go back one step, press the REW button (during the steps [2] to [7].)

Your clock setting will be lost if there is a power failure or if the VCR has been

unplugged for more than 30 seconds.

- 3 -

EN

Page 3
Image 3
Sylvania 6260VE owner manual Preset for Use, Hint

6260VE specifications

The Sylvania 6260VE is a groundbreaking offering in the world of modern lighting solutions, known for its unique blend of efficiency, design, and advanced technology. Designed primarily for commercial and residential use, this LED luminaire is ideal for a diverse range of applications, from office spaces to retail environments.

One of the most notable features of the Sylvania 6260VE is its exceptional energy efficiency. By utilizing advanced LED technology, this luminaire provides significant energy savings compared to traditional lighting solutions. The integrated LED module ensures that users benefit from longer lifespan and reduced maintenance costs, making it an economically savvy choice for both businesses and homeowners.

Additionally, the 6260VE provides high lumen output combined with a uniform light distribution. This makes it particularly effective in enhancing the visual aesthetics of a space while promoting visibility and safety. The design of the luminaire allows for flexible mounting options, making it easy to integrate into existing setups or new designs.

Another key characteristic of the Sylvania 6260VE is its versatility. With a range of color temperature options available, users can select the perfect ambiance for their environment. Whether a warm, inviting glow is desired for a cozy living area or bright, clean light for a workspace, the 6260VE can accommodate varying lighting needs.

The Sylvania 6260VE also incorporates smart technology features for modern users. This includes compatibility with smart building systems and the potential for integration with sensors and control systems. This technology allows for tailored lighting solutions that can adapt to changing circumstances, such as occupancy levels or natural light availability.

Moreover, durability is another hallmark of the Sylvania 6260VE. Constructed from high-quality materials, this luminaire is designed to withstand the test of time, making it suitable for high-traffic areas and various environmental conditions.

Overall, the Sylvania 6260VE stands out as a versatile, energy-efficient lighting solution that combines state-of-the-art technology with practical design features. Its ability to enhance both functionality and aesthetics makes it a top choice for anyone looking to upgrade their lighting systems, offering the perfect blend of innovation and reliability.