B
DISPLAY Setting
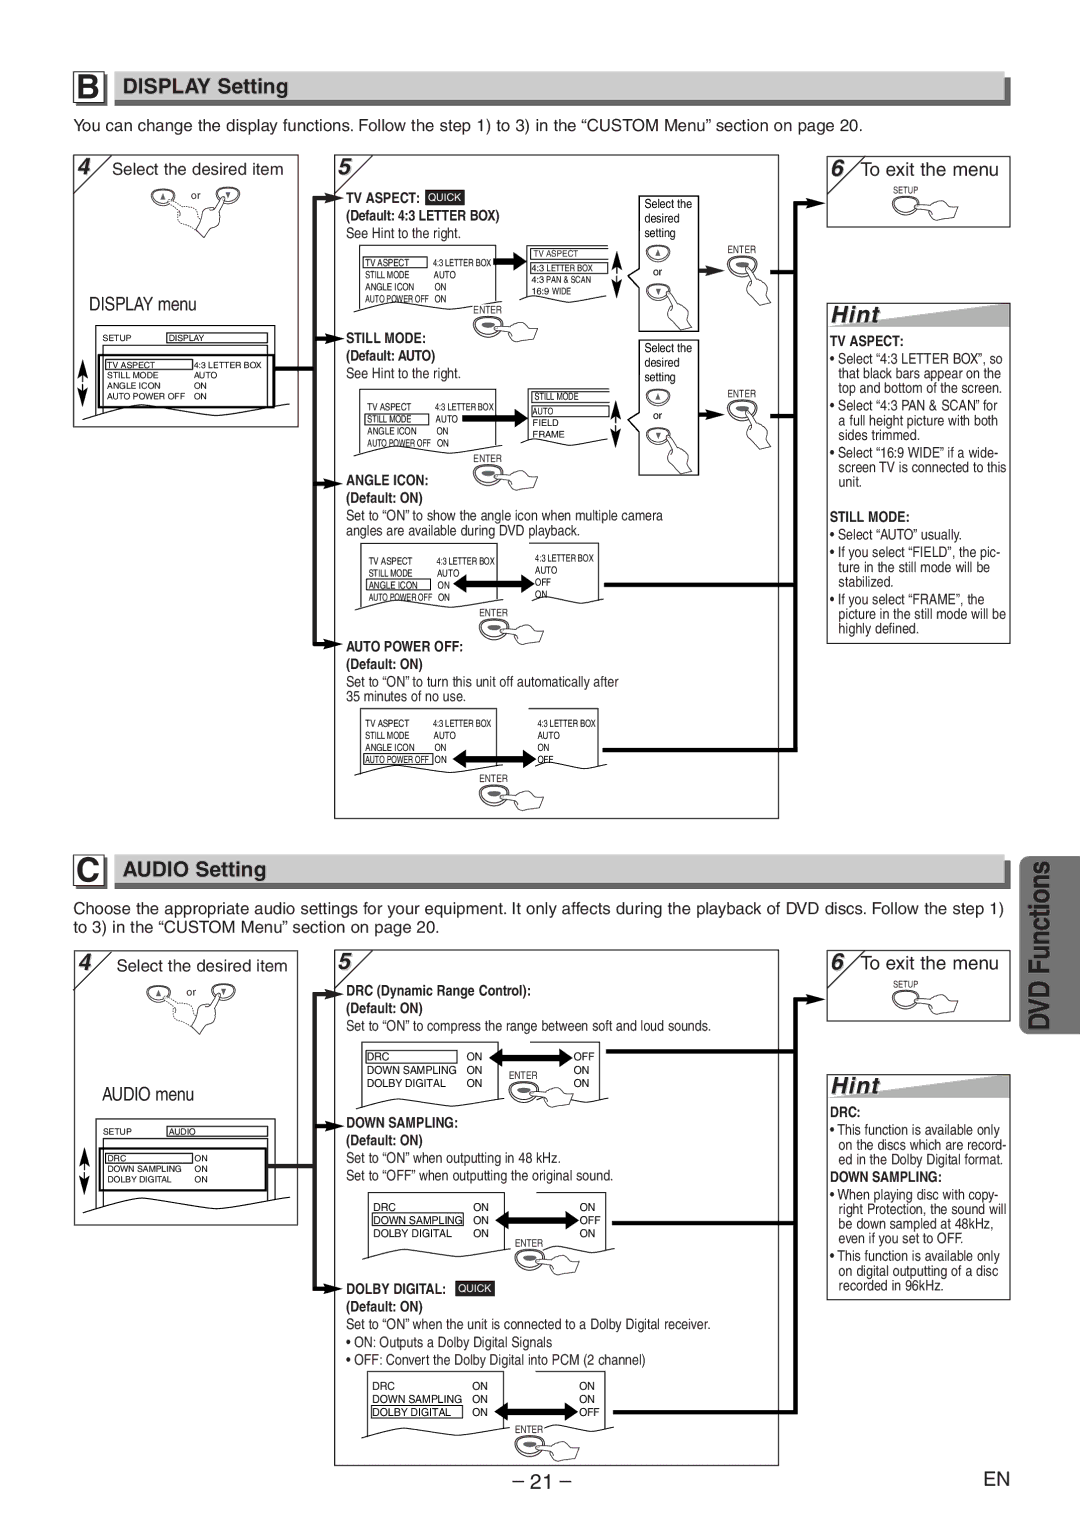
You can change the display functions. Follow the step 1) to 3) in the “CUSTOM Menu” section on page 20.
4 Select the desired item |
or |
DISPLAY menu |
5
TV ASPECT: QUICK
(Default: 4:3 LETTER BOX)
See Hint to the right.
TV ASPECT | 4:3 LETTER BOX |
STILL MODE | AUTO |
ANGLE ICON | ON |
AUTO POWER OFF | ON |
| ENTER |
Select the desired setting
TV ASPECT | ENTER |
| |
4:3 LETTER BOX | or |
4:3 PAN & SCAN |
|
16:9 WIDE |
|
6To exit the menu
SETUP
Hint
|
|
|
|
|
| SETUP | DISPLAY |
|
|
|
|
|
|
|
| TV ASPECT | 4:3 LETTER BOX |
|
|
| STILL MODE | AUTO |
|
|
| ANGLE ICON | ON |
|
|
| AUTO POWER OFF ON |
|
| |
|
|
|
|
|
|
|
|
|
|
STILL MODE: |
|
| Select the |
|
(Default: AUTO) |
|
| ||
| desired |
| ||
See Hint to the right. |
|
| ||
| setting |
| ||
TV ASPECT | 4:3 LETTER BOX | STILL MODE |
| ENTER |
AUTO | or |
| ||
STILL MODE | AUTO |
| ||
FIELD |
| |||
|
| |||
ANGLE ICON | ON |
|
| |
FRAME |
|
| ||
AUTO POWER OFF | ON |
|
| |
|
|
| ||
| ENTER |
|
|
|
ANGLE ICON: |
|
|
|
|
(Default: ON) |
|
|
|
|
Set to “ON” to show the angle icon when multiple camera |
| |||
angles are available during DVD playback. |
|
| ||
TV ASPECT | 4:3 LETTER BOX | 4:3 LETTER BOX |
|
|
STILL MODE | AUTO | AUTO |
|
|
ANGLE ICON | ON | OFF |
|
|
AUTO POWER OFF | ON | ON |
|
|
| ENTER |
|
|
|
AUTO POWER OFF: |
|
|
| |
(Default: ON) |
|
|
|
|
Set to “ON” to turn this unit off automatically after |
|
| ||
35 minutes of no use. |
|
|
| |
TV ASPECT | 4:3 LETTER BOX | 4:3 LETTER BOX |
|
|
STILL MODE | AUTO | AUTO |
|
|
ANGLE ICON | ON | ON |
|
|
AUTO POWER OFF | ON | OFF |
|
|
ENTER
TV ASPECT:
•Select “4:3 LETTER BOX”, so that black bars appear on the top and bottom of the screen.
•Select “4:3 PAN & SCAN” for a full height picture with both sides trimmed.
•Select “16:9 WIDE” if a wide- screen TV is connected to this unit.
STILL MODE:
•Select “AUTO” usually.
•If you select “FIELD”, the pic- ture in the still mode will be stabilized.
•If you select “FRAME”, the picture in the still mode will be highly defined.
C AUDIO Setting
Choose the appropriate audio settings for your equipment. It only affects during the playback of DVD discs. Follow the step 1) to 3) in the “CUSTOM Menu” section on page 20.
Functions
4 Select the desired item | ||
|
| or |
AUDIO menu | ||
SETUP | AUDIO | |
DRC |
| ON |
DOWN SAMPLING | ON | |
DOLBY DIGITAL | ON | |
5
DRC (Dynamic Range Control):
(Default: ON)
Set to “ON” to compress the range between soft and loud sounds.
DRC | ON |
| OFF | |
| ON |
| ON | |
DOWN SAMPLING | ENTER | |||
DOLBY DIGITAL | ON | ON | ||
|
DOWN SAMPLING: (Default: ON)
Set to “ON” when outputting in 48 kHz.
Set to “OFF” when outputting the original sound.
DRC | ON |
| ON |
DOWN SAMPLING | ON |
| OFF |
| |||
DOLBY DIGITAL | ON |
| ON |
|
| ENTER | |
DOLBY DIGITAL: QUICK
(Default: ON)
Set to “ON” when the unit is connected to a Dolby Digital receiver.
•ON: Outputs a Dolby Digital Signals
•OFF: Convert the Dolby Digital into PCM (2 channel)
DRC | ON |
| ON |
DOWN SAMPLING | ON |
| ON |
DOLBY DIGITAL | ON |
| OFF |
| |||
|
| ENTER | |
6To exit the menu
SETUP
Hint
DRC:
•This function is available only on the discs which are record- ed in the Dolby Digital format.
DOWN SAMPLING:
•When playing disc with copy- right Protection, the sound will be down sampled at 48kHz, even if you set to OFF.
•This function is available only on digital outputting of a disc recorded in 96kHz.
DVD
– 21 – | EN |
