PROGRAM NUMBER 4
ONCE DAILY WEEKLY
ONE TIME PROGRAM
PROGRAM NUMBER 4
DATE - - / - - START TIME - - : - - - -
END TIME - - : - - - -
CHANNEL - -
REC SPEED - -
ONE TIME PROGRAM
PROGRAM NUMBER 4
DATE 05 /12 MON
START TIME - - : - - - -
END TIME - - : - - - -
CHANNEL - -
REC SPEED - -

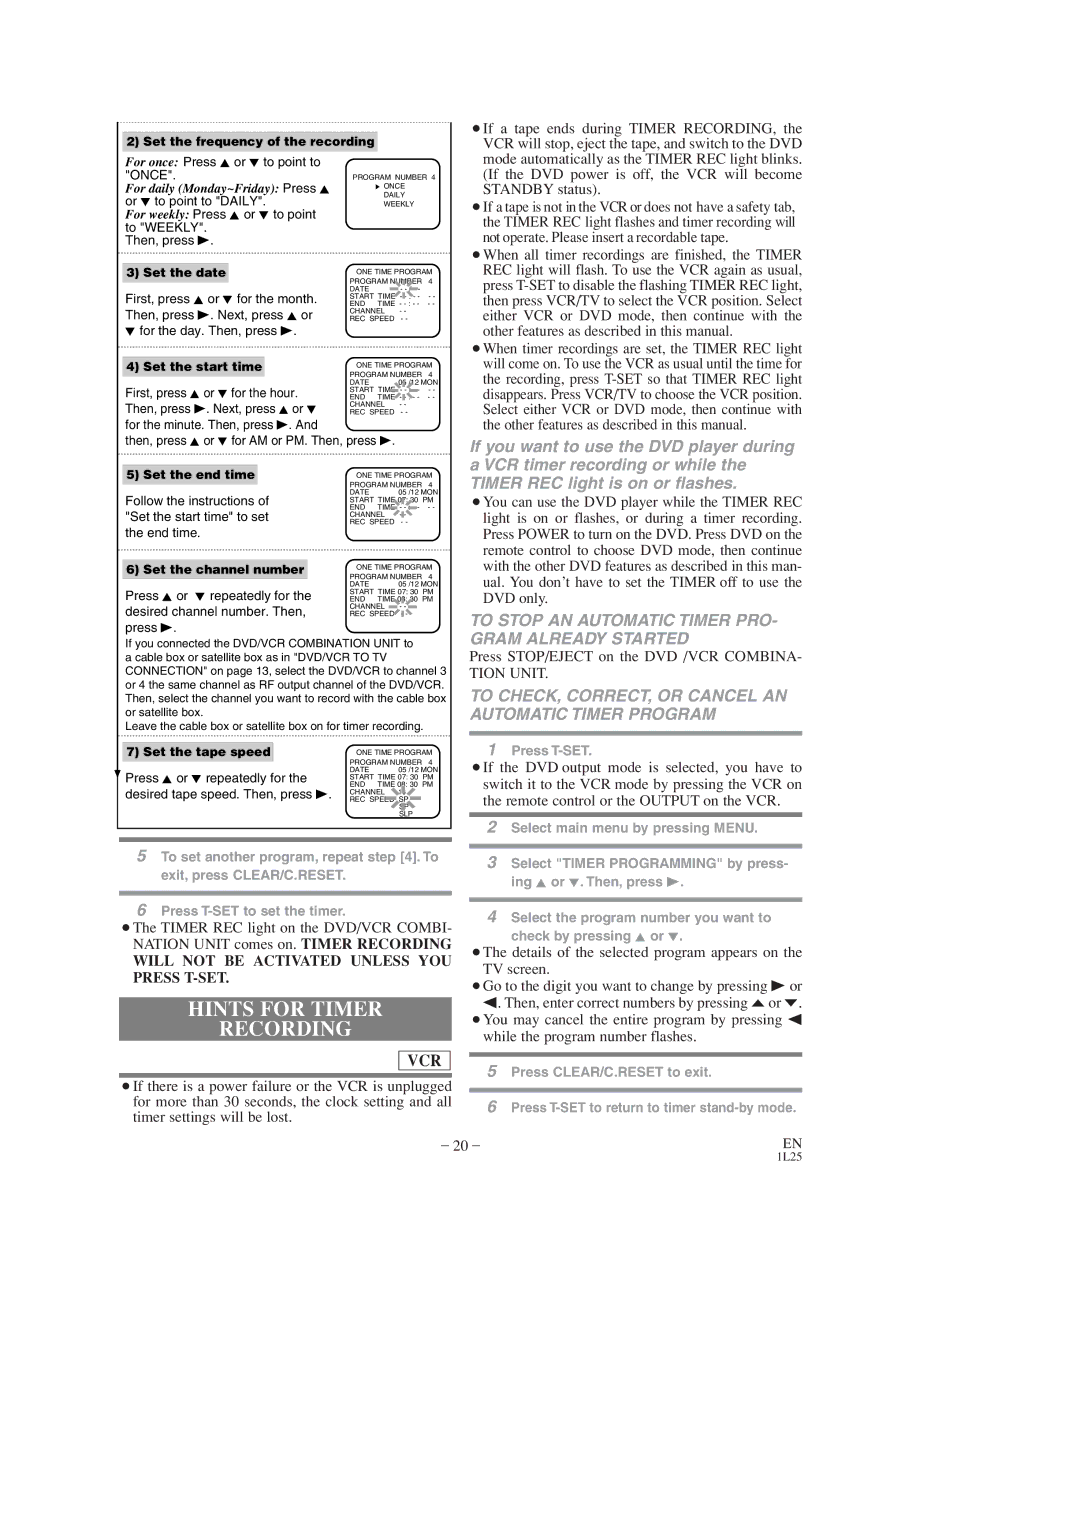
2) Set the frequency of the recording

For once: Press K or L to point to "ONCE".

For daily (Monday~Friday): Press K or L to point to "DAILY".

For weekly: Press K or L to point to "WEEKLY".

Then, press B.

3) Set the date

First, press K or L for the month.

Then, press B. Next, press K or

Lfor the day. Then, press B.

4) Set the start time

First, press K or L for the hour. Then, press B. Next, press K or L

for the minute. Then, press B. And

then, press K or L for AM or PM. Then, press B.

5) Set the end time


ONE TIME PROGRAM


PROGRAM NUMBER 4

Follow the instructions of

DATE


05 /12 MON

START TIME 07: 30 PM

"Set the start time" to set

END

TIME - - : - - - -

CHANNEL

- -

REC SPEED

- -

the end time.


6) Set the channel number


ONE TIME PROGRAM


PROGRAM NUMBER 4


DATE


05 /12 MON

Press K or L repeatedly for the

START TIME 07: 30 PM

END

TIME 08: 30 PM

desired channel number. Then,

CHANNEL

- -

REC SPEED

- -

press B.

If you connected the DVD/VCR COMBINATION UNIT to a cable box or satellite box as in "DVD/VCR TO TV CONNECTION" on page 13, select the DVD/VCR to channel 3 or 4 the same channel as RF output channel of the DVD/VCR. Then, select the channel you want to record with the cable box or satellite box.

Leave the cable box or satellite box on for timer recording.

7) Set the tape speed


ONE TIME PROGRAM


PROGRAM NUMBER 4

Press K or L repeatedly for the

DATE

05 /12 MON

START TIME 07: 30 PM

desired tape speed. Then, press B.

END TIME 08: 30 PM

CHANNEL

16

REC SPEED SP

SP

SLP

¡If a tape ends during TIMER RECORDING, the VCR will stop, eject the tape, and switch to the DVD mode automatically as the TIMER REC light blinks. (If the DVD power is off, the VCR will become STANDBY status).

¡If a tape is not in the VCR or does not have a safety tab, the TIMER REC light flashes and timer recording will not operate. Please insert a recordable tape.

¡When all timer recordings are finished, the TIMER REC light will flash. To use the VCR again as usual, press T-SET to disable the flashing TIMER REC light, then press VCR/TV to select the VCR position. Select either VCR or DVD mode, then continue with the other features as described in this manual.

¡When timer recordings are set, the TIMER REC light will come on. To use the VCR as usual until the time for the recording, press T-SET so that TIMER REC light disappears. Press VCR/TV to choose the VCR position. Select either VCR or DVD mode, then continue with the other features as described in this manual.

If you want to use the DVD player during a VCR timer recording or while the TIMER REC light is on or flashes.

¡You can use the DVD player while the TIMER REC light is on or flashes, or during a timer recording. Press POWER to turn on the DVD. Press DVD on the remote control to choose DVD mode, then continue with the other DVD features as described in this man- ual. You don’t have to set the TIMER off to use the DVD only.

TO STOP AN AUTOMATIC TIMER PRO- GRAM ALREADY STARTED

Press STOP/EJECT on the DVD /VCR COMBINA-

TION UNIT.

TO CHECK, CORRECT, OR CANCEL AN AUTOMATIC TIMER PROGRAM

1Press T-SET.

¡If the DVD output mode is selected, you have to switch it to the VCR mode by pressing the VCR on the remote control or the OUTPUT on the VCR.


2

Select main menu by pressing MENU.

5 To set another program, repeat step [4]. To


3

Select "TIMER PROGRAMMING" by press-

exit, press CLEAR/C.RESET.


ing K or L. Then, press B.


6 Press T-SET to set the timer.


4

Select the program number you want to

¡The TIMER REC light on the DVD/VCR COMBI-


check by pressing K or L.

NATION UNIT comes on. TIMER RECORDING


¡The details of the selected program appears on the

WILL NOT BE ACTIVATED UNLESS YOU

TV screen.

PRESS T-SET.

¡Go to the digit you want to change by pressing B or


s. Then, enter correct numbers by pressing oor p.

HINTS FOR TIMER


¡You may cancel the entire program by pressing s

RECORDING


while the program number flashes.


VCR


5

Press CLEAR/C.RESET to exit.


¡If there is a power failure or the VCR is unplugged


for more than 30 seconds, the clock setting and all

6

Press T-SET to return to timer stand-by mode.

timer settings will be lost.


– 20 –

EN

1L25

Page 20
Image 20
Sylvania DVC860D owner manual Hints for Timer, To Stop AN Automatic Timer PRO- Gram Already Started

DVC860D specifications

The Sylvania DVC860D is a versatile and user-friendly digital video recorder that combines functionality and innovation to cater to today’s multimedia needs. Designed for both casual users and tech enthusiasts, the DVC860D stands out with its compact design and robust performance features.

One of the main features of the DVC860D is its ability to record video in high definition. With support for various resolutions, including 720p and 1080p, the device captures every detail, ensuring that your home videos look sharp and vibrant. Its built-in MPEG-4 encoding technology allows for efficient storage without compromising on quality, making it ideal for recording long events or multiple shows.

In addition to its recording capabilities, the DVC860D offers playback support for a wide range of formats, including DVD, CD, and various digital file formats. This means users can not only record but also view their favorite movies, TV shows, and personal videos with ease. The compatibility with standard DVD media ensures that anyone can access their video library without the need for additional converters or software.

The DVC860D is also equipped with a user-friendly interface that simplifies navigation. The remote control features dedicated buttons for quick access to recordings, playback functions, and menu options. This intuitive design makes it accessible even for those who may not be tech-savvy, minimizing the learning curve associated with digital recording devices.

Moreover, the Sylvania DVC860D comes with built-in scheduling features, allowing users to set recordings in advance. This function is particularly beneficial for capturing live broadcasts, such as sports events or favorite TV shows, without the need to be present at all times.

Connectivity is another area where the DVC860D excels. With multiple inputs, including USB ports and HDMI output, the device allows for easy connection to TVs, computers, and external storage devices. This flexibility means that users can transfer videos seamlessly or enhance their viewing experience on larger screens.

In summary, the Sylvania DVC860D is a sophisticated digital video recorder that offers high-definition video recording, extensive format compatibility, an intuitive user interface, scheduling capabilities, and versatile connectivity options. Its combination of features makes it an excellent choice for anyone looking to enhance their video recording and playback experience in a straightforward and efficient manner.