Please read before using this equipment
DVR90DE
Table of contents
Important Safeguards
Precautions
About Copyright
Features
Before you start
Easy understanding for DVD recording
When using a DVD-RW
When using a DVD-R
Choose a disc type
Play the recorded con- tents
Record to DVD discs
Edit the recorded disc
SETUP/DISC/CD menu
Guide to Displays
Edit
Snap the battery cover back
Accessories
Installing batteries in the remote control
Audio/Video cables
Information on this owners Manual
Using a remote control
Operation of the remote control
Ual
14 15
Before you start Location of controls
Front Panel
AC in Power inlet
Rear Panel
Remote Control
Front display
Display message
Connection to antenna
Use a standard antenna cable as shown System Installer
Connections
Antenna and antenna cable are not included
Use a standard antenna cable as shown
Connection to other devices
Connection to TV with a standard A/V cable
Use a component video cable to connect the Compo
Connection to TV with a S-Video cable
Connection to TV with a component video cable
Recorder to the audio input jacks on the TV
Connection to TV and VCR
VCR
Center
Channel setting
Switching on Initial setting
Getting started
Getting channels auto- matically
Using K / L buttons, then press Enter button
Select Manual Preset using Buttons, then press Enter button
Manual Preset menu will appear
Adding/deleting chan- nels
Play SETUP/DISC menu Select Clock Setting using
Initial setting Clock
Setting the clock
Enter button Press Setup button to dis Buttons, then press
Buttons, then press Enter
Select the time using K / L
Button
Option window will appear
Adjusting the clock automatically
Select Auto using K / L
OFF has been selected as
Select on or OFF using Buttons, then press Enter button
Setting the daylight sav- ings time
Daylight Saving Time options will appear
Select TV Aspect using K Buttons, then press Enter button
Initial setting Selecting the TV aspect ratio
Letter Box, 43 Pan & Scan
More than
Front display Remote
Sec
Getting started
Information on DVD recording
What is CPRM?
Recording
Recording speed
Settings for record- ing to a blank disc
Video mode has been selected as the default
Select Disc using / B buttons, then press Enter button
Select Video or VR using Buttons, then press Enter button
Select Auto Chapter using
Formatting a disc
Formatting will start
Video mode
VR mode
Formatting is complete
Select a recording speed using REC Speed button
When a DVD-RW disc is loaded
When a DVD-R disc is loaded
Recording from
Recording Ing picture quality
One-touch timer
No space remained on the disc When a power failure occurs
Recording will start
Finalizing the discs
Video mode
Press REC Monitor button again to exit
Disc menu
Select Yes using / B buttons, then press Enter button
Finalizing is complete
Select Yes, then press Enter button
VR mode
Press Timer PROG. button
Timer recording
Press Setup button to exit Disc menu
If you have not made the clock setting yet
Buttons
Press Enter button when all information required is entered
Press Power button to turn the DVD recorder off
Date
During the timer recording, press Timer PROG. button
Check the end time on
When the recording time is partially overlapped
When the starting time is same
Priority of overlapped setings
Setting a disc to pro- tect
Disc will be protected
Recording from an external component
Before attempting to record from an external component
Select the input of the DVD Recorder which the compo
Press Pause F button
Press Stop C button on
Nent to record from is con
Playable discs
Playing discs
Information on DVD play
Region codes
Press OPEN/CLOSE a but- ton to open the disc tray
Select a desired title using K
Basic Play
Press TOP MENU/ORIGI- NAL button to display the title menu
Press Stop C button to stop play
Press Stop C button to stop playing
B buttons
Press Menu Play List but- ton
Press Menu Play List but- ton to exit the menu
Press TOP Menu button to exit the title menu
Press TOP Menu button
TOP Menu button
Resume play
Step by step play- back
Chapter
Pause Repeat play
Title
All
Track
Zoom
During play, press Zoom button
Select icon using / B button, then press Enter button
Using Skip H / G buttons
Using Display button
Title/Chapter search
Track search Time search
Using Skip H / G
Buttons
Reverse search
Slow forward / Slow reverse play
Grams without interrupting Are playing
Audio menu will appear
Audio channel will switch
Audio soundtrack will switch
Audio channel menu will appear
Display menu will appear Screen
Switching subtitles
Subtitle menu will appear
Switching camera angles
Reducing block noise
Playing discs
Editing
Information on disc editing
Buttons, then Press Enter button Edit menu will appear
Editing discs
Deleting titles
Titlelist will appear Screen
Press 6 twice using number Buttons
Putting names on titles
Tons, the press Enter button
Select abc using K / L but
Four times using number but
Press 3 twice, 9 once
Setting or clearing chap- ter markers
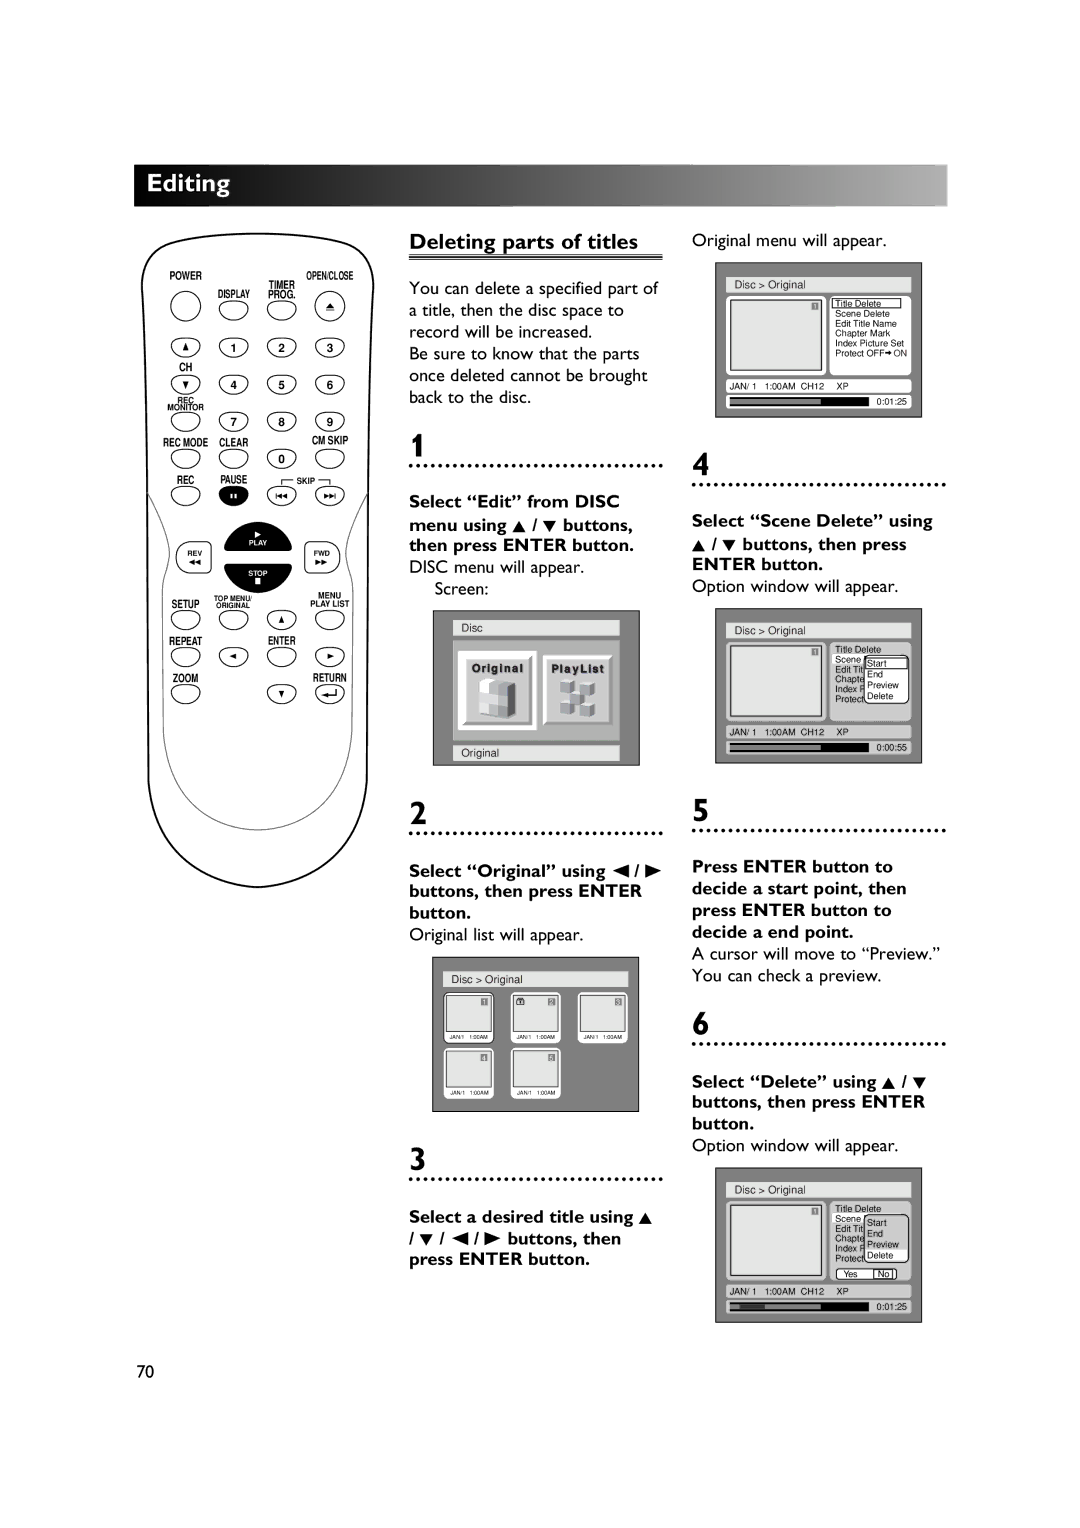
Original menu will appear
DVD-RWVR Original Deleting titles
Disc menu will appear Screen
Original list will appear
Select Delete using K / L buttons, then press Enter button
Select Scene Delete using Buttons, then press
Select Original using / B buttons, then press Enter button
Deleting parts of titles
Part of a title will be deleted
You can put title names on Titles and change the names from
Name you entered will be activated for the title
Using K / L buttons, then
Select Edit Title Name
Window for entering a title
Select Add using K / L buttons, then press Enter button
Select Chapter Mark using Buttons, then press Enter button
Buttons, then Press Enter button Original menu will appear
Setting pictures for thumbnails
Chapter marker will be added
Editing, or erasing the titles, you
Setting titles to protect
To prevent accidental recording
Buttons, then
Releasing titles from protecting
Select Disc Protect from Disc menu, then select Yes
DVD-RWVR Playlist Deleting titles
VR mode, even when a title is
Select PlayList using / B buttons, then press Enter button
Playlist will appear
Select Title Delete using K
Option window will appear
Select Scene Delete using Buttons, then press Enter button
Select Delete using K / L
Disc
Setting or clearing chap
Ter markers
Yes JAN/ 1 100AM CH12
Buttons, then Press Enter button Playlist menu will appear
Picture for thumbnail will be set
Adding titles to a playlist
Then press Enter button
Select Delete PlayList Using K / L / / B buttons
Deleting a playlist
Playlist will be erased
Title Delete
Titlelist will appear Screen Alphabet window will appear
Refer to page xx for details Option window will appear
Using Setup menu
This feature may not be available to some discs
Other settings Parental Lock
Setting a parental lock level
Select PlayBack using K Buttons, then press Enter button
Select Yes, then enter a new password
When you first change
When you already set your own password
Enter your own password
When selecting No, the cur
Rent password is still effective
Select Playback using K / L Buttons, then press Enter button
Choosing the menu lan- guage
SETUP/DISC menu will appear
Play SETUP/DISC menu
Choosing the audio lan- guage
Choosing the subtitle language
Select OFF to switch subtitles off the screen
Setting digital audio out- put
Other settings Audio settings
Select Digital Out using K Buttons, then press Enter button
Button Press Setup button to exit Setup menu
When your amplifier/decoder
Select 48kHz using K / L
96kHz
Select on or OFF using Buttons, then press Enter button. On
Compressing the range of sound volume
Range of sound volume will be compressed
Outputting the sound during play in fast for- ward
Sound will be output during play in fast forward
Setup menu will appear
Select Setup using / B
Your setting will be activated
You can setup the OSD screen
FL Dimmer
OSD Language
Screen Saver
Select a desired option, then press Enter button
Others
Troubleshooting
102
103
Playback
Quick Guide to DVD disc types
104
Language code
105
Others
Glossary
Limited Warranty


 Editing