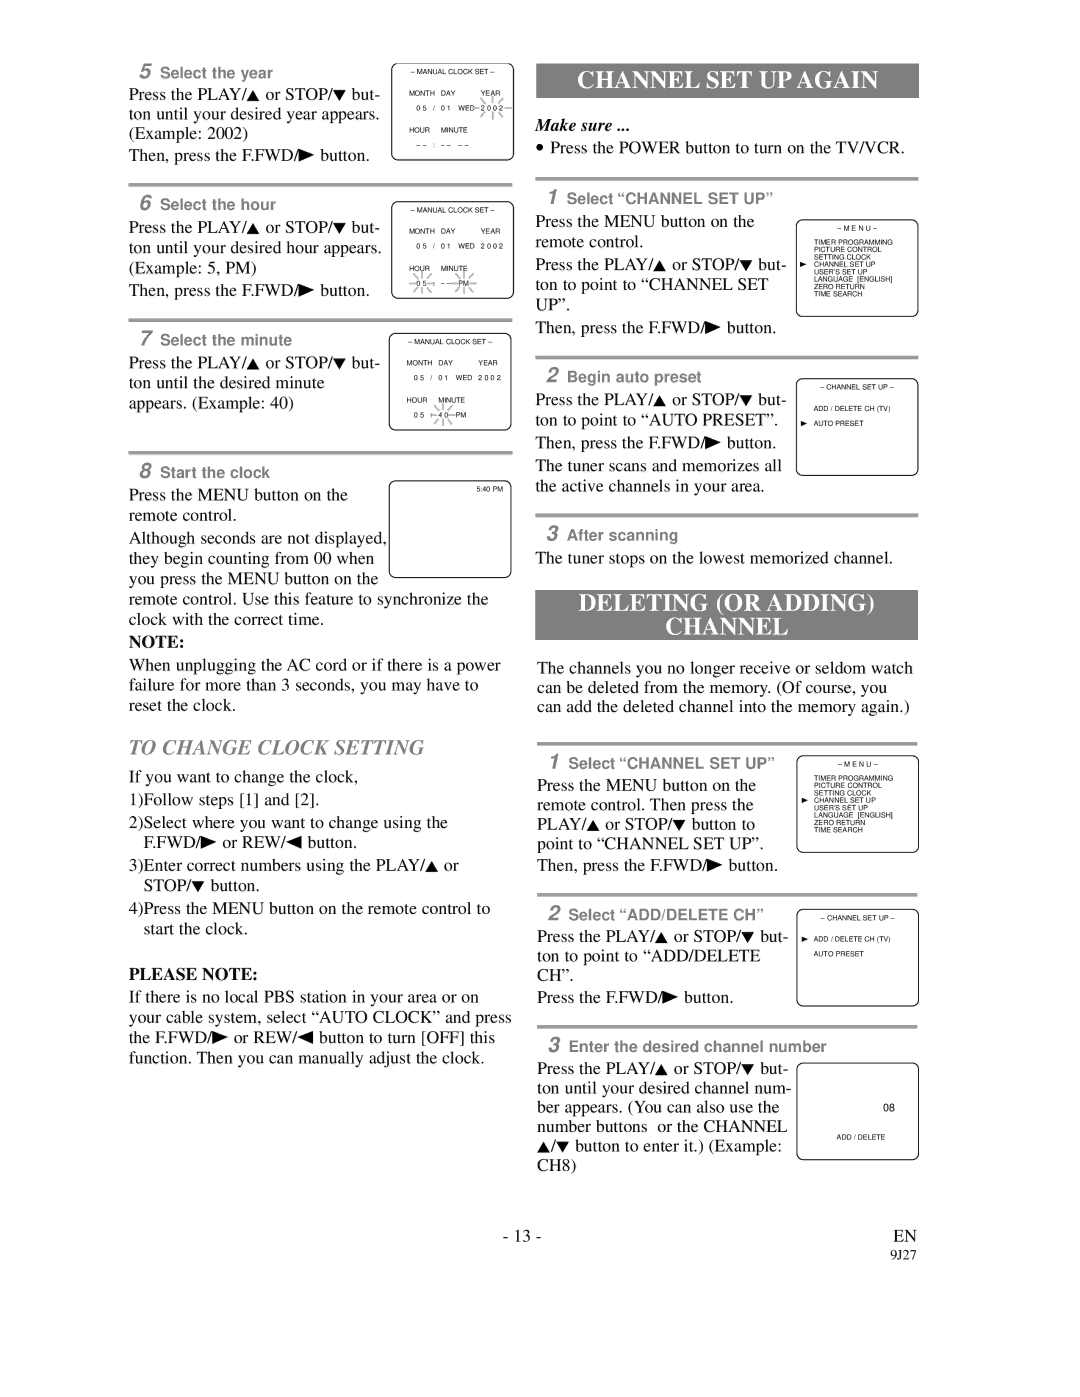
5 Select the year

– MANUAL CLOCK SET –


Press the PLAY/K or STOP/L but-

MONTH DAY

YEAR


ton until your desired year appears.

0 5

/ 0 1

WED 2 0 0 2


(Example: 2002)

HOUR

MINUTE

– –

: – –

– –

Then, press the F.FWD/B button.


CHANNEL SET UP AGAIN

Make sure ...

Press the POWER button to turn on the TV/VCR.

6 Select the hour

– MANUAL CLOCK SET –

Press the PLAY/K or STOP/L but-

MONTH DAY

YEAR

ton until your desired hour appears.

0 5

/ 0 1

WED 2 0 0 2


(Example: 5, PM)

HOUR

MINUTE


Then, press the F.FWD/B button.

0 5

: – –

PM


7 Select the minute

– MANUAL CLOCK SET –


Press the PLAY/K or STOP/L but-

MONTH DAY

YEAR

1Select “CHANNEL SET UP”

Press the MENU button on the remote control.

Press the PLAY/K or STOP/L but- ton to point to “CHANNEL SET UP”.

Then, press the F.FWD/B button.

– M E N U –

TIMER PROGRAMMING PICTURE CONTROL SETTING CLOCK

BCHANNEL SET UP USER’S SET UP LANGUAGE [ENGLISH] ZERO RETURN

TIME SEARCH

ton until the desired minute

0 5

/ 0 1

WED 2 0 0 2


appears. (Example: 40)

HOUR

MINUTE

0 5

: 4 0

PM


8 Start the clock

Press the MENU button on the

5:40 PM


remote control.


Although seconds are not displayed, they begin counting from 00 when you press the MENU button on the

remote control. Use this feature to synchronize the clock with the correct time.

NOTE:

When unplugging the AC cord or if there is a power failure for more than 3 seconds, you may have to reset the clock.

2Begin auto preset

– CHANNEL SET UP –

Press the PLAY/K or STOP/L but-

ADD / DELETE CH (TV)

ton to point to “AUTO PRESET”. B AUTO PRESET Then, press the F.FWD/B button.

The tuner scans and memorizes all the active channels in your area.

3After scanning

The tuner stops on the lowest memorized channel.

DELETING (OR ADDING)

CHANNEL

The channels you no longer receive or seldom watch can be deleted from the memory. (Of course, you can add the deleted channel into the memory again.)

TO CHANGE CLOCK SETTING

If you want to change the clock, 1)Follow steps [1] and [2].

2)Select where you want to change using the F.FWD/B or REW/s button.

3)Enter correct numbers using the PLAY/K or STOP/L button.

4)Press the MENU button on the remote control to start the clock.

PLEASE NOTE:

If there is no local PBS station in your area or on your cable system, select “AUTO CLOCK” and press

1 Select “CHANNEL SET UP”

– M E N U –


Press the MENU button on the

TIMER PROGRAMMING

PICTURE CONTROL

remote control. Then press the

SETTING CLOCK

B CHANNEL SET UP

USER’S SET UP

PLAY/K or STOP/L button to

LANGUAGE [ENGLISH]

TIME SEARCH


ZERO RETURN

point to “CHANNEL SET UP”.


Then, press the F.FWD/B button.


2 Select “ADD/DELETE CH”

– CHANNEL SET UP –

Press the PLAY/K or STOP/L but-

B ADD / DELETE CH (TV)

ton to point to “ADD/DELETE

AUTO PRESET

CH”.


Press the F.FWD/B button.


the F.FWD/B or REW/s button to turn [OFF] this function. Then you can manually adjust the clock.

3Enter the desired channel number

Press the PLAY/K or STOP/L but- ton until your desired channel num- ber appears. (You can also use the number buttons or the CHANNEL K/L button to enter it.) (Example: CH8)

08

ADD / DELETE

- 13 -

EN

9J27

Page 13
Image 13
Sylvania SRC2109E owner manual Channel SET UP Again, Deleting or Adding Channel, To Change Clock Setting, Please Note

SRC2109E specifications

The Sylvania SRC2109E is a compact and versatile LED TV that blends advanced technology with user-friendly features, making it a popular choice for both casual viewers and dedicated enthusiasts. With a sleek design, the SRC2109E is well-suited for various environments, whether it’s in a cozy living room, a bedroom, or even a small office space.

One of the standout features of the Sylvania SRC2109E is its 21.5-inch HD display, which provides vibrant colors and sharp contrast, enhancing the viewing experience. The LED technology ensures that the pictures are bright and dynamic, while the high definition resolution (1366 x 768 pixels) delivers clear and detailed visuals, making it ideal for movies, sports, and gaming alike.

The SRC2109E also comes equipped with multiple connectivity options, including HDMI and USB ports. This allows users to easily connect external devices such as gaming consoles, Blu-ray players, or streaming devices, expanding the TV’s functionality. The USB port is particularly useful for viewing photos or videos directly from flash drives, adding to the versatility of the device. The inclusion of a VGA input also enables the TV to be used as a computer monitor, accommodating various multimedia purposes.

Another notable aspect of the Sylvania SRC2109E is its built-in digital tuner, which allows users to access over-the-air HD channels. This feature eliminates the need for a separate cable subscription for those who prefer to enjoy live television. Furthermore, the user-friendly menu and remote control make navigating through settings and channels a straightforward process.

The SRC2109E is designed with energy efficiency in mind, adhering to modern standards that help reduce power consumption. This not only saves on electricity bills but also contributes to eco-friendliness, making it an excellent choice for environmentally conscious consumers.

In terms of audio, the Sylvania SRC2109E provides clear sound quality, which complements its impressive visual display. While it may not rival high-end sound systems, it meets the needs of casual viewers who enjoy watching their favorite shows and movies without needing additional audio equipment.

In summary, the Sylvania SRC2109E offers a compelling combination of robust features, advanced technology, and user-focused design. Its HD display, versatile connectivity options, and energy-efficient performance make it a great addition to any home setup, ensuring that users can enjoy a pleasant viewing experience. Whether for everyday watching or occasional gaming, the SRC2109E stands out as a reliable and stylish television option.