2.Preparation for Use
GB | W Connection and Installation of the Equipment |
|
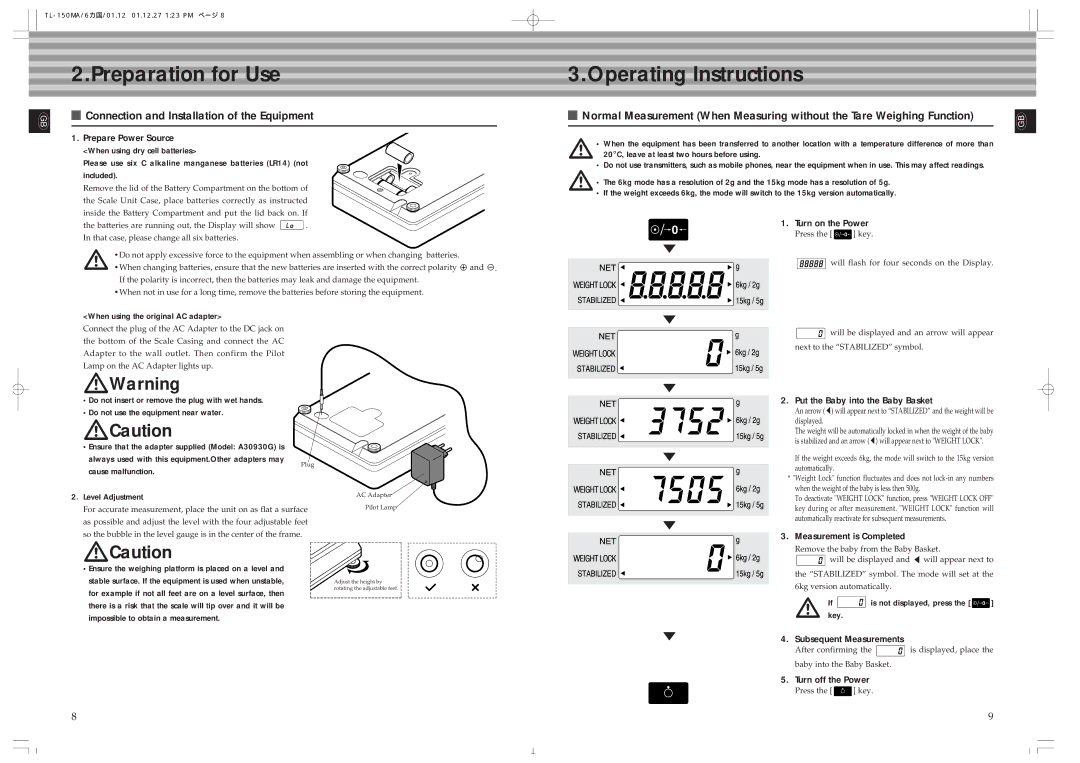
1. Prepare Power Source
<When using dry cell batteries>
Please use six C alkaline manganese batteries (LR14) (not included).
Remove the lid of the Battery Compartment on the bottom of the Scale Unit Case, place batteries correctly as instructed inside the Battery Compartment and put the lid back on. If
the batteries are running out, the Display will show ![]() . In that case, please change all six batteries.
. In that case, please change all six batteries.
m | •Do not apply excessive force to the equipment when assembling or when changing batteries. |
•When changing batteries, ensure that the new batteries are inserted with the correct polarity and . |
If the polarity is incorrect, then the batteries may leak and damage the equipment. •When not in use for a long time, remove the batteries before storing the equipment.
<When using the original AC adapter>
Connect the plug of the AC Adapter to the DC jack on the bottom of the Scale Casing and connect the AC Adapter to the wall outlet. Then confirm the Pilot Lamp on the AC Adapter lights up.
mWarning
•Do not insert or remove the plug with wet hands. •Do not use the equipment near water.
mCaution
•Ensure that the adapter supplied (Model: A30930G) is
3.Operating Instructions
WNormal Measurement (When Measuring without the Tare Weighing Function)
m• When the equipment has been transferred to another location with a temperature difference of more than 20°C, leave at least two hours before using.
•Do not use transmitters, such as mobile phones, near the equipment when in use. This may affect readings.
m• The 6kg mode has a resolution of 2g and the 15kg mode has a resolution of 5g.
•If the weight exceeds 6kg, the mode will switch to the 15kg version automatically.
/ 0 | 1. Turn on the Power |
Press the [ / 0 ] key. | |
s |
|
will flash for four seconds on the Display.
|
|
| s | |
|
|
|
| will be displayed and an arrow will appear |
|
|
|
| next to the “STABILIZED” symbol. |
|
|
|
|
|
|
|
|
|
|
|
|
|
|
|
|
|
|
|
|
|
|
| s | |
|
|
|
| 2. Put the Baby into the Baby Basket |
|
|
|
| An arrow (t) will appear next to “STABILIZED” and the weight will be |
|
|
|
| displayed. |
|
|
|
| The weight will be automatically locked in when the weight of the baby |
|
|
|
| |
|
|
|
| is stabilized and an arrow (t) will appear next to "WEIGHT LOCK". |
|
|
|
| |
|
|
|
|
|
GB
always used with this equipment.Other adapters may cause malfunction.
Plug
s | If the weight exceeds 6kg, the mode will switch to the 15kg version | |
automatically. | ||
| ||
| * "Weight Lock" function fluctuates and does not | |
| when the weight of the baby is less then 500g. |
2. Level Adjustment | AC Adapter |
For accurate measurement, place the unit on as flat a surface | Pilot Lamp |
as possible and adjust the level with the four adjustable feet |
|
so the bubble in the level gauge is in the center of the frame. |
|
mCaution |
|
•Ensure the weighing platform is placed on a level and |
|
stable surface. If the equipment is used when unstable, | Adjust the height by |
for example if not all feet are on a level surface, then | rotating the adjustable feet. |
| |
there is a risk that the scale will tip over and it will be |
|
impossible to obtain a measurement. |
|
| To deactivate "WEIGHT LOCK" function, press "WEIGHT LOCK OFF" | |
| key during or after measurement. "WEIGHT LOCK" function will | |
s | automatically reactivate for subsequent measurements. | |
3. Measurement is Completed | ||
|
Remove the baby from the Baby Basket.
![]() will be displayed and t will appear next to the “STABILIZED” symbol. The mode will set at the
will be displayed and t will appear next to the “STABILIZED” symbol. The mode will set at the
6kg version automatically.
m If ![]() is not displayed, press the [
is not displayed, press the [ ![]() / 0 ] key.
/ 0 ] key.
s | 4. | Subsequent Measurements |
| |
|
| After confirming the | is displayed, place the | |
|
| baby into the Baby Basket. |
| |
| 5. | Turn off the Power |
| |
|
| Press the [ | ] key. |
|
8 | 9 |
