TAPCO Juice Features
| 3 |
| 3 |
|
2 | 1 | 2 | 2 |
|
SIG OL | SIG OL |
| ||
1 |
|
| 1 | 4 |
OO
dBu 30
OO
dBu 30
POWER
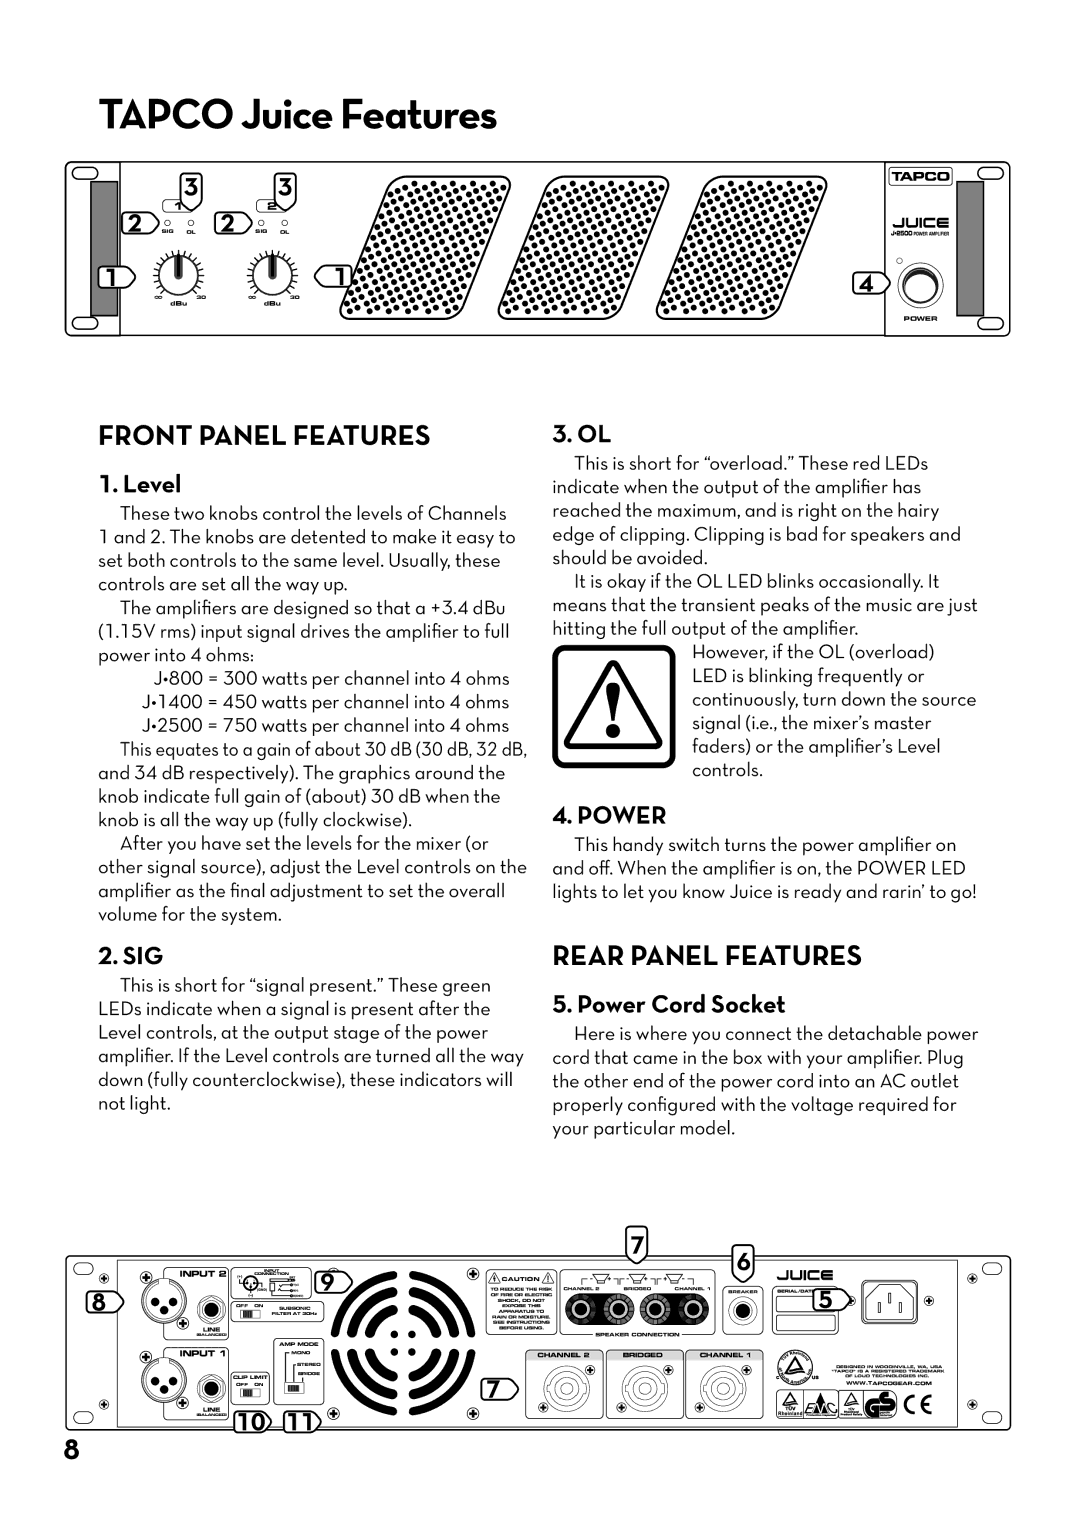
FRONT PANEL FEATURES
1. Level
These two knobs control the levels of Channels 1 and 2. The knobs are detented to make it easy to set both controls to the same level. Usually, these controls are set all the way up.
The amplifiers are designed so that a +3.4 dBu (1.15V rms) input signal drives the amplifier to full power into 4 ohms:
J•800 = 300 watts per channel into 4 ohms J•1400 = 450 watts per channel into 4 ohms J•2500 = 750 watts per channel into 4 ohms This equates to a gain of about 30 dB (30 dB, 32 dB,
and 34 dB respectively). The graphics around the knob indicate full gain of (about) 30 dB when the knob is all the way up (fully clockwise).
After you have set the levels for the mixer (or other signal source), adjust the Level controls on the amplifier as the final adjustment to set the overall volume for the system.
3. OL
This is short for “overload.” These red LEDs indicate when the output of the amplifier has reached the maximum, and is right on the hairy edge of clipping. Clipping is bad for speakers and should be avoided.
It is okay if the OL LED blinks occasionally. It means that the transient peaks of the music are just hitting the full output of the amplifier.
However, if the OL (overload) LED is blinking frequently or continuously, turn down the source signal (i.e., the mixer’s master faders) or the amplifier’s Level controls.
4. POWER
This handy switch turns the power amplifier on and off. When the amplifier is on, the POWER LED lights to let you know Juice is ready and rarin’ to go!
2. SIG
This is short for “signal present.” These green LEDs indicate when a signal is present after the Level controls, at the output stage of the power amplifier. If the Level controls are turned all the way down (fully counterclockwise), these indicators will not light.
REAR PANEL FEATURES
5. Power Cord Socket
Here is where you connect the detachable power cord that came in the box with your amplifier. Plug the other end of the power cord into an AC outlet properly configured with the voltage required for your particular model.
8
|
|
|
|
|
| 7 |
| 6 |
INPUT 2 |
| INPUT | 9 |
|
|
| ||
|
| CONNECTION | CAUTION |
|
| |||
|
|
|
|
|
|
| ||
|
|
|
| TO REDUCE THE RISK CHANNEL 2 | BRIDGED | CHANNEL 1 | BREAKER | |
|
|
|
| OF FIRE OR ELECTRIC |
|
| ||
| OFF | ON |
|
| SHOCK, DO NOT |
|
|
|
| SUBSONIC |
| EXPOSE THIS |
|
|
| ||
|
|
| FILTER AT 30Hz |
| APPARATUS TO |
|
|
|
|
|
|
|
| RAIN OR MOISTURE. |
|
|
|
|
|
|
|
| SEE INSTRUCTIONS |
|
|
|
LINE |
|
|
|
| BEFORE USING. |
|
|
|
(BALANCED) |
|
|
|
| SPEAKER CONNECTION |
| ||
INPUT 1 |
|
| AMP MODE |
|
|
|
|
|
|
| MONO |
| CHANNEL 2 | BRIDGED | CHANNEL 1 | ||
|
|
|
| |||||
|
|
| STEREO |
|
|
|
| |
| CLIP LIMIT | BRIDGE | 7 |
|
|
| ||
|
|
|
|
|
| |||
| OFF | ON |
|
|
|
|
|
|
LINE | 10 | 11 |
|
|
|
|
| |
(BALANCED) |
|
|
|
|
| |||
5![]()
![]()
![]()
![]()
DESIGNED IN WOODINVILLE, WA, USA "TAPCO" IS A REGISTERED TRADEMARK OF LOUD TECHNOLOGIES INC.
WWW.TAPCOGEAR.COM
8