Trail Camera
Page
Français 24-45 Español 46-66 Deutsch 67-88
89-109
Setup Menu Reference Table
Index
This Trail Cam to obtain maximum battery life
800 423-3537. In Canada, call 800
Main Features
Introduction
Parts and Controls Guide
Front of Camera
Control Panel Detail
Inserting an SD card
Do not mix old and new batteries
Memory
Setup Menu Display
About the Setup Menu
Using the Setup Menu
Battery Level
Delay
Menu Item Settings Description/Operation
Bold=default Date
Time
Bold=default Mode
Format
Camera Operation
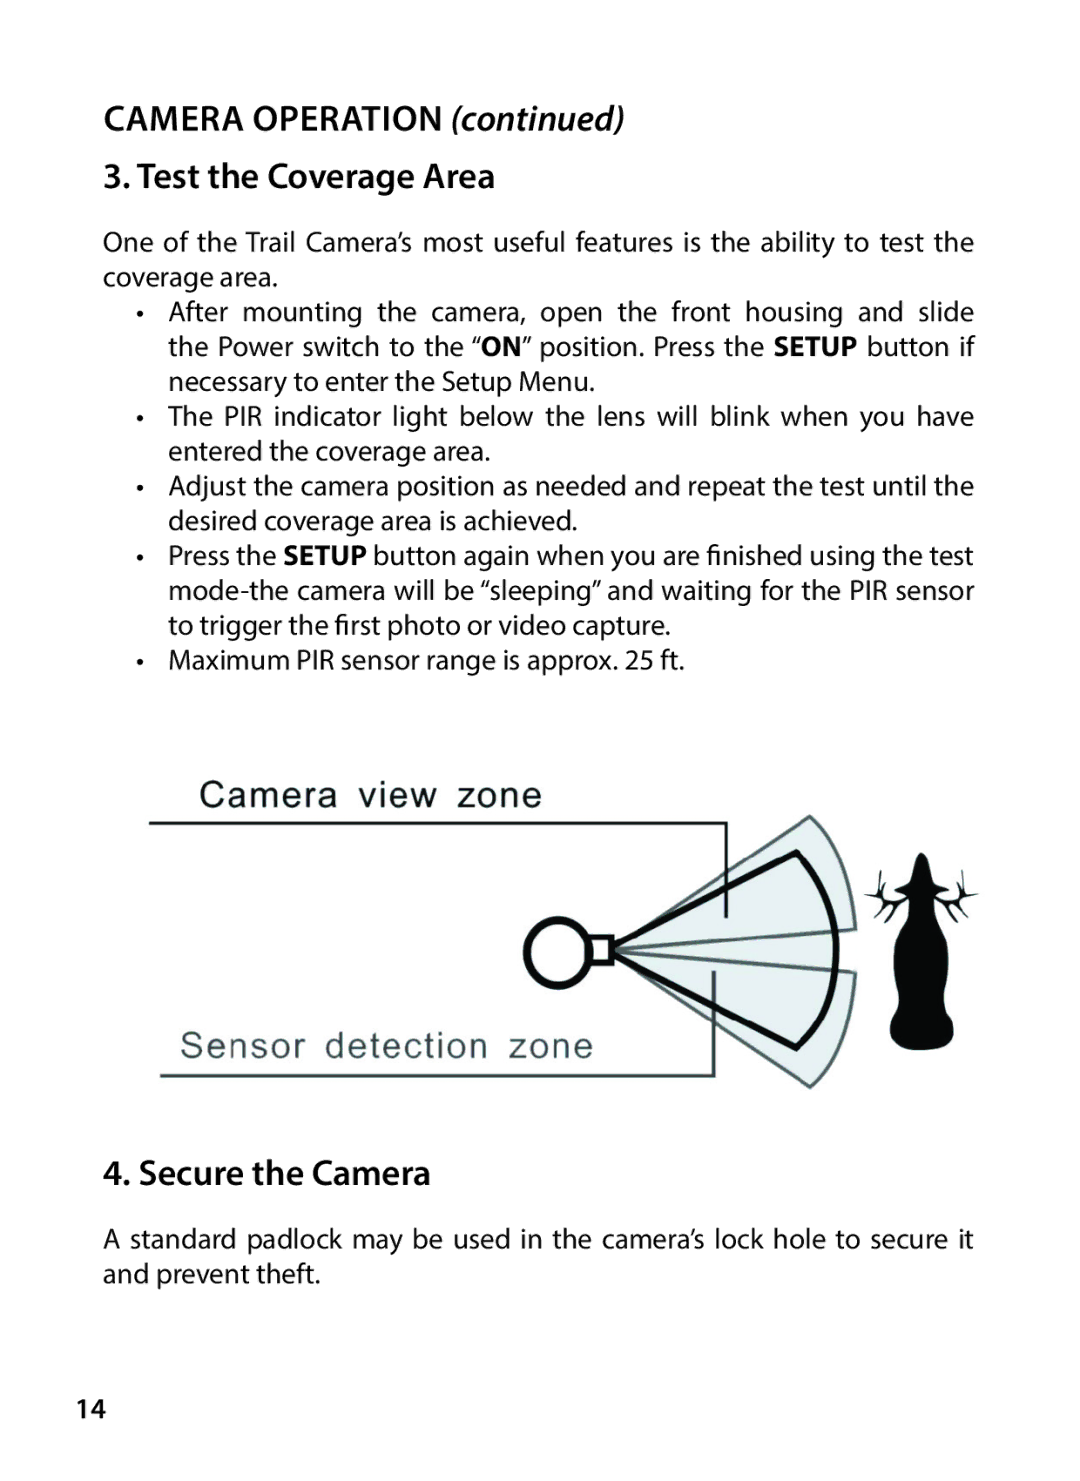
Camera Operation Test the Coverage Area
Using an SD Card Reader
Connecting the Camera to Your Computer via USB
Glossary
Technical Specifications
JPEG/AVI
Battery life is shorter than expected
Camera stops taking images or won’t take images
Night photos or videos appear too bright
Camera won’t power up
Daytime photos or videos appear too dark
Daytime photos or videos appear too bright
Short video clips-not recording to the length set
Photos with streaked subject
Red , green or blue color cast
Photos Do Not Capture Subject of Interest
Camera won’t retain settings
ONE Year Limited Warranty
FCC Compliance Statement
Modèle # 04-13
Guide des composants et des commandes
Table des matières
Au lithium Energizer avec ce piège photographique
Capacité maximale de 32 Go
Caractéristiques principales
Devant de l’appareil photo
Détail du flash infrarouge à LED
Détail du panneau de commande
Mémoire
Insertion d’une carte SD
Menu DES Réglages
Menu de Choix des Paramètres
Utilisation du menu des réglages suite
Delay
Format
Fonctionnement DE LA Caméra
Angle de vision de la caméra Angle de détecteur de mouvement
Avec un lecteur de cartes SD
En branchant directement la caméra à un ordinateur
Glossaire
Fiche Technique
La durée de vie des piles est plus courte que prévue
La caméra arrête de prendre des photos ou n’en prend pas
Les photos ou vidéos prises de nuit sont trop sombres
La caméra ne s’allume pas
Problèmes de qualité des photos et/ou vidéos
Les photos ou vidéos prises en plein jour sont trop sombres
Les photos prises ne contiennent pas le sujet ciblé
Photos avec sujets striés
Voile rouge, vert ou bleu
La LED du détecteur IRP s’allume/ne s’allume pas
La caméra ne mémorise pas les réglages
Garantie Limitée DE UN Année
Page
Trail Camera Manual de instrucciones
Tabla DE Referencia DEL Menú DE Configuración
Información sobre el menú de Configuración
Nota Importante
En Canadá, llame al 800
Introducción
Características principales
Guía de piezas y controles
Vista frontal
Detalle del panel de control
Inserción de una tarjeta SD
Instalación DE LAS Pilas Y LA Tarjeta SD
Memoria
Información Sobre EL Menú DE Configuración
USO DEL Menú DE Configuración
Hora
¡Precaución! Antes de formatear la tarjeta
Funcionamiento DE LA Cámara
Monte la cámara
Page
Utilización de un lector de tarjetas SD
Conexión de la cámara a un ordenador mediante USB
Glosario
Especificaciones Técnicas
Las baterías duran menos de lo previsto
La cámara deja de tomar imágenes o no toma imágenes
Los vídeos o fotos nocturnos son demasiado oscuros
Problemas de calidad de las instantáneas o los vídeos
La cámara no se enciende
Los vídeos o fotos diurnos son demasiado oscuros
Fotos con el sujeto rayado
Los vídeos o fotos nocturnos son demasiado brillantes
Los vídeos o fotos diurnos son demasiado brillantes
Aspecto rojizo, verdoso o azulado
El LED del sensor PIR dispara/no dispara el flash
La cámara no conserva los ajustes
Garantía Limitada de UN año
Overland Park, Kansas
Eliminación de equipos eléctricos y electrónicos
Trail Camera Bedienungsanleitung
Anleitung für Teile und Bedienelemente
Seitenindex
Einleitung
Wichtiger Hinweis
Bis zu 32GB Kapazität in dieser Wildkamera
Hauptfunktionen
Anleitung für Teile und Bedienelemente
Detailansicht IR-LED-Gruppe
Detailansicht Bedienfeld
Speicher
Einlegen einer SD-Karte
Info Über DAS SETUP-MENÜ
Anzeige SETUP-MENÜ
Menüelement Einstellungen Beschreibung
Delay
Achtung! Stellen Sie sicher, dass Sie
Kamerabetrieb
Kamerabetrieb weiter
Anzeigen DER Fotos UND Videos
Verwendung eines SD-Kartenlesegeräts
Anschließen der Kamera an Ihren Computer via USB
Glossar
Technische Spezifikationen
Fehlerbehebung / Häufig Gestellte Fragen und Antworten
Die Batterielaufzeit ist kürzer als angenommen
Qualitätsprobleme von Standfotos und/oder Videoaufnahmen
Kamera schaltet sich nicht ein
Roter, grüner oder blauer Farbstich
Am Tag aufgenommene Fotos oder Videos erscheinen zu hell
Die Objekte auf den Fotos erscheinen gestreift
Einstellungen werden von der Kamera nicht gespeichert
Auf den Fotos ist nicht das gewünschte Objekt zu sehen
PIR-Sensor LED-Blitz / Blitz funktioniert nicht
Gewährleistungsfrist EIN Jahre
Entsorgung von elektrischen und elektronischen Geräten
Trail Camera Manuale di istruzioni
Installazione della batteria e della scheda SD
Indice Delle Pagine
Fino a 32GB con la presente fotocamera da esplorazione
Evitare di utilizzare insieme batterie vecchie e nuove
Devono essere alcaline o al litio
Introduzione
Caratteristiche principali
Guida ai componenti e ai comandi
Dettaglio serie di LED IR
Dettaglio del pannello di controllo
Installazione Della Batteria E Della Scheda SD
Inserimento della scheda SD
Menu Setup SUL Display
Informazioni SUL Menu Setup
Utilizzo DEL Menu Setup
Voce di Impostazioni Descrizione/Operazioni Menu
Verificare di avere prima scaricato e
Funzionamento Della Fotocamera
100
101
Uso di un lettore di schede SD
Collegamento della fotocamera al computer tramite USB
Glossario
102
Specifiche Tecniche
103
La durata della batteria è minore di quanto previst
104
Le foto o i video notturni appaiono troppo luminosi
Foto e i video notturni appaiono troppo scuri
Le foto e i video diurni appaiono troppo scuri
Dominante cromatico rosso , verde o blu
Le foto e i video diurni appaiono troppo luminosi
Foto con soggetto rigato
Le foto non catturano soggetti interessanti
107
Il LED del sensore PIR lampeggia/non lampeggia
La fotocamera non conserva le impostazioni
Garanzia Limitata PER UNO Anno
108
Smaltimento di apparecchiature elettriche ed elettroniche
109
Page
Page
Tasco Cody, Overland Park, Kansas
2013 B.O.P

