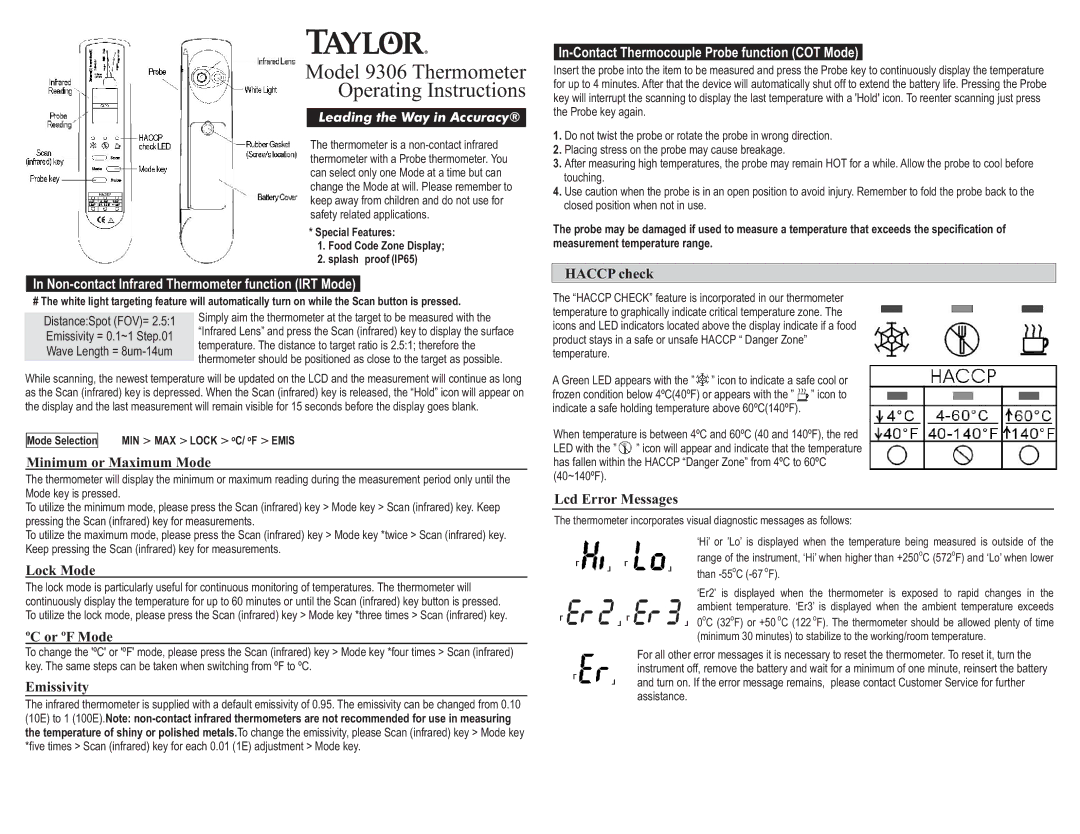
Model 9306 Thermometer
Operating Instructions
Leading the Way in Accuracy®
The thermometer is a
* Special Features:
1. Food Code Zone Display;
2. splash proof (IP65)
In Non-contact Infrared Thermometer function (IRT Mode)
# The white light targeting feature will automatically turn on while the Scan button is pressed.
Distance:Spot (FOV)= 2.5:1 | Simply aim the thermometer at the target to be measured with the | |
Emissivity = 0.1~1 Step.01 | “Infrared Lens” and press the Scan (infrared) key to display the surface | |
temperature. The distance to target ratio is 2.5:1; therefore the | ||
Wave Length = | ||
thermometer should be positioned as close to the target as possible. | ||
|
While scanning, the newest temperature will be updated on the LCD and the measurement will continue as long as the Scan (infrared) key is depressed. When the Scan (infrared) key is released, the “Hold” icon will appear on the display and the last measurement will remain visible for 15 seconds before the display goes blank.
![]() Mode Selection
Mode Selection![]() MIN > MAX > LOCK > oC/ oF > EMIS
MIN > MAX > LOCK > oC/ oF > EMIS
Minimum or Maximum Mode
The thermometer will display the minimum or maximum reading during the measurement period only until the Mode key is pressed.
To utilize the minimum mode, please press the Scan (infrared) key > Mode key > Scan (infrared) key. Keep pressing the Scan (infrared) key for measurements.
To utilize the maximum mode, please press the Scan (infrared) key > Mode key *twice > Scan (infrared) key. Keep pressing the Scan (infrared) key for measurements.
Lock Mode
The lock mode is particularly useful for continuous monitoring of temperatures. The thermometer will continuously display the temperature for up to 60 minutes or until the Scan (infrared) key button is pressed. To utilize the lock mode, please press the Scan (infrared) key > Mode key *three times > Scan (infrared) key.
ºC or ºF Mode
To change the 'ºC' or 'ºF' mode, please press the Scan (infrared) key > Mode key *four times > Scan (infrared) key. The same steps can be taken when switching from ºF to ºC.
Emissivity
The infrared thermometer is supplied with a default emissivity of 0.95. The emissivity can be changed from 0.10 (10E) to 1 (100E).Note:
In-Contact Thermocouple Probe function (COT Mode)
Insert the probe into the item to be measured and press the Probe key to continuously display the temperature for up to 4 minutes. After that the device will automatically shut off to extend the battery life. Pressing the Probe key will interrupt the scanning to display the last temperature with a 'Hold' icon. To reenter scanning just press the Probe key again.
1.Do not twist the probe or rotate the probe in wrong direction.
2.Placing stress on the probe may cause breakage.
3.After measuring high temperatures, the probe may remain HOT for a while. Allow the probe to cool before touching.
4.Use caution when the probe is in an open position to avoid injury. Remember to fold the probe back to the closed position when not in use.
The probe may be damaged if used to measure a temperature that exceeds the specification of measurement temperature range.
HACCP check
The “HACCP CHECK” feature is incorporated in our thermometer temperature to graphically indicate critical temperature zone. The icons and LED indicators located above the display indicate if a food product stays in a safe or unsafe HACCP “ Danger Zone” temperature.
A Green LED appears with the ” ![]() ” icon to indicate a safe cool or frozen condition below 4ºC(40ºF) or appears with the ”
” icon to indicate a safe cool or frozen condition below 4ºC(40ºF) or appears with the ” ![]() ” icon to indicate a safe holding temperature above 60ºC(140ºF).
” icon to indicate a safe holding temperature above 60ºC(140ºF).
When temperature is between 4ºC and 60ºC (40 and 140ºF), the red
LED with the ” ![]() ” icon will appear and indicate that the temperature has fallen within the HACCP “Danger Zone” from 4ºC to 60ºC (40~140ºF).
” icon will appear and indicate that the temperature has fallen within the HACCP “Danger Zone” from 4ºC to 60ºC (40~140ºF).
Lcd Error Messages
The thermometer incorporates visual diagnostic messages as follows:
|
| ‘Hi’ or ’Lo’ is displayed when the temperature being measured is outside of the |
「 | 」 「 | range of the instrument, ‘Hi’ when higher than +250oC (572oF) and ‘Lo’ when lower |
」 | ||
|
| than |
|
| ‘Er2’ is displayed when the thermometer is exposed to rapid changes in the |
|
| ambient temperature. ‘Er3’ is displayed when the ambient temperature exceeds |
「 | 」「 | 」 0oC (32oF) or +50 oC (122 oF). The thermometer should be allowed plenty of time |
|
| (minimum 30 minutes) to stabilize to the working/room temperature. |
|
| For all other error messages it is necessary to reset the thermometer. To reset it, turn the |
|
| instrument off, remove the battery and wait for a minimum of one minute, reinsert the battery |
「 | 」 | and turn on. If the error message remains, please contact Customer Service for further |
|
| assistance. |