Thank you. And congratulations!
Our thanks for buying your new speakers from TSC. We sincerely appreciate your confidence in us and our products. Please read this Owner’s Manual! It contains many tips on getting your new speakers set up, connected, and sounding as good as they should. We hope you find it clear, concise, and helpful.
Again, thank you.
Out Of The Box
You should save the carton and the inserts your speakers came in. You may need to ship your TSC speakers in the future and the packaging is designed to protect them from damage.
Where Should You Put Them?
Because they’re so versatile, we realize that you may place your new Indoor/Outdoor speakers almost anywhere in or around your home. That being said, here are some guidelines you should find useful.
Picking The Right Spot
We’re going to assume that most will choose to put these speakers somewhere outside the home – be- side a pool, near the barbecue, or close to an outdoor entertainment area, etc.
Before you select a place, ask yourself these questions:
•Exactly what area do I want to provide high quality sound for?
•What is the best place to put the speakers so they can project sound into that area?
•Is there a solid surface – either horizontal or vertical – on which you can mount the speakers?
•Is there something that will shelter the speakers from prolonged, heavy rainfall or temperature extremes?
•How difficult will it be to run speaker wire from your receiver or amplifier to the speakers?
Once you selected the best spot to place your speakers, you’re ready to move to the next step
Mounting Your Speakers
Although you can place TSC’s Indoor/Outdoor speakers on a shelf without the supplied brackets, we strongly suggest that you do not do so! The brackets are designed to hold the speaker securely under most wind and vibration conditions. Without a bracket, a passing breeze or enthusiastic pet or child could dislodge a speaker and possibly injure a passerby.
First, remove the bracket from the speaker by twisting the knurled end caps (one at each end of the speaker) counterclockwise. Once you’ve removed the end caps, the bracket detaches easily.
Mount the bracket securely to the surface you’ve chosen. Note that it’s de- signed for either horizontal or vertical mounting to accommodate your needs.
For the most secure mounting, you should attach the bracket so that the screws or bolts you’ve used tap into a solid structural element such as a wall stud.
Use the “keyhole” slots if you wish to easily remove the speaker/bracket combination at some time in the future. For more permanent mounting, use the slots or the circular hole in the center of the bracket. If you opt for this “permanent” mounting method, remember that you’ll need to detach to speaker from the bracket (and disconnect the speaker wires, too) when you want to move it.
Once the bracket is securely mounted:
•Position the speaker between the ends of the bracket
•Insert the threaded portion of one end cap through the bracket hole into the speaker housing. Gently tighten the end cap.
•Repeat this at the other end of the bracket/speaker assembly.
•Rotate the speaker until it points in the direction you’ve chosen.
•Tighten both end caps to lock the speaker into position. DO NOT OVERTIGHTEN!!!
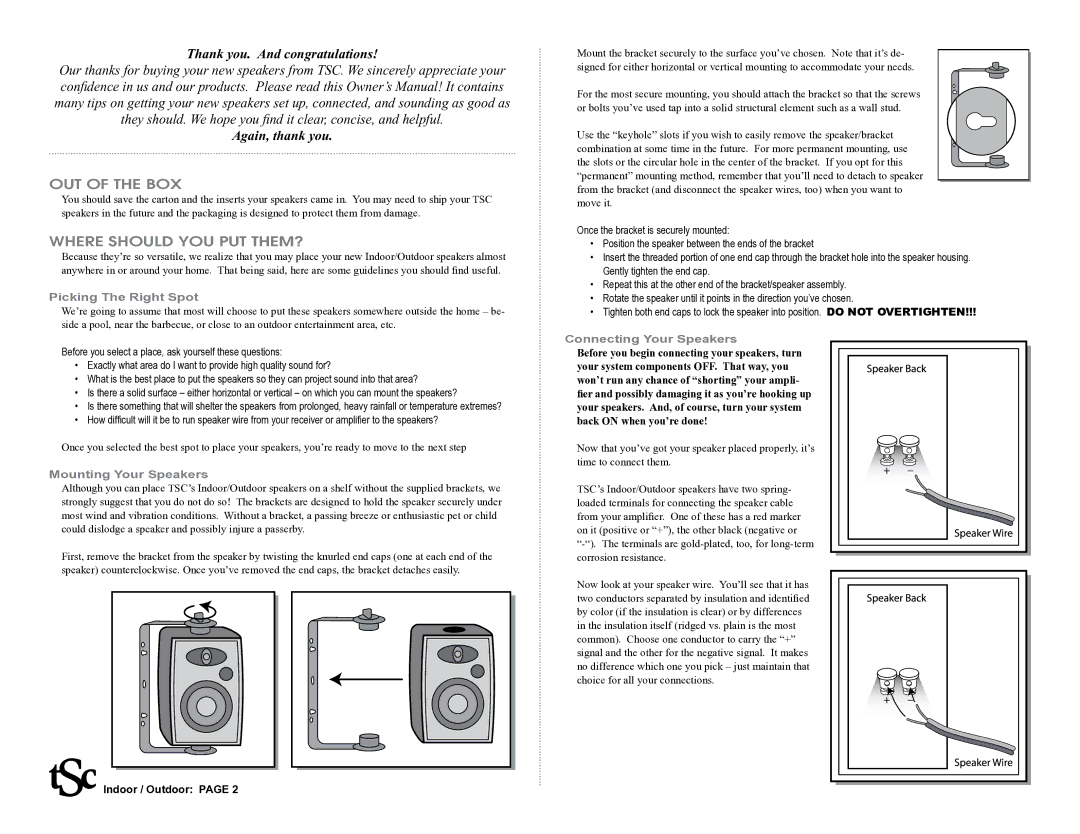
Connecting Your Speakers
Before you begin connecting your speakers, turn your system components OFF. That way, you won’t run any chance of “shorting” your ampli- fier and possibly damaging it as you’re hooking up your speakers. And, of course, turn your system back ON when you’re done!
Now that you’ve got your speaker placed properly, it’s time to connect them.
TSC’s Indoor/Outdoor speakers have two spring- loaded terminals for connecting the speaker cable from your amplifier. One of these has a red marker on it (positive or “+”), the other black (negative or
Now look at your speaker wire. You’ll see that it has two conductors separated by insulation and identified by color (if the insulation is clear) or by differences in the insulation itself (ridged vs. plain is the most common). Choose one conductor to carry the “+” signal and the other for the negative signal. It makes no difference which one you pick – just maintain that choice for all your connections.
Indoor / Outdoor: PAGE 2