T1251 I/B_back Feb. 28, 07.
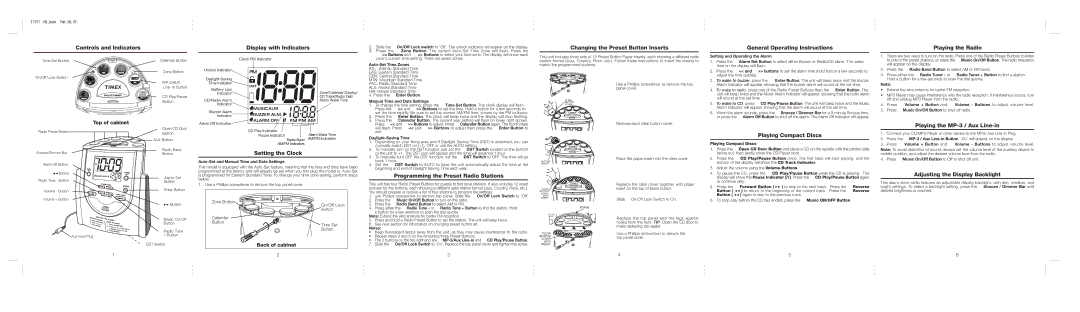
Controls and Indicators |
| Display with Indicators |
|
|
|
Time Set Button O | N Calendar Button | Clock PM Indicator |
| ||
| M Zone Button | Unlock Indicator |
|
| |
On/Off Lock Switch P |
| |
|
|
2.Slide the P On/Off Lock switch to 'Off'. The unlock indicator will appear on the display.
3.Press the M Zone Button. The current
Auto-Set Time Zones
ATL : Atlantic Standard Time
EAS: Eastern Standard Time
CEN: Central Standard Time
MTN: Mountain Standard Time
Changing the Preset Button Inserts
This unit includes three sets of 12 Preset Button Paper Inserts, each showing a different radio station format (Jazz, Country, Rock, etc.). Follow these instructions to insert the inserts to match the programmed stations.
General Operating Instructions
Setting and Operating the Alarm
1. | Press the K Alarm Set Button to select either Buzzer or Radio/CD alarm. The wake |
| time on the display will flash. |
2. | Press the 3 << and 9 >> buttons to set the alarm time (hold button a few seconds to |
| adjust the time quickly). |
3. | To wake to buzzer, press the J Enter Button. The unit will beep twice and the Buzzer |
Playing the Radio
1.There are two ways to turn on the radio. Press one of the Radio Preset Buttons to listen to one of the preset stations, or press the 7 Music On/Off Button. The radio frequency will appear on the display.
2.Press the L Radio Band Button to select AM or FM band.
3.Press either the 4 Radio Tuner - or 8 Radio Tuner + Button to find a station. Hold a button for a few seconds to scan the dial quickly.
| Q | Time Indicator |
|
|
| Line- In Button | Battery Low |
|
|
|
|
| Zone/Calendar Display/ | |
| R CD Play/Pause | Indicator |
| |
|
|
| CD Track/Radio Dial/ | |
| Button | CD/Radio Alarm |
| Alarm Wake Time |
| Indicator |
|
| |
|
|
|
| |
|
| Buzzer Alarm |
|
|
|
| Indicator |
|
|
| Top of cabinet | Alarm Off Indicator |
|
|
Radio Preset Button | S Open CD Door |
| CD Play Indicator |
|
Button |
| Alarm Wake Time | ||
|
| Pause Indicator | ||
|
|
| ||
| AUX Button |
| Radio Band | AM/PM Indicators |
| SNOOZE/DIMMER |
| AM/FM Indicators |
|
|
|
|
|
PAC: Pacific Standard Time
ALS: Alaska Standard Time
HAI: Hawaii Standard Time
4.Press the J Enter Button.
Manual Time and Date Settings
1.To change the time setting, press the O Time Set Button. The clock display will flash. Press the 3 << and 9 >> Buttons to set the time. Hold a button for a few seconds to set the time rapidly. Be sure to set the correct AM/PM time, shown by the PM indicator.
2.Press the J Enter Button. The clock will beep twice and the display will stop flashing.
3.Press the N Calendar Button. The current year setting will flash on lower right screen. Press 3 << and 9 >> Buttons to adjust. Press N Calendar Button again. The month/date will flash. Press 3 << and 9 >> Buttons to adjust then press the J Enter Button to exit.
Daylight-Saving Time
1. Depending on your living area and if Daylight Saving Time (DST) is observed, you can |
manually switch DST on (+1), OFF or use the AUTO setting. |
1
CLEAR
2 BUTTON COVER
1 | Use a Phillips screwdriver to remove the top |
| panel cover. |
2 | Remove each clear button cover. |
| Alarm Indicator will appear, showing that the buzzer alarm will sound at the set time. |
4. | To wake to radio, press one of the Radio Preset Buttons then the J Enter Button. The |
| unit will beep twice and the Music Alarm Indicator will appear, showing that the radio alarm |
| will sound at the set time. |
5. | To wake to CD, press R CD Play/Pause Button. The unit will beep twice and the Music |
| Alarm Indicator will appear showing that the alarm will sound at the set time. |
6. | When the alarm sounds, press the 1 Snooze / Dimmer Bar for a |
| or press the 2 Alarm Off Button to shut off the alarm. The Alarm Off Indicator will appear. |
Playing Compact Discs
Playing Compact Discs
Note:
•Extend the wire antenna for better FM reception.
•MP3 Player may cause interference with the radio reception. If interference occurs, turn off and unplug MP3 Player from the radio.
4.Press 6 Volume + Button and 5 Volume - Buttons to adjust volume level.
5.Press 7 Music On/Off Button to shut off radio.
Playing the MP-3 / Aux Line-in
1.Connect your CD/MP3 Player or other device to the MP3/ Aux
2.Press the Q
3.Press 6 Volume + Button and 5 Volume - Buttons to adjust volume level.
Snooze/Dimmer Bar 1 | L Radio Band |
Button | |
Alarm Off Button 2 |
|
Button 3 |
|
Radio Tune - Button 4 | K Alarm Set |
Button | |
Volume - Button 5 | J Enter Button |
| |
Volume + Button 6 |
|
Setting the Clock
Auto-Set and Manual Time and Date Settings
This model is equipped with the
1. Use a Phillips screwdriver to remove the top panel cover.
2. | To manually turn on the DST function, just set the T DST Switch located on the bottom |
| of the unit to +1. The DST icon will appear and the time will advance 1 hour. |
3. | To manually turn OFF the DST function, set the T DST Switch to OFF. The time will go |
| back 1 hour. |
4. | Set the T DST Switch to AUTO to have the unit automatically adjust the time at the |
| beginning and end of Daylight Saving Time each year. |
Programming the Preset Radio Stations
This unit has four Radio Preset Buttons for guests to find local stations. It also includes 12 insert pictures for the buttons, each showing a different radio station format (Jazz, Country, Rock, etc.). You should prepare or receive a list of four stations to program the settings.
1. use Phillips screwdriver to remove top panel. Slide the P On/Off Lock Switch to 'Off' |
Music On/Off Button |
3
BUTTON INSERT
4
CLEAR BUTTON COVER WITH INSERT
3 | Place the paper insert into the clear cover |
4 | Replace the clear cover together with paper |
| insert on the top of black button. |
1. | Press the S Open CD Door Button and place a CD on the spindle with the printed side | ||
| facing out, then gently close the CD Player door. | ||
2. | Press the R CD Play/Pause Button once. The first track will start playing, and the | ||
| bottom of the display will show the CD Track Indicator. | ||
3. | Adjust the volume using the Volume Buttons. | ||
4. | To pause the CD, press the R CD Play/Pause Button while the CD is playing. The | ||
| display will show the Pause Indicator (//). Press the R CD Play/Pause Button again | ||
| to continue play. |
| |
5. | Press the 9 Forward Button ( | ) to skip to the next track. Press the 3 Reverse | |
| Button ( | ) to return to the beginning of the current track. Press the 3 Reverse | |
| Button ( | ) again to skip to the previous track. | |
Note: To avoid distortion of sound, always set the volume level of the auxiliary device to middle position, and adjust the desired volume level from the radio.
4. Press 7 Music On/Off Button to Off to shut off unit.
Adjusting the Display Backlight
This alarm clock radio features an adjustable display backlight, with dim, medium, and bright settings. To select a backlight setting, press the 1 Snooze / Dimmer Bar until desired brightness is reached.
9 . Button |
G Music On/Off |
Zone Button
Calendar
On/Off Lock switch
2. | Press the 7 | to turn on the radio. |
3. | Press the L Radio Band Button to select AM or FM. | |
4. | Press either the 4 Radio Tune - or 8 Radio Tune + Button to find the station. Hold | |
| a button for a few seconds to scan the dial quickly. | |
Note: Extend the wire antenna for better FM reception.
5. Press and hold a Radio Preset Button to set the station. The unit will beep twice. |
FRAME
F Replace the top panel with the tags against
6. To stop play before the CD has ended, press the 7 Music ON/OFF Button. |
| Button |
| 8 Radio Tune |
Aux Input Plug | + Button |
| T DST Switch |
Button
Time Set
Button
Back of cabinet
6. See next section for information on changing preset button art. |
Notes:
•Keep fluorescent lamps away from the unit, as they may cause interference to the radio.
•Repeat steps 3 and 6 for the remaining three Preset Buttons.
•The 2 buttons on the top right end are Q
7. Slide the P On/Off Lock Switch to 'On'. Replace the top panel cover and tighten the screw.
hooks from the front. TIP: Open the CD door to make replacing top easier.
CLEAR | G Use a Phillips screwdriver to secure the |
BUTTON | top panel cover. |
COVER | |
WITH |
|
INSERT |
|
1 | 2 | 3 | 4 | 5 | 6 |