Using the remote control
Preparing the remote control for use
With the remote control, you can operate your TV, most VCR and DVD player models, and cable TV converters together, even if they are different brands. If you will be using your TV with a Toshiba VCR or DVD player, your remote control is already programmed and ready to use. If you own different brands of VCRs, DVD players and/or convert- ers, you first have to program your remote control. (See “Programming the remote control to operate your other devices” on page 12.)
Installing the remote control batteries
To install the batteries:
1. Open the battery cover on the back of the remote control.
2.Install two “AAA” size batteries. Match the + and – signs on the batteries to the signs on the battery compartment.
3. Close the battery cover on the remote control until the lock snaps.
Note:
The TV remote control may not operate your VCR, DVD player, or cable TV converter. Refer to the owner's manual supplied with the applicable equipment to see which features may be available. Additionally, the remote control for this TV may not support certain features available on the original remote controls for such additional equipment, in which case, it is suggested that you use the original remote control for the applicable device.
Caution:
•Never throw batteries into a fire.
Notes:
•Be sure to use AAA size batteries.
•Dispose of batteries in a designated disposal area.
•Batteries should always be disposed of with the environment in mind. Always dispose of batteries in accordance with applicable laws and regulations.
•If the remote control does not operate correctly, or if the operating range becomes reduced, replace batteries with new ones.
•When necessary to replace batteries in the remote control, always replace both batteries with new ones. Never mix battery types or use new and used batteries in combination.
•Always remove batteries from remote control if they are dead or if the remote control is not to be used for an extended period of time.
This will prevent battery acid from leaking into the battery compartment.
Safeguards | Important |
ToshibaWelcome to
yourConnecting TV
Remote ControlUsing the
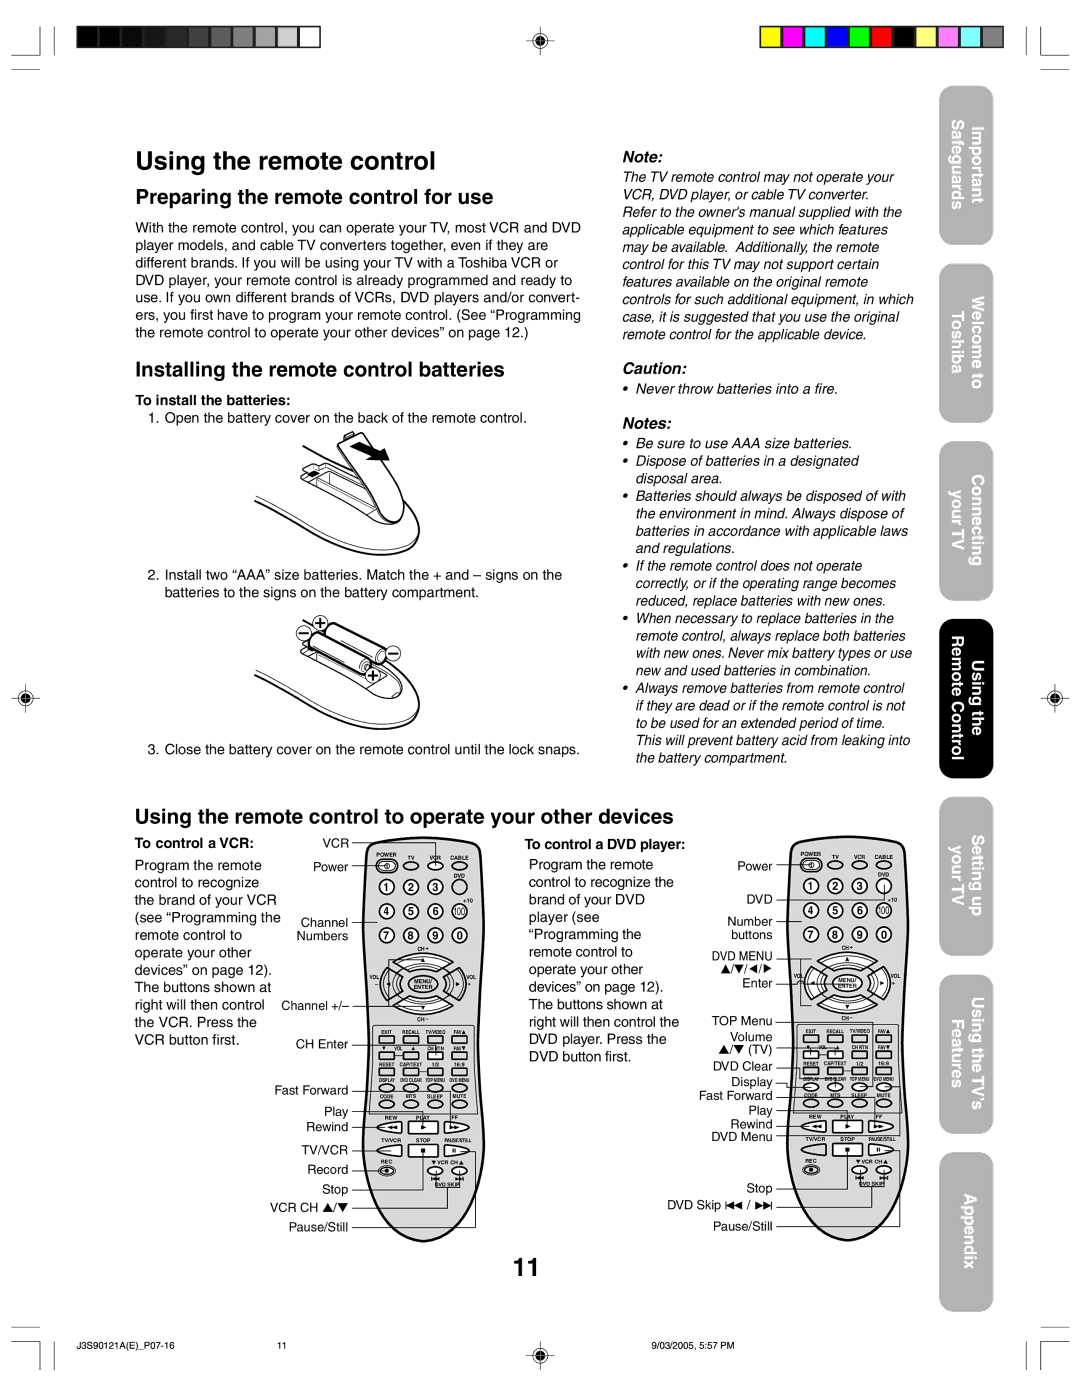
Using the remote control to operate your other devices
To control a VCR:
Program the remote control to recognize the brand of your VCR (see “Programming the remote control to operate your other devices” on page 12). The buttons shown at right will then control the VCR. Press the VCR button first.
VCR
Power
Channel
Numbers
Channel +/–
CH Enter
POWER | TV | VCR | CABLE | |
| ||||
|
|
| DVD | |
1 | 2 | 3 |
| |
|
|
| +10 | |
4 | 5 | 6 | 100 | |
7 | 8 | 9 | 0 | |
| CH + |
| ||
VOL | MENU/ | VOL | ||
– | + | |||
ENTER | ||||
|
| |||
| CH – |
| ||
EXIT | RECALL | TV/VIDEO | FAV | |
VOL | CH RTN | FAV | ||
RESET | CAP/TEXT | 1/2 | 16:9 | |
DISPLAY | DVD CLEAR | TOP MENU | DVD MENU | |
To control a DVD player:
Program the remote control to recognize the brand of your DVD player (see “Programming the remote control to operate your other devices” on page 12). The buttons shown at right will then control the DVD player. Press the DVD button first.
4 | 5 | 6 | 100 | yourTV Settingup |
POWER | TV | VCR | CABLE |
|
Power
DVD
DVD | 1 | 2 | 3 |
|
|
|
| +10 | |
Number |
|
|
|
|
buttons | 7 | 8 | 9 | 0 |
CH +
DVD MENU |
|
|
|
|
|
| |
▲/▼/ / | VOL |
|
| VOL |
|
| |
Enter | MENU/ |
|
| ||||
– | + |
|
| ||||
ENTER |
|
| |||||
|
|
|
| ||||
TOP Menu |
| CH – |
| Features | Usingthe | ||
EXIT | RECALL | TV/VIDEO | FAV | ||||
Volume | |||||||
|
|
|
| ||||
▲/▼ (TV) |
| VOL | CH RTN | FAV | |||
|
|
|
| ||||
DVD Clear | RESET CAP/TEXT | 1/2 | 16:9 | ||||
|
|
|
| ||||
Display | DISPLAY DVD CLEAR | TOP MENU | DVD MENU | ||||
Fast Forward
CODE MTS SLEEP MUTE
Play
REW PLAY FF
Rewind 

TV/VCR STOP PAUSE/STILL
Fast Forward | CODE | MTS SLEEP | MUTE | TV | |
|
|
| ’s | ||
Play | REW | PLAY | FF | ||
| |||||
Rewind |
| ||||
|
|
|
| ||
DVD Menu | TV/VCR | STOP | PAUSE/STILL |
|
TV/VCR |
|
REC | VCR CH |
Record |
|
Stop | DVD SKIP |
| |
VCR CH ▲/▼ |
|
Pause/Still |
|
11
Stop
DVD Skip ![]() /
/ ![]()
![]()
Pause/Still
REC | VCR CH |
| DVD SKIP |
Appendix
11 | 9/03/2005, 5:57 PM |
