Using the Wireless Utility

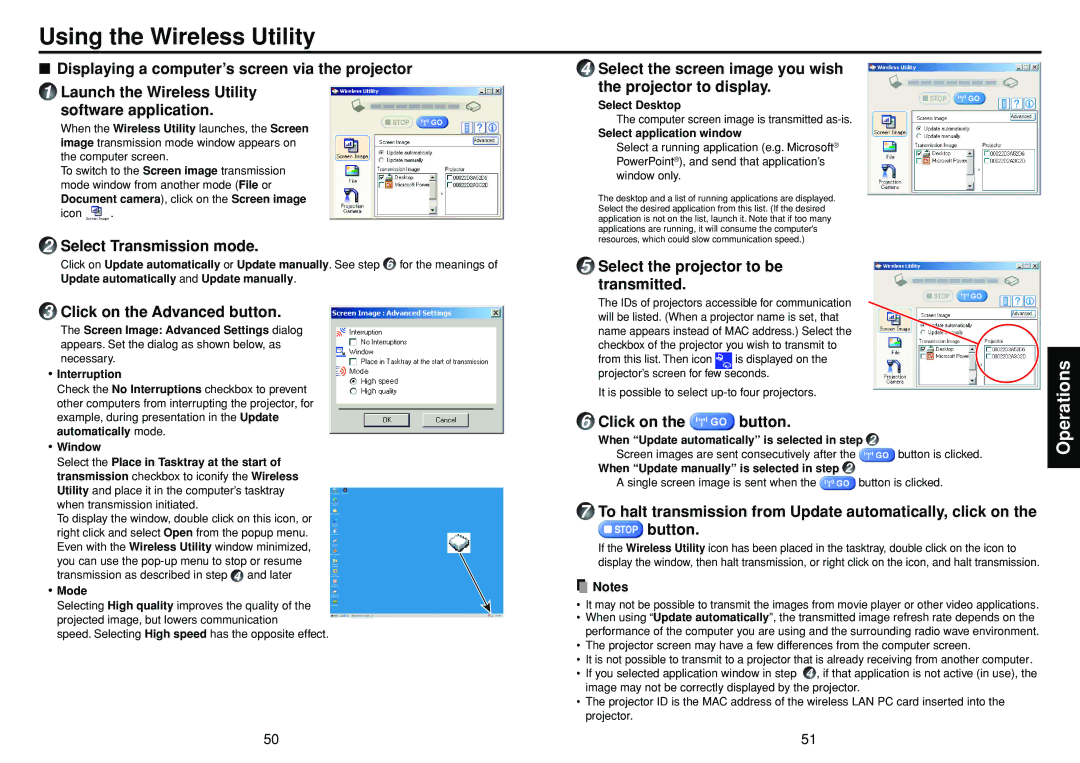
Displaying a computer’s screen via the projector

1 Launch the Wireless Utility software application.

When the Wireless Utility launches, the Screen image transmission mode window appears on the computer screen.

To switch to the Screen image transmission mode window from another mode (File or Document camera), click on the Screen image

icon .

2Select Transmission mode.

Click on Update automatically or Update manually. See step 6 for the meanings of Update automatically and Update manually.

3Click on the Advanced button.

The Screen Image: Advanced Settings dialog appears. Set the dialog as shown below, as necessary.

Interruption

Check the No Interruptions checkbox to prevent other computers from interrupting the projector, for example, during presentation in the Update automatically mode.

Window

Select the Place in Tasktray at the start of transmission checkbox to iconify the Wireless Utility and place it in the computer’s tasktray when transmission initiated.

To display the window, double click on this icon, or right click and select Open from the popup menu. Even with the Wireless Utility window minimized, you can use the pop-up menu to stop or resume transmission as described in step 4 and later

Mode

Selecting High quality improves the quality of the projected image, but lowers communication

speed. Selecting High speed has the opposite effect.

4Select the screen image you wish

the projector to display.

Select Desktop

The computer screen image is transmitted as-is.

Select application window

Select a running application (e.g. Microsoft® PowerPoint®), and send that application’s window only.

The desktop and a list of running applications are displayed. Select the desired application from this list. (If the desired application is not on the list, launch it. Note that if too many applications are running, it will consume the computer’s resources, which could slow communication speed.)

5Select the projector to be

transmitted.

The IDs of projectors accessible for communication will be listed. (When a projector name is set, that name appears instead of MAC address.) Select the checkbox of the projector you wish to transmit to

from this list. Then icon is displayed on the projector’s screen for few seconds.

It is possible to select up-to four projectors.

6Click on the button.

When “Update automatically” is selected in step 2

Screen images are sent consecutively after the button is clicked.

When “Update manually” is selected in step 2

A single screen image is sent when the button is clicked.

7To halt transmission from Update automatically, click on the

button.

If the Wireless Utility icon has been placed in the tasktray, double click on the icon to display the window, then halt transmission, or right click on the icon, and halt transmission.

Notes

It may not be possible to transmit the images from movie player or other video applications.

When using “Update automatically”, the transmitted image refresh rate depends on the performance of the computer you are using and the surrounding radio wave environment.

The projector screen may have a few differences from the computer screen.

It is not possible to transmit to a projector that is already receiving from another computer.

If you selected application window in step 4 , if that application is not active (in use), the image may not be correctly displayed by the projector.

The projector ID is the MAC address of the wireless LAN PC card inserted into the projector.

Operations

50

51

Page 26
Image 26
Toshiba TDP-SW20 manual Using the Wireless Utility

TDP-SW20 specifications

The Toshiba TDP-SW20 is a versatile and compact digital projector designed to cater to a variety of needs, from business presentations to home entertainment. Aimed at providing high-quality visual output, this model stands out for its range of features and reliable performance.

One of the key characteristics of the TDP-SW20 is its brightness level, which measures at 2000 ANSI lumens. This ensures that images maintain clarity and vibrancy even in moderately lit environments. The projector utilizes a DLP (Digital Light Processing) technology, which enhances the color accuracy and contrast ratio, delivering sharp and vivid images. The native resolution of the projector is SVGA (800 x 600), which is suitable for standard presentations and general content display.

The TDP-SW20 is engineered to be user-friendly. It offers a variety of connectivity options, including multiple input terminals such as VGA, composite video, and audio inputs. This flexibility allows users to connect various devices like laptops, DVD players, and game consoles without difficulty. Additionally, the projector supports plug-and-play functionality, simplifying setup and operation, particularly for on-the-go professionals.

Portability is another significant advantage of the TDP-SW20. Weighing around 2.2 kg, it is lightweight and compact, making it easy to transport between venues. The unit also features an integrated carrying case, enhancing its usability for traveling presenters.

Another noteworthy feature is the lamp life, which can last up to 2000 hours in normal mode and even longer in eco mode, reducing the frequency of replacements. This feature not only helps in saving operational costs but also contributes to a more sustainable usage.

In terms of sound quality, the TDP-SW20 is equipped with built-in speakers that provide adequate audio output for small gatherings, though users may opt for external speakers for larger audiences.

Overall, the Toshiba TDP-SW20 combines functionality, portability, and ease of use, making it an excellent choice for users looking for a reliable projector that adapts to various settings and requirements. Whether for educational purposes, corporate use, or home movie nights, this projector delivers a satisfactory performance, ensuring that your visual presentations are impactful and engaging.