Additional information about the On-Screen-Display
The OSD disappears
Any changes made are automatically saved in the Touch Monitor memory when the OSD disappears. Turning off the power should be avoided while using the OSD, as this may not allow changes to be saved.
Adjustments for clock, phase and position s are saved for each signal timing or screen resolution. Except for these adjustments, all other adjustments have only one setting that applies to all signal timing.
The submenu color will change from white to pink when the function is selected.
You can skip the OSD menu and display commonly used adjustment scales directly by using the following button operations (refer to previous diagram for button locations):
Brightness | Press the Brightness Button (3) when the Menu is not displayed. |
|
|
Contrast: | Press the Contrast Button (2) when the Menu is not displayed. |
|
|
Auto Setting: | Press the Auto Button (5) when the Menu is not displayed. |
|
|
The Auto Adjust process may take as much as 10 consecutive seconds. The display image will make noticeable changes as the Auto Adjust function completes.
Self-Test Check:
This product provides a
If your LCD monitor is properly connected, but there is no image showing and the power indicator light on the Touch Monitor displays orange, please follow the steps below:
1.Turn off both the computer and LCD monitor.
2.Unplug the video signal connector from the back of the computer.
3.Turn the LCD monitor on.
4.The monitor should display “No Signal Input” on the screen and the power LED indicator should be orange. If no display is observed, there may be a problem with the Touch Monitor.
5.Turn off the LCD monitor and reconnect the signal cable. Then turn the computer and LCD monitor on. As the computer boots, there should be a video display and the power LED should now be green. If the LED of the monitor is an orange color after completing the steps above, please check your VGA card and computer system.
6
Menu Table
Primary | Secondary |
|
|
|
|
|
|
|
|
| |
Directory | Directory | Description |
| ||||||||
|
|
|
|
|
|
|
|
|
|
| |
Image | Brightness | Adjust the brightness of the screen. |
| ||||||||
| Contrast | Adjust the contrast of the image. |
| ||||||||
| Clock | Adjust the clock pulse of the image. |
| ||||||||
| Phase | Adjust the focus of the image. |
| ||||||||
| H. Position | Move the image left and right on the screen. | |||||||||
| V. Position | Move the image up and down on the screen. | |||||||||
| Sharpness | Adjust the picture sharpness of lower resolutions. | |||||||||
Audio | Volume | Adjust the volume of the audio. |
| ||||||||
| Mute | Set the audio mute to be on or off |
| ||||||||
Color | 9300K | Set the color temp. to 9300K white color. | |||||||||
| 7500K | Set the color temp. to 7500K white color. |
| ||||||||
| 6500K | Set the color temp. to 6500K white color. |
| ||||||||
| User/Red | Adjust red/green/blue gain. |
| ||||||||
| User/Green |
| |||||||||
| User/Blue |
|
|
|
|
|
|
|
|
| |
Language | English | Select the OSD language. |
| ||||||||
| Français |
|
|
|
|
|
|
|
|
| |
| Italiano | Adjust OSD display time setting. |
| ||||||||
| Deutsch |
| |||||||||
|
|
|
|
|
|
|
|
|
| ||
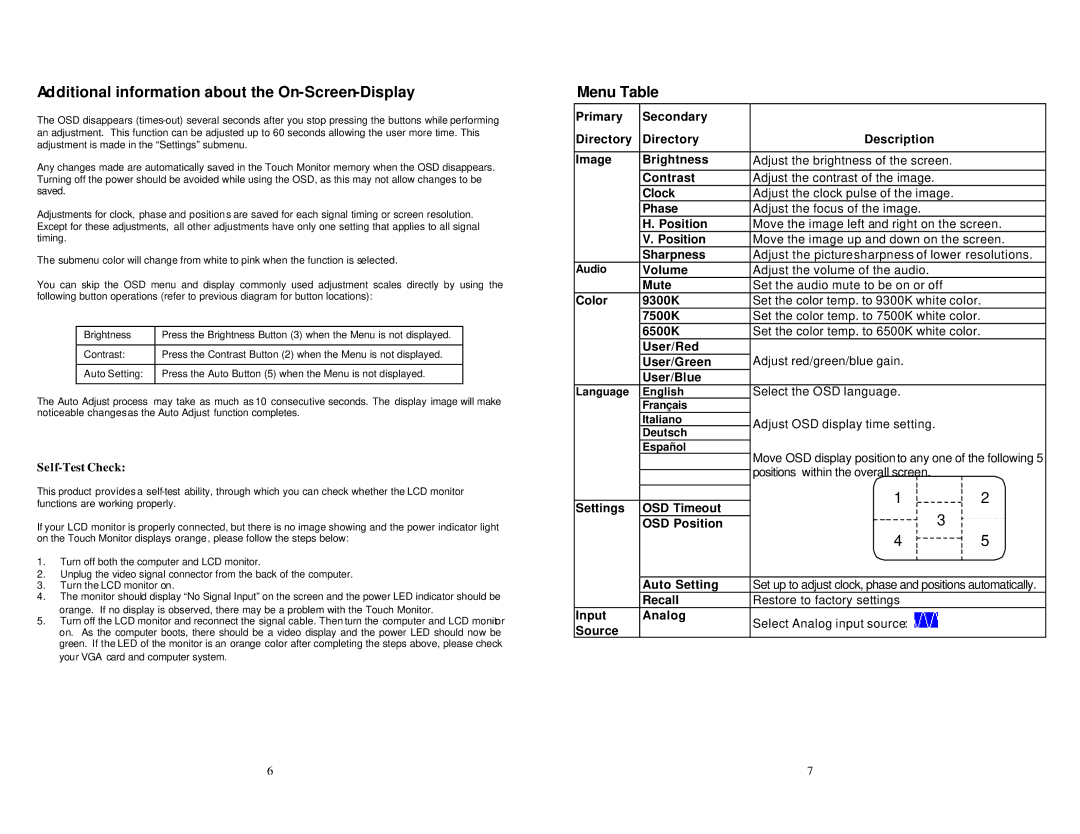
| Español | Move OSD display position to any one of the following 5 | |||||||||
| 梣 | 捭 | |||||||||
|
|
| positions within the overall screen. |
| |||||||
| 鉻風鉻風 |
| |||||||||
|
|
|
|
|
|
|
|
|
| ||
| 梣 | 梣 | 1 |
|
|
|
|
| 2 | ||
Settings | OSD Timeout |
|
|
|
|
| |||||
|
| 3 |
|
|
| ||||||
| OSD Position |
|
|
|
|
| |||||
|
|
|
|
| |||||||
|
|
| 4 |
|
|
|
|
| 5 | ||
|
|
|
|
|
|
|
| ||||
|
|
|
|
|
|
|
|
|
| ||
| Auto Setting | Set up to adjust clock, phase and positions automatically. | |||||||||
| Recall | Restore to factory settings |
| ||||||||
Input | Analog | Select Analog input source: |
| ||||||||
Source |
|
|
| ||||||||
|
|
|
|
|
|
|
|
|
|
| |
7