• Save Your Open Files | • Protect All Your Equipment |
•Maintain Your Internet Connection
Copyright © 2001 Tripp Lite. All rights reserved. Internet Office™ is a registered trademark of Tripp Lite.
C US
Save these instructions and thoroughly read the Operation and Safety sections before using your Internet Office 300 UPS. Save the original carton and styrofoam inserts. If you require service, your warranty may be voided if the Internet Office 300 UPS is sent back to Tripp Lite in improper packaging.
1 • OPERATION
1.1Operation Overview
The Internet Office 300 UPS protects your equipment from all power problems: blackouts, brownouts, surges, spikes and line noise. Reliable battery power allows you to complete work, save data and safely shut down your system in the event of a blackout. Internet Office protects your equipment on both the AC and modem/network line. When AC power is present, the UPS is keeping the battery constantly charged, and connected equipment is powered directly from the AC power line.
1.2Step-By-Step Operation
The UPS is simple to operate and takes just a few minutes to set up. Follow the steps below before you turn the UPS ON:
STEP 1: Plug the UPS into an electrical outlet that does not share a circuit with a heavy electrical load (e.g., an air conditioner or refrigerator, etc.)
STEP 2: Determine the total VA or wattage draw of all the equipment you plan on connecting to the Battery Backup Protected/Surge Protected Outlets. Look on the equipment nameplate for this information. If the equipment is listed in amps, multiply the number of amps by 120 to determine VA. (Example: 1 amp x 120 = 120 VA). The total VA for all the equipment cannot exceed 300. The total wattage cannot exceed 150.
STEP 3: Plug your computer and monitor into the three Battery Backup Protected/ Surge Protected Outlets. (Remember they provide both surge and battery backup protection.) NOTE: Do not plug laser printers into these outlets.
STEP 4: Plug your peripherals (e.g., printer, scanner or fax machine) into the three Surge Protected Outlets. (Remember they are not supplied with battery backup during a utility power failure.)
2 • SAFETY
2.1Installation Safety Warnings
 WARNING!
Tripp Lite does not recommend the use of any of its UPS Systems in any life support application where a malfunction or failure of a Tripp Lite UPS System could cause failure or significantly alter the performance of the life support device. Contact Tripp Lite for further information.
 CAUTION!
Do not allow the UPS to be exposed to moisture, rain, dust, excessive heat or direct sunlight. Do not block the cooling vents on the side of the UPS. Position the UPS at least 6 inches (15 cm) away from any monitors or floppy disks. Small magnetic fields present during backup operation can cause monitor interference or disrupt information on disks.
Two slots on the rear of the UPS allow for secure wall or surface mounting. To mount, use the mounting template on the back of this manual to install fasteners with 5/16" (8 mm) clearance from the mounting surface. Fasteners must be able to support at least 5 lb. (2 kg.).
Connect the UPS to a two-pole, three-wire, grounded AC power outlet. To reduce the risk of fire, connect only to a circuit provided with 15 amperes overcurrent protection (in accordance with the National Electrical Code,ANSI/NFPA70 or your local electrical code.)
Never plug a UPS into itself; this will damage the unit and void your warranty. Never plug a surge suppressor into any of the outlets; this will overload the UPS when operating from battery power. Since the UPS already has surge suppression built in, adding extra surge suppression is not necessary.
The UPS may be damaged if connected to a motor-powered AC generator with voltage and frequency output beyond nominal accepted ranges. Consult the generator manufacturer or Tripp Lite Customer Service before connecting the UPS to a generator.
2.2Battery Safety Warnings
 WARNING!
Batteries can present a risk of electrical shock and burn from high short-circuit current. Observe proper precautions. Do not dispose of the batteries in a fire. Do not open the UPS or the batteries. Do not short or bridge the battery terminals with any object.
There are no user-serviceable parts inside the UPS. Battery replacement should be performed only by authorized service personnel using the same number and type of batteries (Sealed Lead-Acid). The batteries are recyclable. Refer to your local codes for disposal requirements or call 1-800-SAV-LEAD (1-800-728-5323) for complete recycling information.
 CAUTION!
Batteries left discharged will suffer a permanent loss of capacity. If the UPS is stored or not used for three months or longer, fully recharge the batteries by plugging the UPS into a live AC outlet, turning the Power Switch OFF and letting the UPS charge for 4 - 6 hours.
When the Power Switch is ON, the Battery Backup Protected/Surge Protected Outlets are energized from the internal battery, even when the unit is not plugged in.
These outlets provide both battery backup and surge protection. Plug your computer, monitor and other critical equipment into these outlets. NOTE: DO NOT PLUG PRINTERS
INTO THESE OUTLETS.
3)Surge Protected Outlets:
While all 6 outlets will provide surge and line noise protection, the 3 Surge Protected Outlets will not supply battery backup. Plug equipment (such as a printer, scanner or fax machine) that does not require battery backup during a utility power failure into these outlets.
4)RJ11/45 Telephone/Dataline Surge Suppressor Jacks:
RJ11/45 jacks provide protection against surges on the telephone and data lines. Plug either a single telephone line or a 10Base-T/100Base-TX network cable into UPS's "IN" jack. Plug telephone line (6 ft. RJ11 cordset included) or the network cable from your equipment into UPS's "OUT" jack. Note: Connecting equipment to the RJ11/45 jacks is optional. The UPS will still work properly without this connection.
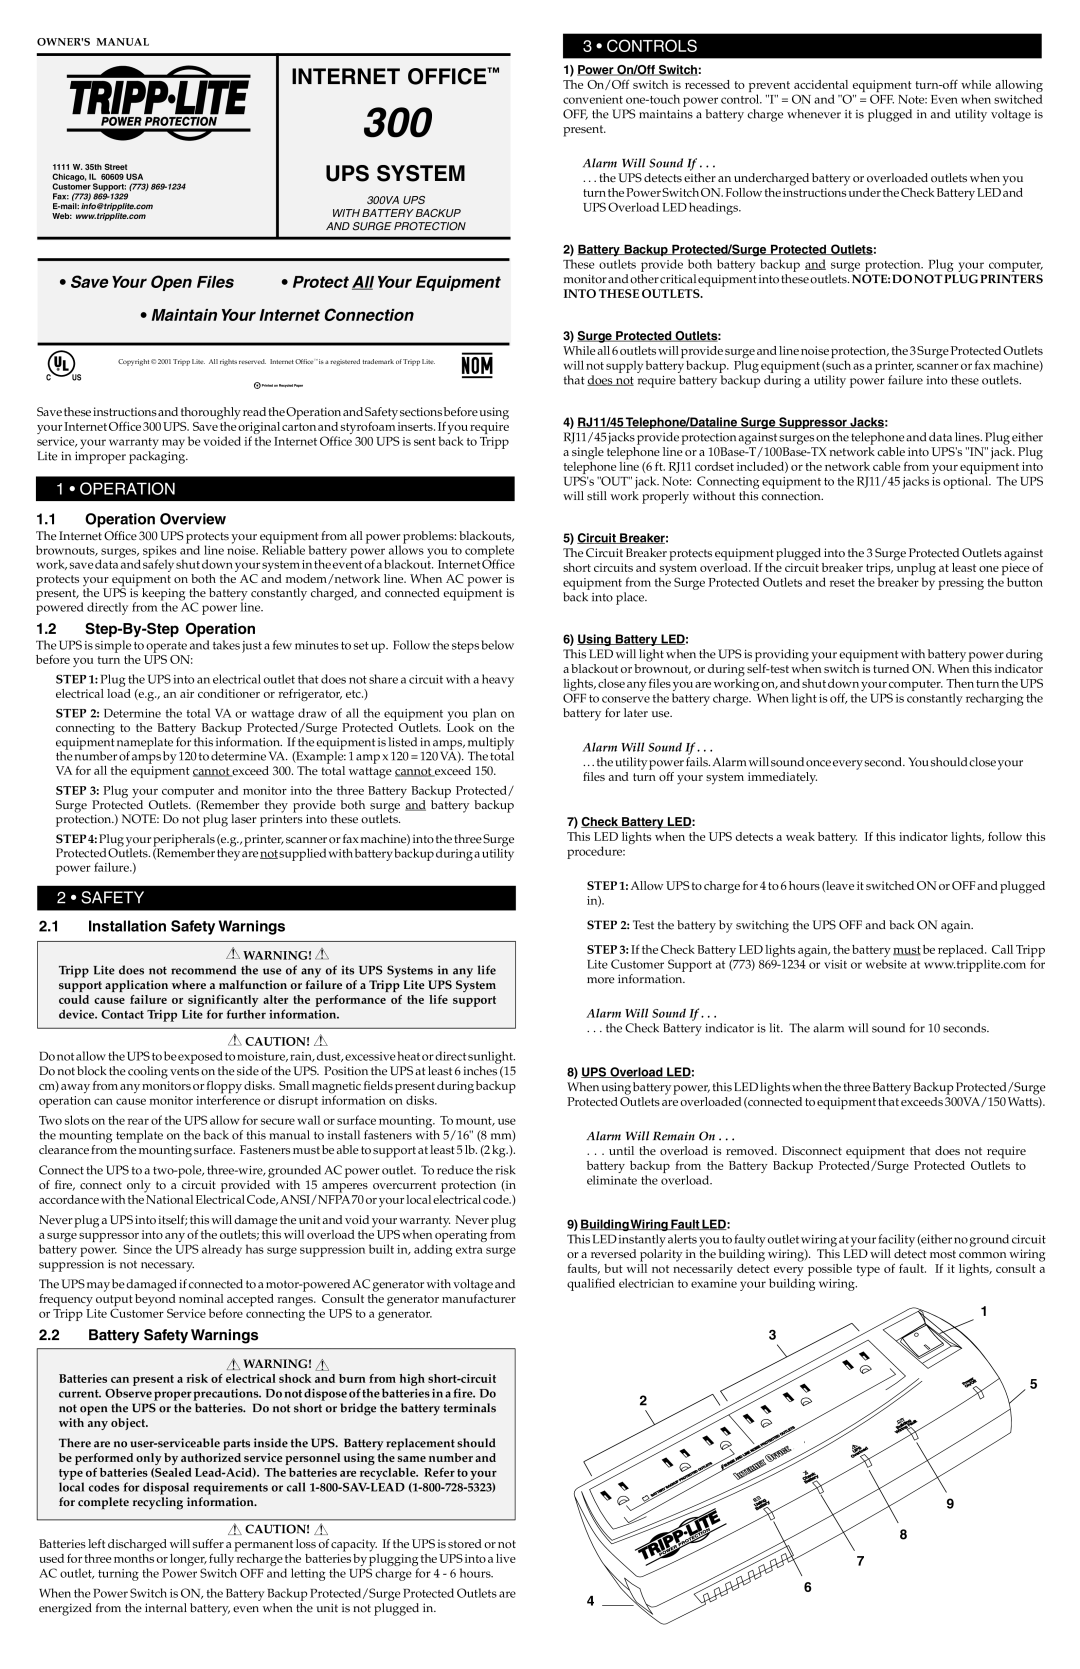
5)Circuit Breaker:
The Circuit Breaker protects equipment plugged into the 3 Surge Protected Outlets against short circuits and system overload. If the circuit breaker trips, unplug at least one piece of equipment from the Surge Protected Outlets and reset the breaker by pressing the button back into place.
6)Using Battery LED:
This LED will light when the UPS is providing your equipment with battery power during a blackout or brownout, or during self-test when switch is turned ON. When this indicator lights, close any files you are working on, and shut down your computer. Then turn the UPS OFF to conserve the battery charge. When light is off, the UPS is constantly recharging the battery for later use.
Alarm Will Sound If . . .
. . . the utility power fails.Alarm will sound once every second. You should close your files and turn off your system immediately.
7)Check Battery LED:
This LED lights when the UPS detects a weak battery. If this indicator lights, follow this procedure:
STEP 1: Allow UPS to charge for 4 to 6 hours (leave it switched ON or OFF and plugged in).
STEP 2: Test the battery by switching the UPS OFF and back ON again.
STEP 3: If the Check Battery LED lights again, the battery must be replaced. Call Tripp Lite Customer Support at (773) 869-1234 or visit or website at www.tripplite.com for more information.
Alarm Will Sound If . . .
. . . the Check Battery indicator is lit. The alarm will sound for 10 seconds.
8)UPS Overload LED:
When using battery power, this LED lights when the three Battery Backup Protected/Surge Protected Outlets are overloaded (connected to equipment that exceeds 300VA/150 Watts).
Alarm Will Remain On . . .
. . . until the overload is removed. Disconnect equipment that does not require battery backup from the Battery Backup Protected/Surge Protected Outlets to eliminate the overload.
9)BuildingWiring Fault LED:
This LED instantly alerts you to faulty outlet wiring at your facility (either no ground circuit or a reversed polarity in the building wiring). This LED will detect most common wiring faults, but will not necessarily detect every possible type of fault. If it lights, consult a qualified electrician to examine your building wiring.
1
3
 5 2
5 2

9
8
7
6
4