4. Installation
4.1Pre-Installation Safety Instructions (continued)
•If the following conditions occur, unplug the device from the wall outlet and bring it to qualified service personnel for repair:
• The power cord or plug has become damaged or frayed.
• Liquid has been spilled into the device.
• The device has been exposed to rain or water.
• The device has been dropped, or the cabinet has been damaged.
• The device exhibits a distinct change in performance, indicating a need for service.
• The device does not operate normally when the operating instructions are followed.
•Only adjust those controls that are covered in the operating instructions. Improper adjustment of other controls may result in damage that will require extensive work by a qualified technician to repair.
•Do not connect the
•Use of this equipment in life support applications where failure of this equipment can reasonably be expected to cause the failure of the life support equipment or to significantly affect its safety or effectiveness is not recommended. Do not use this equipment in the presence of a flammable anesthetic mixture with air, oxygen or nitrous oxide.
Rack Mounting Safety Instructions
•Before working on the rack, make sure that the stabilizers are secured to the rack, extended to the floor, and that the full weight of the rack rests on the floor. Install front and side stabilizers on a single rack or front stabilizers for joined multiple racks before working on the rack.
•Always load the rack from the bottom up, and load the heaviest item in the rack first.
•Make sure that the rack is level and stable before extending a device from the rack.
•Use caution when pressing the device rail release latches and sliding a device into or out of a rack; the slide rails can pinch your fingers.
•After a device is inserted into the rack, carefully extend the rail into a locking position, and then slide the device into the rack.
•Do not overload the AC supply branch circuit that provides power to the rack.
•The total rack load should not exceed 80 percent of the branch circuit rating.
•Make sure that all equipment used on the rack (including power strips and other electrical connectors) is properly grounded.
•Ensure that proper airflow is provided to devices in the rack.
•Ensure that the operating ambient temperature of the rack environment does not exceed the maximum ambient temperature specified for the equipment by the manufacturer.
•Do not step on or stand on any device when servicing other devices in a rack
4.2 Rackmounting Instructions for Console KVMs
The NetDirector Console KVM Switch is designed for mounting in a 1U rack system. For convenience, a rack mounting kit is included with your KVM for quick installation. The various mounting options are explained in the sections that follow:
Note:
1.It is recommended that the unit be installed by two people; one to hold it in place and the other to attach it to the rack.
2.The rackmounting kit that comes with the unit does not include screws or cage nuts. Contact your rack dealer for this hardware.
3.Allow at least 5.1 cm on each side for proper ventilation, and at least 12.7 cm at the rear of the unit for the power cord and cable kits.
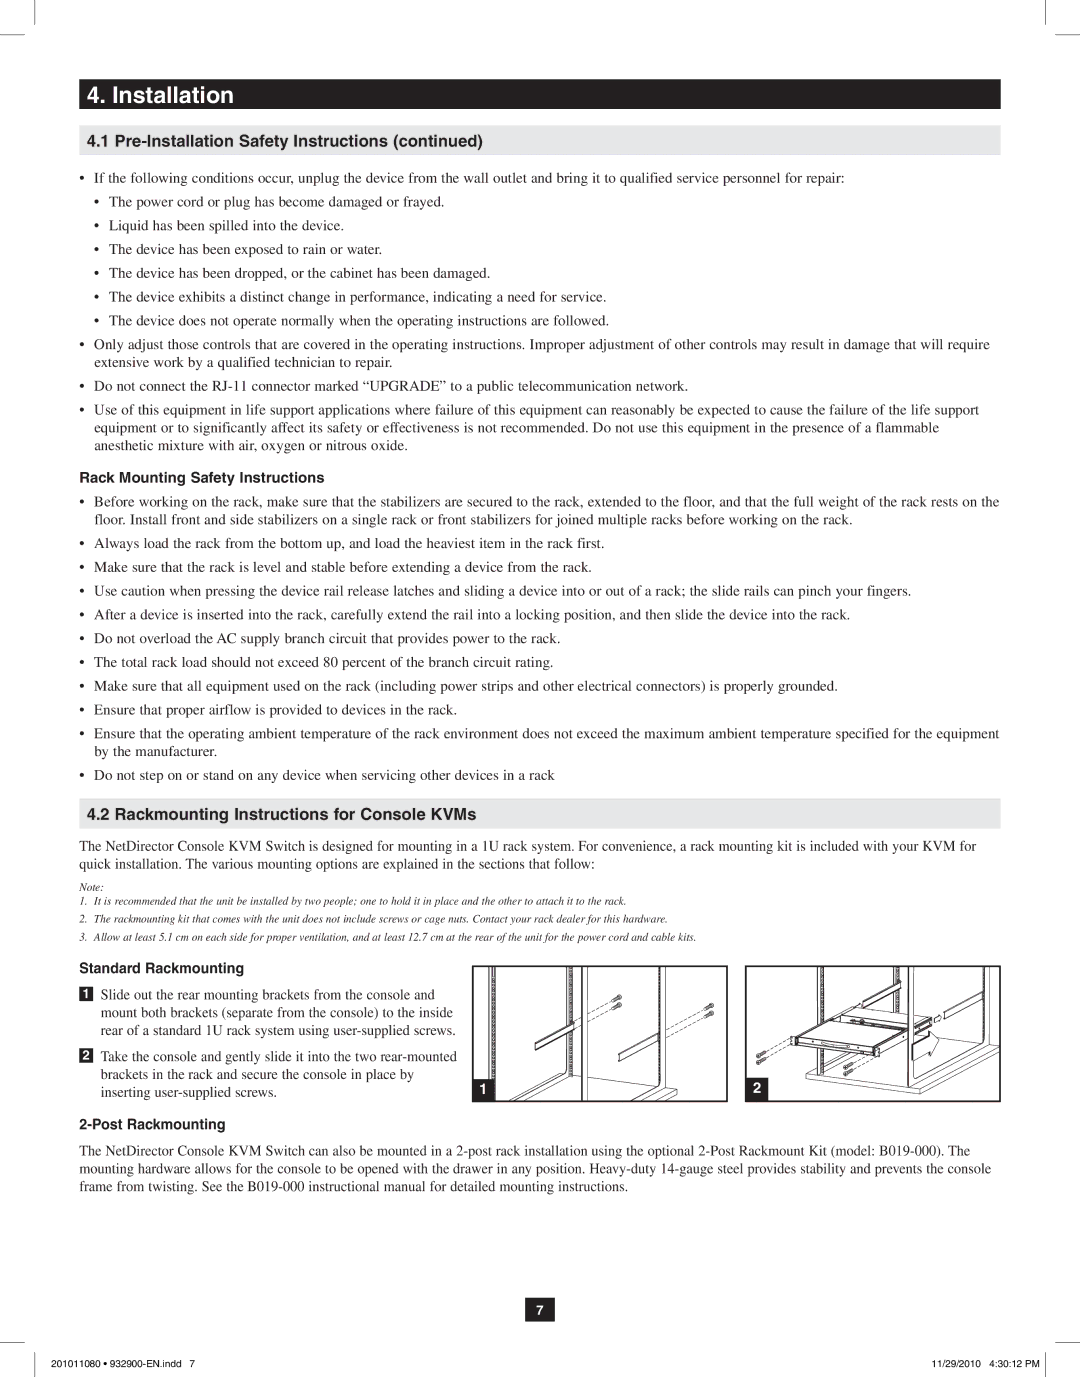
Standard Rackmounting
![]() Slide out the rear mounting brackets from the console and mount both brackets (separate from the console) to the inside rear of a standard 1U rack system using
Slide out the rear mounting brackets from the console and mount both brackets (separate from the console) to the inside rear of a standard 1U rack system using
![]() Take the console and gently slide it into the two
Take the console and gently slide it into the two
1 |
2 |
2-Post Rackmounting
The NetDirector Console KVM Switch can also be mounted in a
7
201011080 • | 11/29/2010 4:30:12 PM |