DC Connectors
Dual DC Connectors (See note at bottom of the page)

Battery Connection

Connect your Inverter/Charger to your batteries using the following procedures:

Connect DC Wiring: Though your Inverter/Charger is a

high-efficiency con- verter of electricity,

its rated output capacity is limited by the length and gauge of the cabling run-

ning from the bat- tery to the unit. Use the shortest length and largest diameter

cabling (maximum 2/0 gauge) to fit

your Inverter/Charger’s DC Input terminals. Shorter and heavier gauge cabling reduces DC voltage drop and allows for maximum transfer of current. Your Inverter/Charger is

capable of delivering peak wattage at up to 200% of its rated continuous wattage output for brief periods of time. See Specifications page for details. Heavier gauge cabling should be used when continuously operating heavy draw equipment under these conditions. Tighten your Inverter/Charger and battery terminals to approximately 3.5 Newton- meters of torque to create an efficient con- nection and to prevent excessive heating at this connection. Insufficient tightening of the terminals could void your warranty. See Specifications Sheet for Minimum Recommended Cable Sizing Chart.

Connect Ground: Using a #8 AWG wire or larger directly connect the Main Ground Lug to the vehicle’s chassis or earth ground.

See the Feature Identification section to locate the Main Ground Lug on your specific Inverter/Charger model. All installations must comply with national and local codes and ordinances.

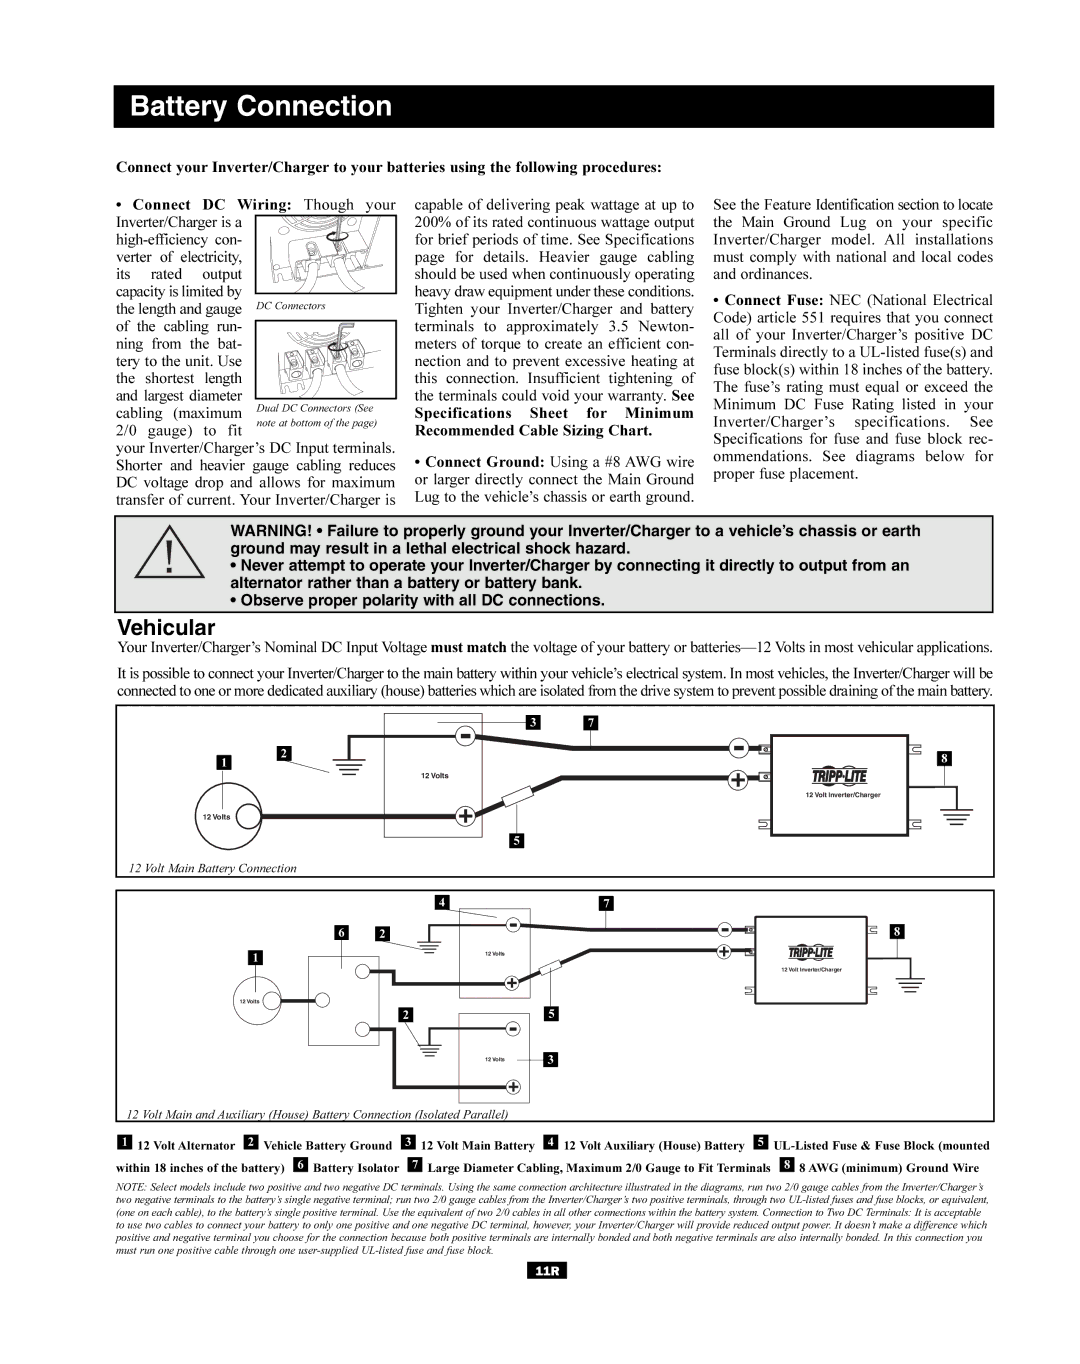
Connect Fuse: NEC (National Electrical Code) article 551 requires that you connect all of your Inverter/Charger’s positive DC Terminals directly to a UL-listed fuse(s) and fuse block(s) within 18 inches of the battery. The fuse’s rating must equal or exceed the Minimum DC Fuse Rating listed in your Inverter/Charger’s specifications. See Specifications for fuse and fuse block rec- ommendations. See diagrams below for proper fuse placement.

WARNING! • Failure to properly ground your Inverter/Charger to a vehicle’s chassis or earth ground may result in a lethal electrical shock hazard.

Never attempt to operate your Inverter/Charger by connecting it directly to output from an alternator rather than a battery or battery bank.

Observe proper polarity with all DC connections.

Vehicular

Your Inverter/Charger’s Nominal DC Input Voltage must match the voltage of your battery or batteries—12 Volts in most vehicular applications.

It is possible to connect your Inverter/Charger to the main battery within your vehicle’s electrical system. In most vehicles, the Inverter/Charger will be connected to one or more dedicated auxiliary (house) batteries which are isolated from the drive system to prevent possible draining of the main battery.


3

7

2


8

1


12 Volts


12 Volt Inverter/Charger

12 Volts


5


12 Volt Main Battery Connection


4

7

6

2

8

1

12 Volts


12 Volt Inverter/Charger

12 Volts

2


5


12 Volts

3

12 Volt Main and Auxiliary (House) Battery Connection (Isolated Parallel)


1

12 Volt Alternator

2

Vehicle Battery Ground

3


12 Volt Main Battery

4

12 Volt Auxiliary (House) Battery

5


UL-Listed Fuse & Fuse Block (mounted


within 18 inches of the battery)

6

Battery Isolator


7

Large Diameter Cabling, Maximum 2/0 Gauge to Fit Terminals


8

8 AWG (minimum) Ground Wire


NOTE: Select models include two positive and two negative DC terminals. Using the same connection architecture illustrated in the diagrams, run two 2/0 gauge cables from the Inverter/Charger’s two negative terminals to the battery’s single negative terminal; run two 2/0 gauge cables from the Inverter/Charger’s two positive terminals, through two UL-listed fuses and fuse blocks, or equivalent, (one on each cable), to the battery’s single positive terminal. Use the equivalent of two 2/0 cables in all other connections within the battery system. Connection to Two DC Terminals: It is acceptable to use two cables to connect your battery to only one positive and one negative DC terminal, however, your Inverter/Charger will provide reduced output power. It doesn’t make a difference which positive and negative terminal you choose for the connection because both positive terminals are internally bonded and both negative terminals are also internally bonded. In this connection you must run one positive cable through one user-supplied UL-listed fuse and fuse block.

11R

Page 11
Image 11
Tripp Lite RV Series manual Battery Connection, Vehicular

RV Series specifications

Tripp Lite's RV Series is a premium line of power inverters designed specifically for recreational vehicles, ensuring that rogue power interruptions don't compromise your adventure. With a focus on providing reliable, high-quality electrical solutions in challenging environments, the RV Series is engineered to deliver consistent performance while keeping your devices charged and operational.

One of the main features of the RV Series is its ability to convert DC power from your RV's battery into clean, stable AC power. This allows you to run various household appliances, electronics, and other devices, making your travel experience much more comfortable. Offered in multiple wattage capacities, these inverters can handle everything from small electronics to larger appliances, ensuring that RV enthusiasts have the power they need wherever they go.

The technology embedded in the RV Series includes pure sine wave output, which delivers power similar to that from traditional utility outlets. This is crucial for sensitive equipment and appliances like microwaves, TVs, and other electronics that can be damaged by modified sine wave outputs. Pure sine wave inverters provide a consistent voltage that ensures safe and efficient operation.

In addition to their robust power output and pure sine wave technology, Tripp Lite RV inverters come equipped with built-in safety features. These include overload protection, short circuit protection, and over-temperature shutdown, which help prevent damage to both the inverter and connected devices. These safety mechanisms provide users with peace of mind, allowing them to enjoy their travels without worrying about electrical hazards.

Portability is another significant characteristic of the RV Series. Many models are designed to be lightweight and compact, making them easy to install and transport. Some units even feature convenient mounting options to maximize space within your RV, while maintaining access to power sources.

Furthermore, Tripp Lite's RV Series showcases versatile input and output options. Some models include multiple AC outlets, USB ports, and DC output, enabling users to charge various devices simultaneously. This adaptability caters to the diverse needs of modern travelers who rely on multiple gadgets.

In conclusion, Tripp Lite's RV Series combines power, safety, and versatility, making it an excellent choice for anyone looking to enhance their RV experience. With pure sine wave output, built-in safety features, and portability, these inverters represent a smart investment for those seeking reliable power on the road. Whether you're embarking on a weekend getaway or a cross-country trek, the RV Series ensures that you can enjoy all the comforts of home while exploring the great outdoors.