Section 5: Maintenance

WARNING

Before inspecting, cleaning or servicing the machine, shut off engine, wait for all moving parts to come to a complete stop, disconnect spark plug wire and move wire away from spark plug. Remove ignition key on electric start models.

Failure to follow these instructions can result in serious personal injury or property damage.

REMOVING AND REPLACING THE TRIMMER HEAD

1.Stop the engine and wait for all moving parts to stop. Disconnect spark plug wire and move it away from the spark plug. Remove the ignition key on electric start models.

2.Two bolts (A, Figure 5-3) secure the trimmer head (B) to the spindle head

(C). Loosen both bolts (not the nuts) just enough to open up the trimmer head and allow it to slide down the spindle head and past the two stops. Do not attempt to remove the bolts completely – they are permanently attached.

3.Install the new trimmer head on the spindle head. Tighten the hardware securely (to 75 in/lbs.) and evenly.

4.If the wear cup (D, Figure 5-3) is worn, replace it. Use a 1/2" socket wrench to remove the screw (E, Figure 5-3) and washer (F). Install the new wear cup and reinstall the washer and screw. Tighten the screw securely.

C

B

A

D

F

E

Figure 5-3

INSPECTING / REPLACING THE DRIVE BELT

The drive belt can be inspected or re- placed from beneath the machine deck. The belt should not require inspection for many hours of operation. If re- placement becomes necessary, follow the instructions given here.

Belt Inspection

Stop the engine and let all moving parts stop. Allow the engine to cool. Disconnect the spark plug wire and move it away from the spark plug. Remove the ignition key on electric start models.

1.For convenience, we recommend that you place the unit on a raised plat- form to make access to the underside of the deck as easy as possible.

2.Examine the belt. Feed it around the rear (engine) pulley so the entire belt can be examined. If cracks or other damage are noted, a new belt is needed.

Belt Removal

1.Stop the engine and wait for engine to cool. Disconnect the spark plug wire and move it away from the spark plug. Remove the ignition key on electric start models.

2.Remove gasoline from fuel tank.

DANGER

GASOLINE IS HIGHLY FLAMMABLE AND ITS VAPORS ARE EXPLOSIVE.

Drain fuel into approved container outdoors, away from open flame.

Be sure engine and muffler are cool before draining gasoline.

Do not smoke.

Failure to comply can result in seri- ous personal injury and property damage.

3.Carefully tip unit on its left side and secure it in place.

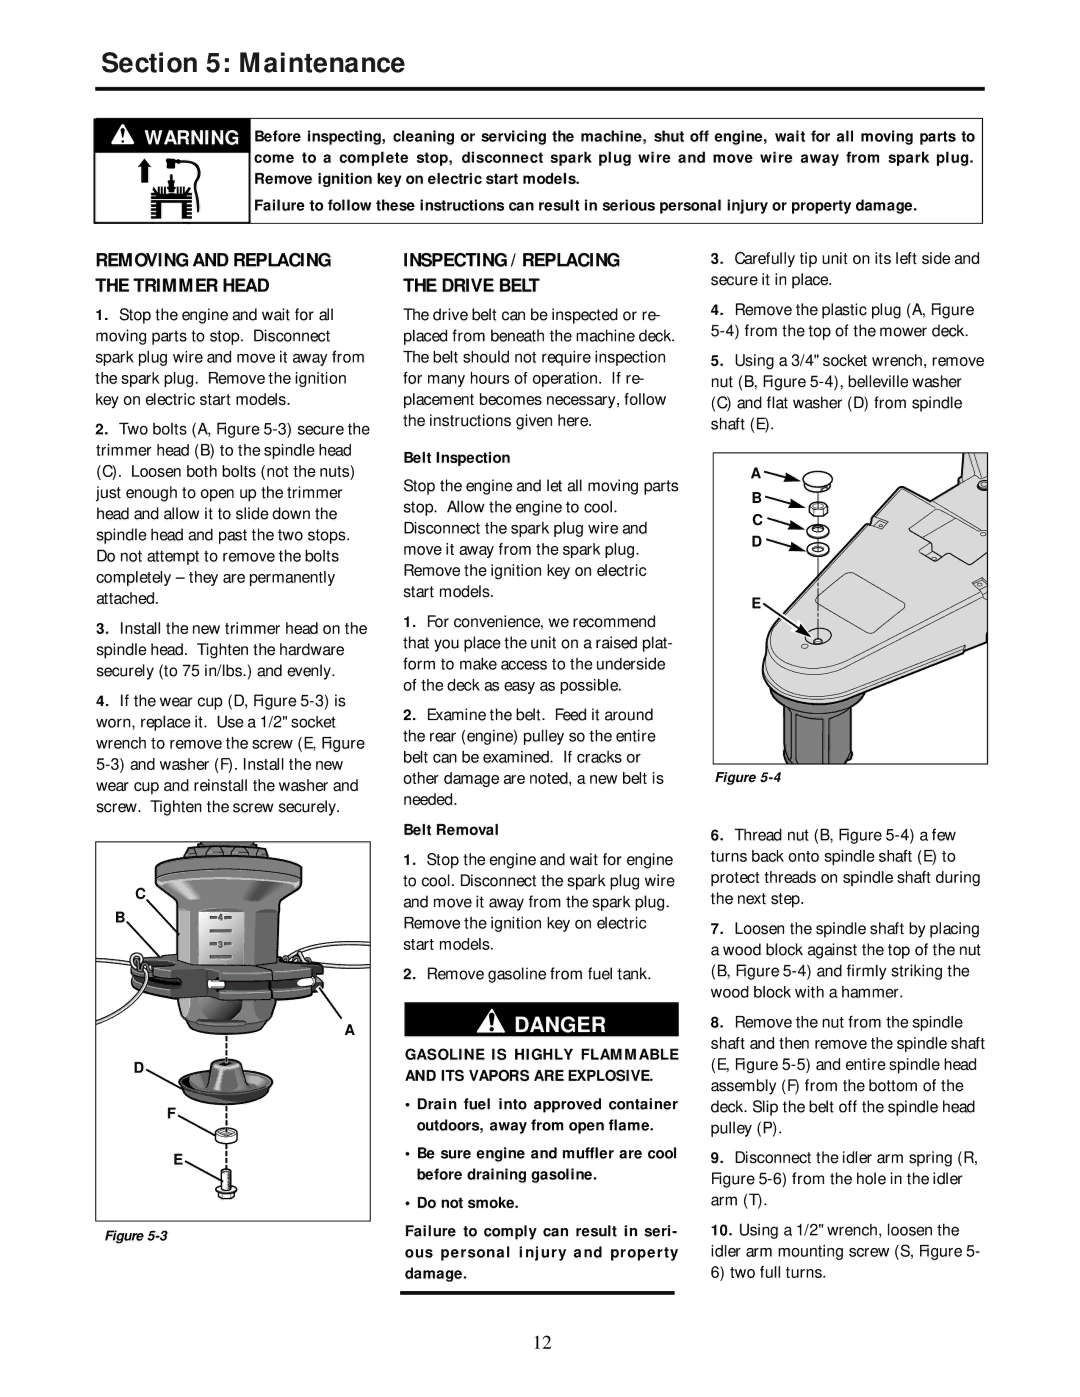
4.Remove the plastic plug (A, Figure 5-4) from the top of the mower deck.

5.Using a 3/4" socket wrench, remove nut (B, Figure 5-4), belleville washer

(C) and flat washer (D) from spindle shaft (E).

A

B

C

D

E

Figure 5-4

6.Thread nut (B, Figure 5-4) a few turns back onto spindle shaft (E) to protect threads on spindle shaft during the next step.

7.Loosen the spindle shaft by placing a wood block against the top of the nut (B, Figure 5-4) and firmly striking the wood block with a hammer.

8.Remove the nut from the spindle

shaft and then remove the spindle shaft (E, Figure 5-5) and entire spindle head assembly (F) from the bottom of the deck. Slip the belt off the spindle head pulley (P).

9.Disconnect the idler arm spring (R, Figure 5-6) from the hole in the idler arm (T).

10.Using a 1/2" wrench, loosen the idler arm mounting screw (S, Figure 5- 6) two full turns.

12

Page 14
Image 14
Troy-Bilt 52057, 52058 Removing and Replacing the Trimmer Head, Inspecting / Replacing the Drive Belt, Belt Inspection

52058, 52057 specifications

The Troy-Bilt 52058 and 52057 are two impressive models in the Troy-Bilt lineup, known for their power, durability, and ease of use, making them popular choices for homeowners and garden enthusiasts alike.

The Troy-Bilt 52058 boasts a robust 306 cc OHV engine, providing the necessary power to tackle even the toughest of garden tasks. This model features a 24-inch cutting width, allowing it to cover large areas quickly. The Rear Tine Tiller design further enhances its capability, as it digs deep into the soil with its heavy-duty tines, ensuring that your garden bed can be prepared with minimal effort. One of the standout features is its patented forward and reverse tilling capability, which improves maneuverability and efficiency.

On the other hand, the Troy-Bilt 52057 comes with a slightly smaller 250 cc engine but remains powerful in its own right. It also incorporates a 16-inch tilling width, making it suitable for smaller gardens or tighter spaces. This model is engineered with a gear-driven transmission, providing superior handling and control while tilling. The adjustable tilling depth feature allows users to customize their tilling experience, whether they're breaking new ground or maintaining existing beds.

Both models are equipped with an ergonomic handle design, ensuring that users remain comfortable during prolonged use. The intuitive controls are easily accessible, allowing for smooth operation even for those who may not have extensive experience with gardening equipment. Additionally, Troy-Bilt has included a sturdy rear-wheel design in both models, which ensures stability and ease of movement across various terrains.

In terms of technology, these tillers are equipped with advanced features that maximize efficiency. The performance-enhancing tilling tines are designed to break up soil efficiently, reducing the time and effort needed for garden preparation. Furthermore, these models comply with modern emissions regulations, making them environmentally friendly choices for today’s gardeners.

Overall, the Troy-Bilt 52058 and 52057 represent a perfect blend of power, versatility, and user-friendly design. Whether you are preparing soil for planting or maintaining existing flower beds, these tillers offer the dependability and performance needed to achieve gardening success. With their strong build quality and thoughtful engineering, they are excellent investments for anyone serious about gardening.