14Section 4: Operation
TILLING TIPS & TECHNIQUES
Tilling Depths
WARNING
Before tilling, contact your tele- phone or utilities company and inquire if underground equipment or lines are used on your property. Do not till near buried electric cables, telephone lines, pipes or hoses.
•Avoid pushing down on the handlebars in an attempt to force the tiller to dig deeper. Doing so takes the weight off the powered wheels, causing them to lose traction. Without the wheels helping to hold the tiller back, the tines will attempt to propel the tiller – often causing the tiller to skip rapidly across the ground. (Sometimes, slight downward pressure on the handlebars will help get through a particularly tough section of sod or unbroken ground, but in most cases this won’t be necessary.)
•Avoid trying to dig too deeply too quickly, especially when busting sod or when tilling soil that hasn’t been tilled for some time. Use shallow depth regulator settings (only an inch or two deep) for the first passes through the soil. With each succeeding pass, dig another inch or two deeper. (Watering the area a few days prior to tilling will make tilling easier, as will letting the newly worked soil set for a day or two before making a final, deep tilling pass.)
•When cultivating (breaking up surface soil around plants to destroy weeds, see Fig.
Choosing Correct Wheel and Tine Speeds
With experience, you will find the “just right” tilling depth and tilling speed combination that is best for your garden.
Set the engine throttle lever at a speed to give the engine adequate power and yet allow it to operate at the slowest possible speed...at least until you have achieved the maximum tilling depth you desire. Faster engine speeds may be desirable when making final passes through the seedbed or when cultivating. Selection of the correct engine speed, in relation to the tilling depth, will ensure a sufficient power level to do the job without causing the engine to labor.
| Let the Tiller Do the Work |
|
| Avoid Making Footprints |
|
| Avoid Tilling Soggy, Wet Soil |
|
|
|
|
|
|
|
|
|
|
| While tilling, relax and let the wheels pull |
|
| Whenever possible, walk on the untilled |
|
| Tilling wet soil often results in large, hard |
|
| the tiller along while the tines do the dig- |
|
| side of the unit to avoid making footprints |
|
| clumps of soil that can interfere with |
|
| ging. Walk on the side that is not yet fin- |
|
| in your freshly tilled or cultivated soil. |
|
| planting. If time permits, wait a day or two |
|
| ished (to avoid making footprints in the |
|
| Footprints cause soil compaction that can |
|
| after heavy rains to allow the soil to dry |
|
| freshly tilled soil) and lightly, but securely |
|
| hamper root penetration and contribute to |
|
| before tilling. Test soil by squeezing it into |
|
| grip the handlebar with just one hand. |
|
| soil erosion. They can also “plant” |
|
| a ball. If it compresses too easily, it is too |
|
|
|
|
| unwanted weed seeds back into the |
|
| wet to till. |
|
|
|
|
| freshly tilled ground. |
|
|
|
|
|
|
|
|
|
| |||
|
|
|
|
|
|
|
|
|
|
|
|
|
|
|
|
|
|
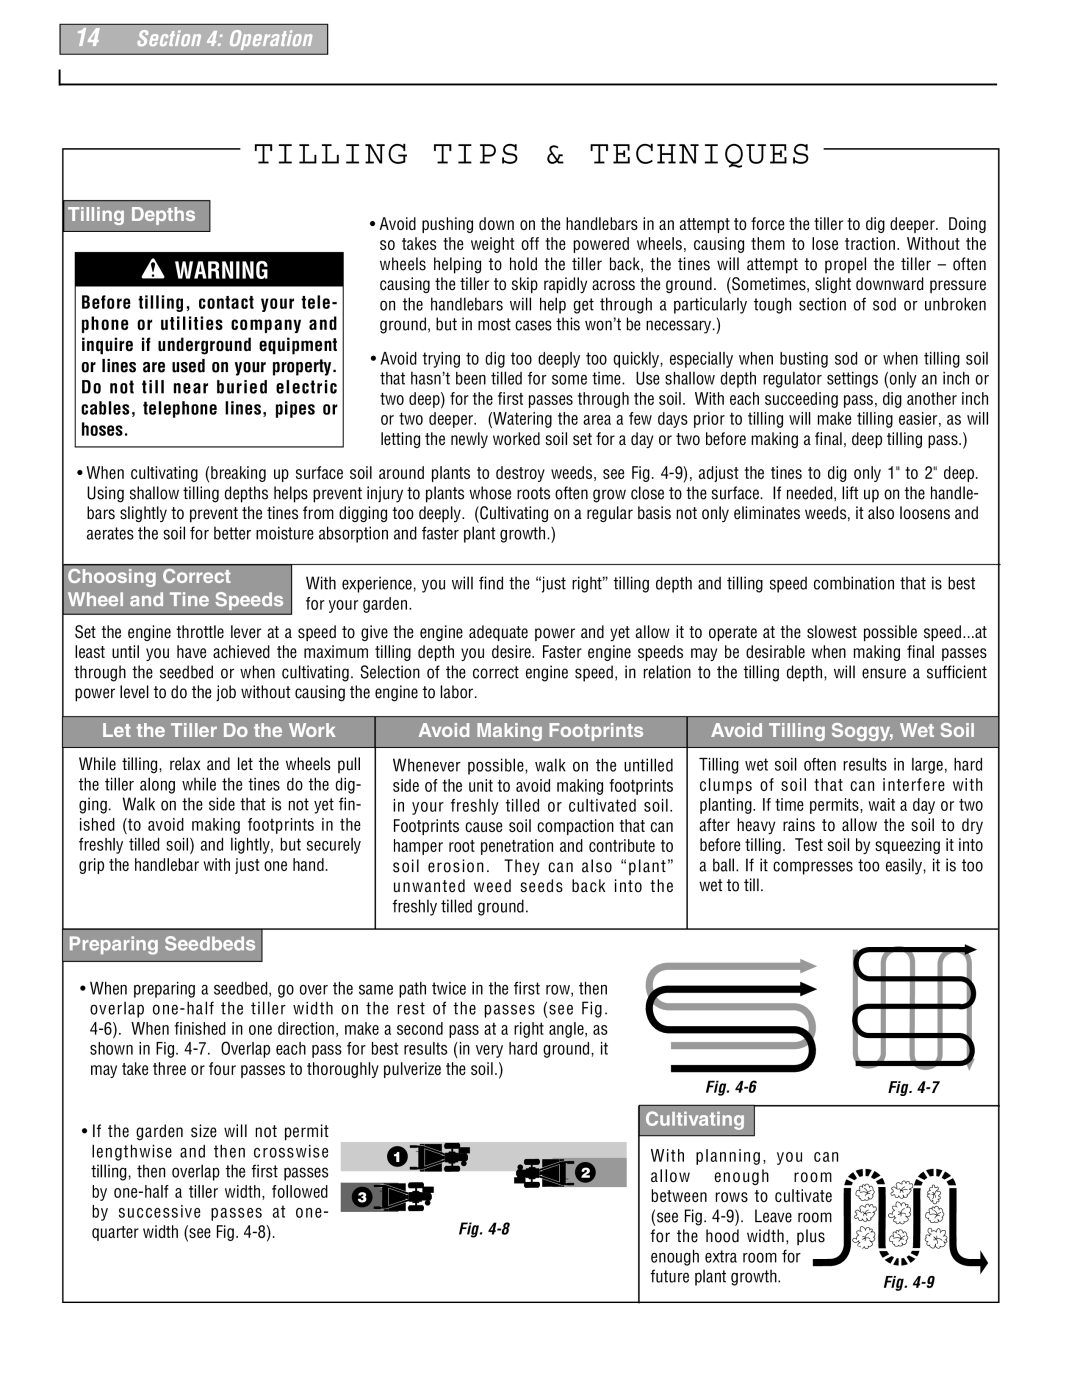
Preparing Seedbeds
•When preparing a seedbed, go over the same path twice in the first row, then overlap
•If the garden size will not permit
lengthwise and then crosswise | 1 |
|
|
|
| |
|
|
|
| |||
tilling, then overlap the first passes |
|
|
|
|
| 2 |
|
|
|
|
| ||
by | 3 |
|
|
|
|
|
by successive passes at one- |
|
|
| Fig. | ||
|
|
| ||||
quarter width (see Fig. |
|
|
| |||
|
|
|
|
|
|
|
|
|
| Fig. |
|
| Fig. |
| |
|
|
|
|
| |||
|
|
|
|
| |||
|
|
|
|
|
|
| |
|
|
|
|
|
|
| |
|
|
|
|
|
|
| |
| Cultivating |
|
|
|
|
| |
|
|
|
|
|
| ||
| With | planning, | you can |
| |||
| allow | enough | room |
| |||
between rows to cultivate |
|
(see Fig. |
|
for the hood width, plus |
|
enough extra room for |
|
future plant growth. | Fig. |
|