Section 2: Assembly

ASSEMBLING THE ELECTRIC START SYSTEM

The following steps explain how to install and charge the battery on electric start tillers. For your safety, follow all steps and observe all accompanying safety messages. Section 5 contains other general battery maintenance and recharging instructions.

DANGER

Battery produces explosive gases.

Keep away sparks, flames, and cigarettes.

Ventilate area when charging or using battery in an enclosed space.

Make sure battery vent tube is always open after battery is filled with acid.

WARNING

Remove metal jewelry before working near the battery or near the electrical system. Failure to comply may cause a short circuit, resulting in electrical burns, a shock, or battery gas explosion.

NOTE: If the battery is put into service after the date shown on the top of the battery, charge for a minimum of one hour at 6-10 amps. Refer to the Maintenence section of this manual for more detailed instructions regarding proper battery charging procedure

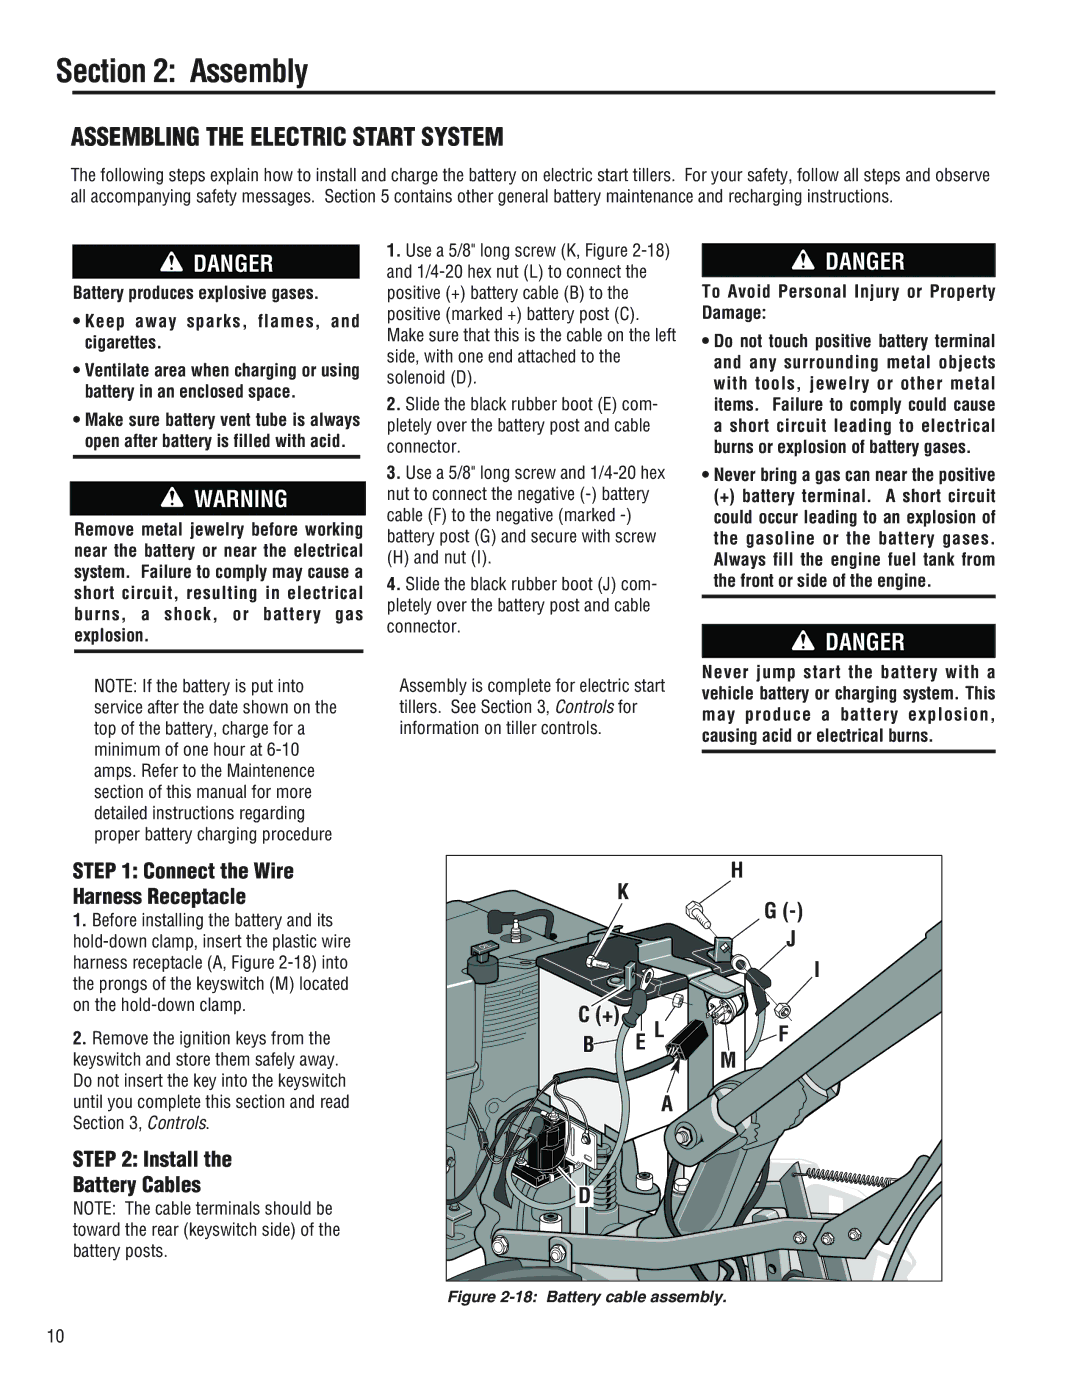
1.Use a 5/8" long screw (K, Figure 2-18) and 1/4-20 hex nut (L) to connect the positive (+) battery cable (B) to the positive (marked +) battery post (C). Make sure that this is the cable on the left side, with one end attached to the solenoid (D).

2.Slide the black rubber boot (E) com- pletely over the battery post and cable connector.

3.Use a 5/8" long screw and 1/4-20 hex nut to connect the negative (-) battery cable (F) to the negative (marked -) battery post (G) and secure with screw

(H) and nut (I).

4.Slide the black rubber boot (J) com- pletely over the battery post and cable connector.

Assembly is complete for electric start tillers. See Section 3, Controls for information on tiller controls.

DANGER

To Avoid Personal Injury or Property Damage:

Do not touch positive battery terminal and any surrounding metal objects with tools, jewelry or other metal items. Failure to comply could cause a short circuit leading to electrical burns or explosion of battery gases.

Never bring a gas can near the positive

(+)battery terminal. A short circuit could occur leading to an explosion of the gasoline or the battery gases. Always fill the engine fuel tank from the front or side of the engine.

DANGER

Never jump start the battery with a vehicle battery or charging system. This may produce a battery explosion, causing acid or electrical burns.

STEP 1: Connect the Wire Harness Receptacle

1.Before installing the battery and its hold-down clamp, insert the plastic wire harness receptacle (A, Figure 2-18) into the prongs of the keyswitch (M) located on the hold-down clamp.

2.Remove the ignition keys from the keyswitch and store them safely away. Do not insert the key into the keyswitch until you complete this section and read Section 3, Controls.

STEP 2: Install the

Battery Cables

NOTE: The cable terminals should be toward the rear (keyswitch side) of the battery posts.

H

K

G (-)

J

I

C (+)

B E LF

M

A

D

Figure 2-18: Battery cable assembly.

10

Page 10
Image 10
Troy-Bilt 682J, E686N, E682L manual Install Battery Cables, To Avoid Personal Injury or Property Damage

682J, E686N, E682L specifications

The Troy-Bilt brand is widely recognized for its reliable outdoor power equipment, including a line of innovative lawn tractors. Among these, the Troy-Bilt 682J, E686N, and E682L stand out for their exceptional performance and user-friendly features, catering to various lawn care needs.

The Troy-Bilt 682J is a robust lawn tractor designed for efficiency and ease of use. Its 19 HP engine provides ample power for handling various landscaping tasks, while the 42-inch cutting deck allows for a wide cutting path, making quick work of mowing larger yards. The tractor boasts a six-speed transmission, enabling users to select the speed that best suits their mowing conditions. Additionally, the 682J features an ergonomic seat and steering for comfort during extended use, making it a solid choice for homeowners with medium to large properties.

The Troy-Bilt E686N takes things a step further with its advanced technology. This model integrates a 20 HP engine and a larger 46-inch cutting deck, enhancing productivity significantly. The E686N is equipped with a hydrostatic transmission, offering smooth operation and easier control, allowing users to maneuver around obstacles with precision. One of its standout features is the Easy Change Oil Kit, which simplifies maintenance, ensuring that the engine runs smoothly for longer periods. The inclusion of a washout port on the deck makes cleaning effortless, promoting better lawn health and equipment longevity.

For those seeking a more compact option, the Troy-Bilt E682L delivers reliable performance in a smaller package. This model features a 19 HP engine paired with a 38-inch cutting deck, perfect for navigating tighter spaces without compromising power. Its tight turning radius enhances maneuverability, making it ideal for suburban lawns with landscaping features and garden beds. The E682L is designed with user comfort in mind, featuring an adjustable seat and simple controls for intuitive operation.

In summary, the Troy-Bilt 682J, E686N, and E682L represent a dynamic trio of lawn tractors, each catering to various homeowner needs. With powerful engines, efficient cutting decks, and user-friendly features, these models are built to enhance the mowing experience. With their proven reliability and advanced technologies, Troy-Bilt tractors make maintaining a beautiful lawn a manageable task for anyone.