Section 2: Assembly

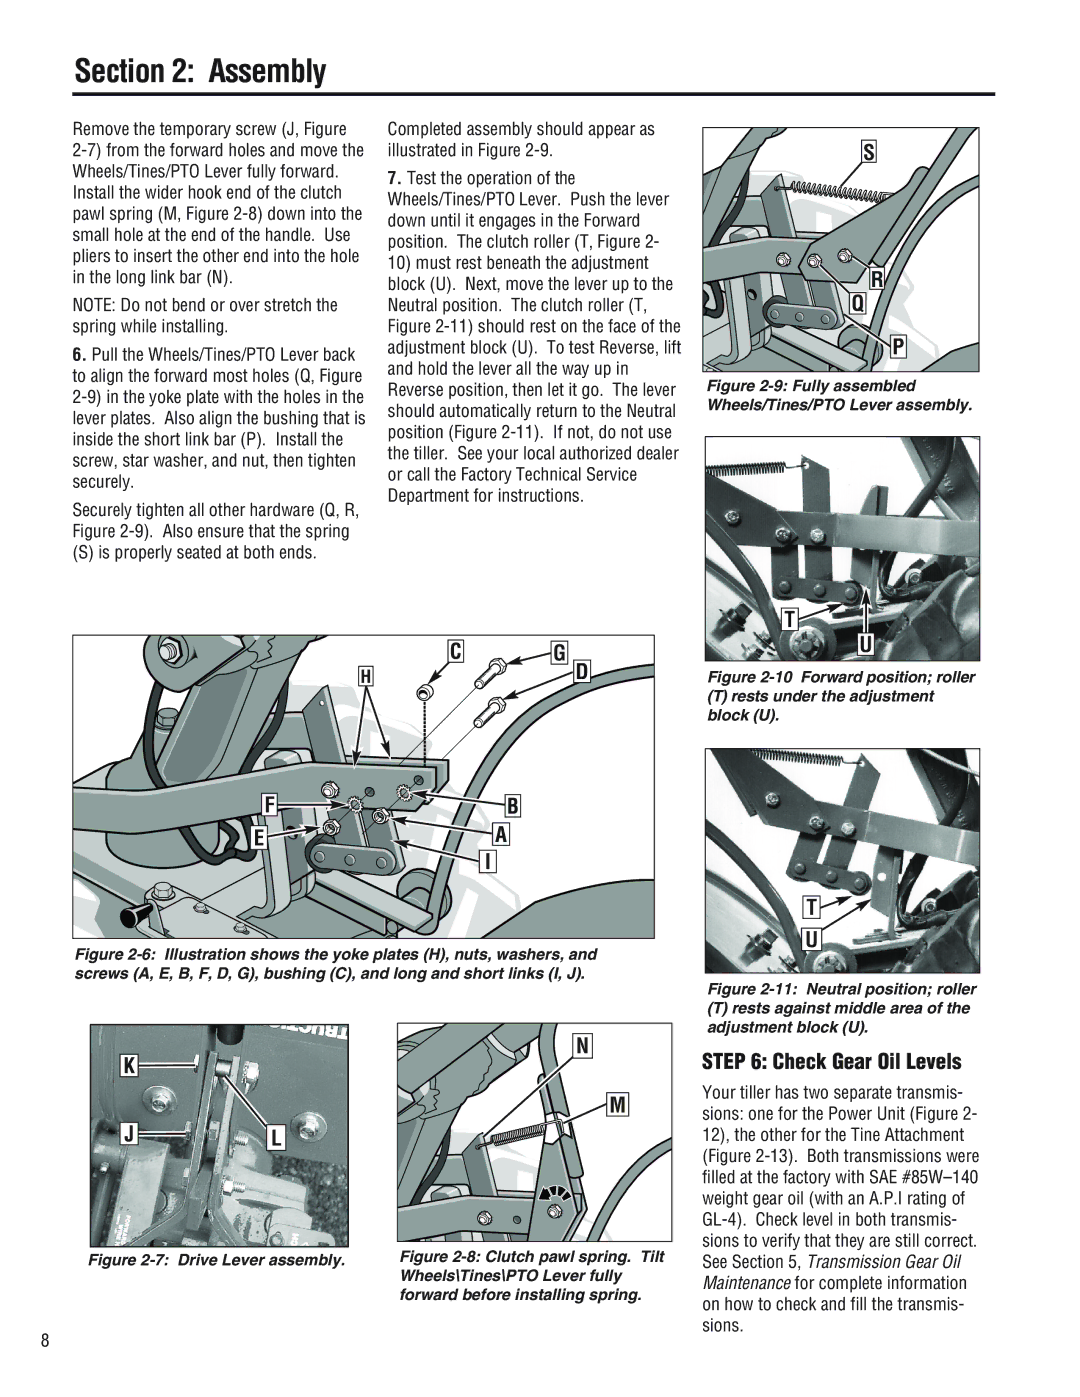
Remove the temporary screw (J, Figure

2-7) from the forward holes and move the Wheels/Tines/PTO Lever fully forward. Install the wider hook end of the clutch pawl spring (M, Figure 2-8) down into the small hole at the end of the handle. Use pliers to insert the other end into the hole in the long link bar (N).

NOTE: Do not bend or over stretch the spring while installing.

6.Pull the Wheels/Tines/PTO Lever back to align the forward most holes (Q, Figure 2-9) in the yoke plate with the holes in the lever plates. Also align the bushing that is inside the short link bar (P). Install the screw, star washer, and nut, then tighten securely.

Securely tighten all other hardware (Q, R, Figure 2-9). Also ensure that the spring

(S) is properly seated at both ends.

Completed assembly should appear as illustrated in Figure 2-9.

7.Test the operation of the Wheels/Tines/PTO Lever. Push the lever down until it engages in the Forward position. The clutch roller (T, Figure 2- 10) must rest beneath the adjustment block (U). Next, move the lever up to the Neutral position. The clutch roller (T, Figure 2-11) should rest on the face of the adjustment block (U). To test Reverse, lift and hold the lever all the way up in Reverse position, then let it go. The lever should automatically return to the Neutral position (Figure 2-11). If not, do not use the tiller. See your local authorized dealer or call the Factory Technical Service Department for instructions.

S

R

Q

P

Figure 2-9: Fully assembled Wheels/Tines/PTO Lever assembly.

T

C

G

H

D

F

B

E

A


I

Figure 2-6: Illustration shows the yoke plates (H), nuts, washers, and screws (A, E, B, F, D, G), bushing (C), and long and short links (I, J).

U

Figure 2-10 Forward position; roller

(T)rests under the adjustment block (U).

T

U

Figure 2-11: Neutral position; roller

K

J

L

Figure 2-7: Drive Lever assembly.

N

M

Figure 2-8: Clutch pawl spring. Tilt Wheels\Tines\PTO Lever fully forward before installing spring.

(T)rests against middle area of the adjustment block (U).

STEP 6: Check Gear Oil Levels

Your tiller has two separate transmis- sions: one for the Power Unit (Figure 2- 12), the other for the Tine Attachment (Figure 2-13). Both transmissions were filled at the factory with SAE #85W–140 weight gear oil (with an A.P.I rating of GL-4). Check level in both transmis- sions to verify that they are still correct. See Section 5, Transmission Gear Oil Maintenance for complete information on how to check and fill the transmis- sions.

8

Page 8
Image 8
Troy-Bilt E686NHorseTM, 682JHorseTM, E682LHorseTM manual Check Gear Oil Levels, Remove the temporary screw J, Figure

E682LHorseTM, E686NHorseTM, 682JHorseTM specifications

Troy-Bilt is a recognized leader in outdoor power equipment, particularly known for its innovative and reliable garden tillers. Among its extensive lineup, the Troy-Bilt 682J Horse™, E686N Horse™, and E682L Horse™ tillers stand out for their robust performance and advanced technological features. Each model is uniquely designed to cater to different gardening needs, making them essential tools for both novice and experienced gardeners.

The Troy-Bilt 682J Horse™ is a commercial-grade tiller that boasts a powerful 6 HP engine, providing ample torque for breaking new ground or cultivating soil. Its 12-inch steel tines are designed for durability and efficiency, allowing for effective tilling at a depth of up to 8 inches. The unique counter-rotating tine feature enhances soil mixing and reduces the risk of soil compaction, ensuring optimal planting conditions. Additionally, the rear-wheel drive system offers superior traction and maneuverability, making it easier to navigate through tough terrain.

Next in line, the E686N Horse™ brings a slightly different set of capabilities, with an emphasis on user comfort and ease of operation. This model is equipped with a powerful 6.5 HP engine, which allows for efficient handling of larger plots. Its forward and reverse gear options provide flexibility in operations, especially when navigating tight spaces. The adjustable tilling width allows users to choose between 16 and 12 inches, making it versatile for various gardening tasks. This model also features an ergonomic design that includes adjustable handlebars, making it easier for users of different heights to operate comfortably.

Finally, the E682L Horse™ is designed for lighter gardening tasks. With a more compact design, this tiller features a 5 HP engine that delivers reliable performance for small to medium gardens. Its tilling depth of up to 6 inches and width of 18 inches makes it ideal for homeowners looking to maintain their garden beds or small plots. The E682L Horse™ incorporates a lightweight and easy-to-maneuver body, allowing for effortless transportation and storage.

All three tillers leverage advanced technologies such as Troy-Bilt's patented Walk Behind design, which provides optimal control and reduces fatigue during extended use. The durability of the construction materials ensures longevity, while user-friendly features enhance the overall gardening experience. Whether you are a professional landscaper or a homeowner with a passion for gardening, the Troy-Bilt 682J Horse™, E686N Horse™, and E682L Horse™ offer tailored solutions that meet a wide array of tilling needs.