3 A

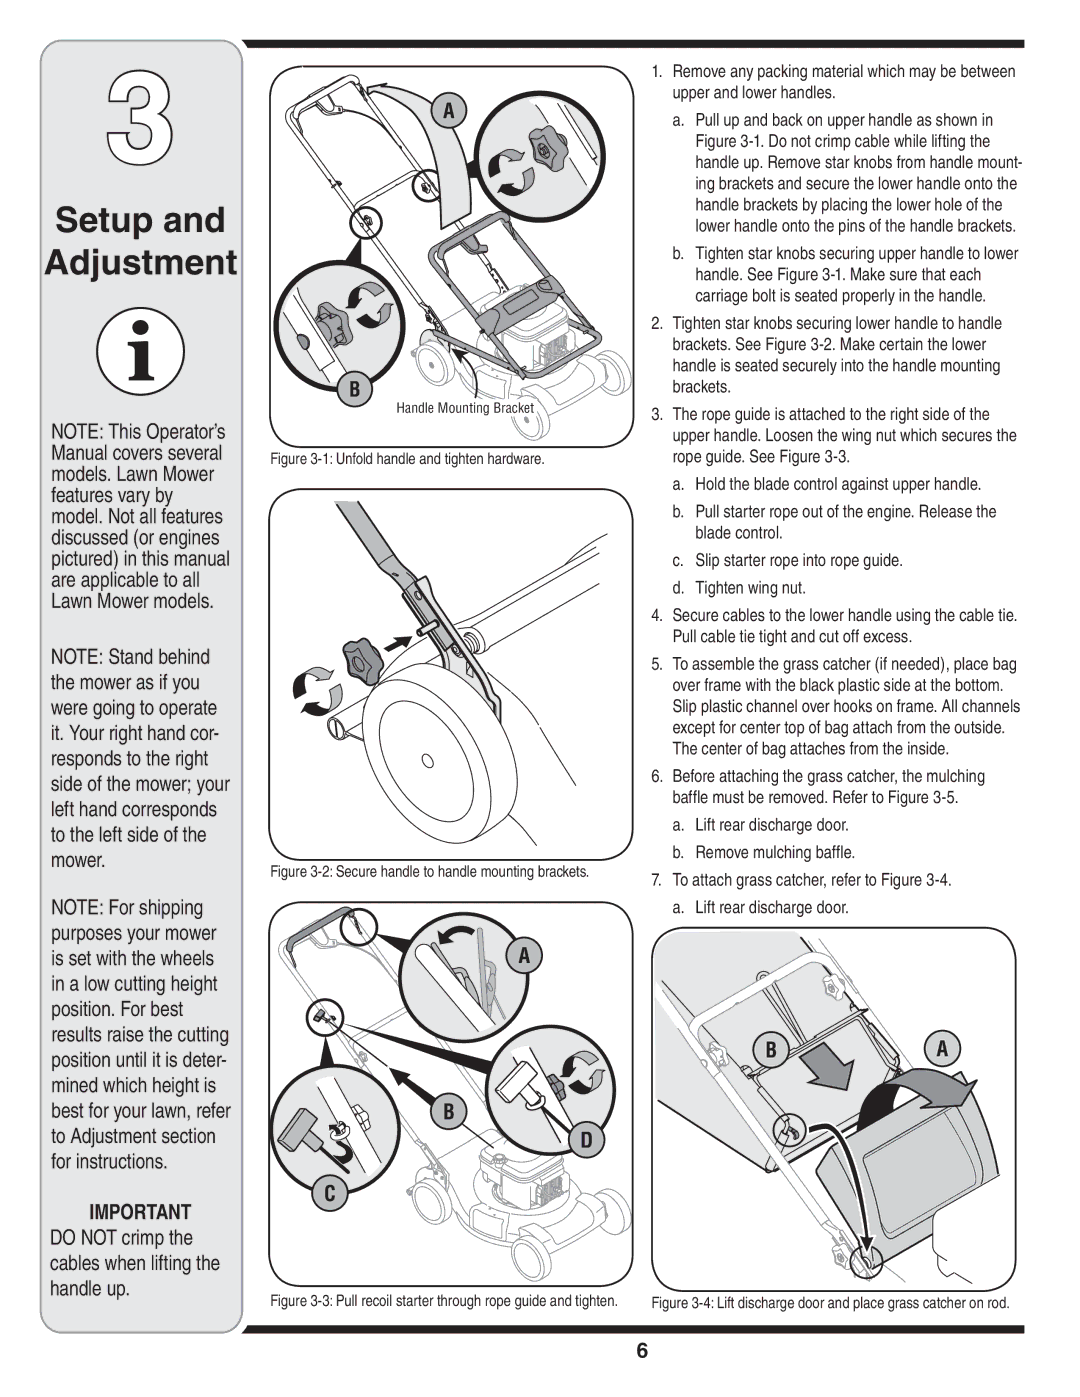
1. Remove any packing material which may be between

upper and lower handles.

a. Pull up and back on upper handle as shown in

Figure 3-1. Do not crimp cable while lifting the

handle up. Remove star knobs from handle mount-

ing brackets and secure the lower handle onto the

Setup and

Adjustment

NOTE: This Operator’s Manual covers several models. Lawn Mower features vary by model. Not all features discussed (or engines pictured) in this manual are applicable to all Lawn Mower models.

NOTE: Stand behind the mower as if you

were going to operate it. Your right hand cor-

responds to the right side of the mower; your left hand corresponds

to the left side of the mower.

NOTE: For shipping purposes your mower

is set with the wheels

in a low cutting height

position. For best results raise the cutting position until it is deter- mined which height is

best for your lawn, refer

to Adjustment section

for instructions.

IMPORTANT

DO NOT crimp the cables when lifting the handle up.

B

Handle Mounting Bracket

Figure 3-1: Unfold handle and tighten hardware.

Figure 3-2: Secure handle to handle mounting brackets.

A

B

D

C

Figure 3-3: Pull recoil starter through rope guide and tighten.


handle brackets by placing the lower hole of the


lower handle onto the pins of the handle brackets.


b. Tighten star knobs securing upper handle to lower


handle. See Figure 3-1. Make sure that each


carriage bolt is seated properly in the handle.

2.

Tighten star knobs securing lower handle to handle


brackets. See Figure 3-2. Make certain the lower


handle is seated securely into the handle mounting


brackets.

3.

The rope guide is attached to the right side of the


upper handle. Loosen the wing nut which secures the


rope guide. See Figure 3-3.


a.

Hold the blade control against upper handle.


b. Pull starter rope out of the engine. Release the


blade control.


c.

Slip starter rope into rope guide.


d.

Tighten wing nut.

4.

Secure cables to the lower handle using the cable tie.


Pull cable tie tight and cut off excess.

5.

To assemble the grass catcher (if needed), place bag


over frame with the black plastic side at the bottom.


Slip plastic channel over hooks on frame. All channels


except for center top of bag attach from the outside.


The center of bag attaches from the inside.

6.

Before attaching the grass catcher, the mulching


baffle must be removed. Refer to Figure 3-5.


a.

Lift rear discharge door.


b.

Remove mulching baffle.

7.

To attach grass catcher, refer to Figure 3-4.


a.

Lift rear discharge door.

BA

Figure 3-4: Lift discharge door and place grass catcher on rod.

Page 6
Image 6
Troy-Bilt 830 warranty Setup Adjustment, Upper and lower handles

830 specifications

The Troy-Bilt 830 is a versatile and innovative yard maintenance tool designed for homeowners and landscapers alike. Known for its robust construction and high-performance capabilities, this machine serves as both a cultivator and a tiller. Its design is focused on making gardening tasks more efficient, allowing users to prepare their soil with ease.

One of the standout features of the Troy-Bilt 830 is its powerful engine. This model typically features a reliable 4-cycle engine that delivers consistent power and torque, making it suitable for tackling various soil types, from soft loam to harder clay. The engine's ability to drive the tines deep into the earth ensures effective tilling, which is essential for promoting healthy plant growth.

The Troy-Bilt 830 is equipped with a set of robust, counter-rotating tines that dig into the soil effectively, breaking it up and creating an ideal seedbed. This counter-rotating feature allows for more efficient soil mixing and aeration. Additionally, the tines are designed to improve soil structure and enable better water absorption, which is crucial for a thriving garden.

Comfort and usability are also key aspects of the Troy-Bilt 830. The adjustable handlebars provide ergonomic support, reducing strain during operation. Users can easily switch between different tilling widths, allowing for customization based on the size of the area being worked on. This feature gives gardeners the flexibility to move through smaller garden beds or larger plots with equal efficiency.

Another notable technology is the easy-starting mechanism, which utilizes a reliable starter system that minimizes the effort required to get the machine running. This means less hassle and more time spent on gardening tasks.

Safety features are also integrated into the design, including protective guards around the tines, ensuring that users can operate the cultivator with peace of mind.

In conclusion, the Troy-Bilt 830 stands out in the realm of garden tillers and cultivators. Its powerful engine, counter-rotating tines, ergonomic design, and user-friendly features make it a valuable asset for anyone interested in effective soil preparation and garden cultivation. With the Troy-Bilt 830, maintaining a healthy, productive garden becomes a more manageable and enjoyable endeavor.